
Manual


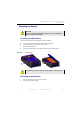


Table Of Contents
- SmartOTDR Mainframe
- Table of Contents
- About This Guide
- Chapter 1 Safety information
- Chapter 2 Introducing the SmartOTDR
- Chapter 3 Starting up
- Chapter 4 Setting-up the SmartOTDR
- Chapter 5 Optical options
- Chapter 6 Microscope application
- Chapter 7 Connectivity
- Establishing connection
- Remote Control
- Smart Access Anywhere
- Connection modes
- Pre-requisite for using the Smart Access Anywhere Application
- Downloading the VIAVI application on PC
- Downloading the VIAVI application on Tablet/ Smartphone
- Launching the SmartAccess Anywhere application
- Using Remote screen and File Transfer applications
- Working with files and directories on SmartOTDR
- Connection information and settings
- Data Transfer
- VNC
- Smart Access Anywhere
- Stratasync
- Chapter 8 File management
- Chapter 9 Technical specifications
- Chapter 10 Options and accessories
- Chapter 11 Maintenance and Troubleshooting
- Maintenance procedure
- Recycling Information
- Troubleshooting
- General information on warranty
- Index

Chapter 11 Maintenance and Troubleshooting
Troubleshooting
User Manual 7SMART102 Rev006 131
Installing the Bluetooth/WIFI option
The Bluetooth and WIFI interfaces allow interface and file transfers.
The Bluetooth/WIFI option consists of a USB dongle and a printed circuit board (PCB)
to be connected to the bottom part of the SmartOTDR.
To install the Bluetooth/WIFI option onto the SmartOTDR:
1 Switch off the SmartOTDR and unplug it from mains.
2 Remove the cover on the underside of the Platform, unscrewing the two screws.
If the board is already set into the Platform, follow instructions on step 4.
3 Insert the board, pressing it gently but firmly, taking care to the connectors.
4 Insert the Bluetooth/WIFI USB dongle into the connector of the board.
BLUETOOTH OPTION
The product is approved in accordance to R&TTE directive concerning
transmitter module marked by CE0678. It is manufactured by MITSUMI
and it is an OEM product.
This device complies with Part 15 of the FCC Rules. Operation is
subject to the following two conditions: (1) this device may not
cause harmful interference, and (2) this device must accept any
interference received, including interference that may cause
undesired operation. This device contains FCC-ID: POOWML-C40.
Figure 89 View board and connectors