
Manual


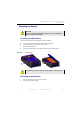


Table Of Contents
- SmartOTDR Mainframe
- Table of Contents
- About This Guide
- Chapter 1 Safety information
- Chapter 2 Introducing the SmartOTDR
- Chapter 3 Starting up
- Chapter 4 Setting-up the SmartOTDR
- Chapter 5 Optical options
- Chapter 6 Microscope application
- Chapter 7 Connectivity
- Establishing connection
- Remote Control
- Smart Access Anywhere
- Connection modes
- Pre-requisite for using the Smart Access Anywhere Application
- Downloading the VIAVI application on PC
- Downloading the VIAVI application on Tablet/ Smartphone
- Launching the SmartAccess Anywhere application
- Using Remote screen and File Transfer applications
- Working with files and directories on SmartOTDR
- Connection information and settings
- Data Transfer
- VNC
- Smart Access Anywhere
- Stratasync
- Chapter 8 File management
- Chapter 9 Technical specifications
- Chapter 10 Options and accessories
- Chapter 11 Maintenance and Troubleshooting
- Maintenance procedure
- Recycling Information
- Troubleshooting
- General information on warranty
- Index

Chapter 11 Maintenance and Troubleshooting
Troubleshooting
130 User Manual 7SMART102 Rev006
3 Close the battery door
The instrument can be turned on.
Contact VIAVI local Sales Service to get a new battery.
Figure 88 Sett
ing a new battery
NOTE
Take care to set the connector of the battery in the right way on the plug of
the base!
Do not forget the black foam to wedge the battery.
When putting a battery back into its seating, make sure that its con-
nector engages correctly in the socket and that the door is correctly
closed.
Do not use any battery other than the one supplied with the instru-
ment, or supplied by VIAVI.