
Manual
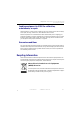


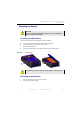


Table Of Contents
- SmartOTDR Mainframe
- Table of Contents
- About This Guide
- Chapter 1 Safety information
- Chapter 2 Introducing the SmartOTDR
- Chapter 3 Starting up
- Chapter 4 Setting-up the SmartOTDR
- Chapter 5 Optical options
- Chapter 6 Microscope application
- Chapter 7 Connectivity
- Establishing connection
- Remote Control
- Smart Access Anywhere
- Connection modes
- Pre-requisite for using the Smart Access Anywhere Application
- Downloading the VIAVI application on PC
- Downloading the VIAVI application on Tablet/ Smartphone
- Launching the SmartAccess Anywhere application
- Using Remote screen and File Transfer applications
- Working with files and directories on SmartOTDR
- Connection information and settings
- Data Transfer
- VNC
- Smart Access Anywhere
- Stratasync
- Chapter 8 File management
- Chapter 9 Technical specifications
- Chapter 10 Options and accessories
- Chapter 11 Maintenance and Troubleshooting
- Maintenance procedure
- Recycling Information
- Troubleshooting
- General information on warranty
- Index

Chapter 11 Maintenance and Troubleshooting
Troubleshooting
User Manual 7SMART102 Rev006 129
Replacing the battery
Accessing to the battery
To access the battery of the SmartOTDR, proceed as follows:
1 Switch off the instrument and disconnect the mains supply.
2 Turn the instrument face down on a flat surface.
3 Remove the battery door
4 Gently pull on the battery's connector and disconnect it from its socket.
Installing a new battery
1 Connect the battery’s connector to the socket.
2 Set the battery into its seating.
CAUTION
Battery is not interchangeable in the field. It must be replaced exclu-
sively for maintenance purpose.
Figure 87 Battery location
Battery
door
Battery
Date and Time parameters will be lost when battery is disconnected.