
Manual


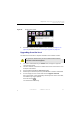


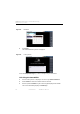
Table Of Contents
- SmartOTDR Mainframe
- Table of Contents
- About This Guide
- Chapter 1 Safety information
- Chapter 2 Introducing the SmartOTDR
- Chapter 3 Starting up
- Chapter 4 Setting-up the SmartOTDR
- Chapter 5 Optical options
- Chapter 6 Microscope application
- Chapter 7 Connectivity
- Establishing connection
- Remote Control
- Smart Access Anywhere
- Connection modes
- Pre-requisite for using the Smart Access Anywhere Application
- Downloading the VIAVI application on PC
- Downloading the VIAVI application on Tablet/ Smartphone
- Launching the SmartAccess Anywhere application
- Using Remote screen and File Transfer applications
- Working with files and directories on SmartOTDR
- Connection information and settings
- Data Transfer
- VNC
- Smart Access Anywhere
- Stratasync
- Chapter 8 File management
- Chapter 9 Technical specifications
- Chapter 10 Options and accessories
- Chapter 11 Maintenance and Troubleshooting
- Maintenance procedure
- Recycling Information
- Troubleshooting
- General information on warranty
- Index

Chapter 11 Maintenance and Troubleshooting
Maintenance procedure
120 User Manual 7SMART102 Rev006
Once the upgrade is completed, the SmartOTDR will automatically turns on and
display the Home page.
Install Software License
This page allows to import the license to get a software option.
To import the license, you can either enter manually the license code, given in the
license file, (.lic file) or import this file with a USB memory stick connected to the Smar-
tOTDR.
The Testing indicator will be lit in red during upgrade. Do not
push any key or remove the USB memory stick until the lit turns
off.
Figure 80 Example of a License file (.lic)
Licence Code