
Manual


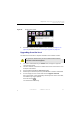
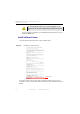


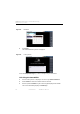
Table Of Contents
- SmartOTDR Mainframe
- Table of Contents
- About This Guide
- Chapter 1 Safety information
- Chapter 2 Introducing the SmartOTDR
- Chapter 3 Starting up
- Chapter 4 Setting-up the SmartOTDR
- Chapter 5 Optical options
- Chapter 6 Microscope application
- Chapter 7 Connectivity
- Establishing connection
- Remote Control
- Smart Access Anywhere
- Connection modes
- Pre-requisite for using the Smart Access Anywhere Application
- Downloading the VIAVI application on PC
- Downloading the VIAVI application on Tablet/ Smartphone
- Launching the SmartAccess Anywhere application
- Using Remote screen and File Transfer applications
- Working with files and directories on SmartOTDR
- Connection information and settings
- Data Transfer
- VNC
- Smart Access Anywhere
- Stratasync
- Chapter 8 File management
- Chapter 9 Technical specifications
- Chapter 10 Options and accessories
- Chapter 11 Maintenance and Troubleshooting
- Maintenance procedure
- Recycling Information
- Troubleshooting
- General information on warranty
- Index

Chapter 11 Maintenance and Troubleshooting
Maintenance procedure
116 User Manual 7SMART102 Rev006
Installation from another server
Before starting the software upgrade via Ethernet, make sure the IP address of the PC
server.
The update can be performed directly onto the equipment, using an http address.
1 Connect the SmartOTDR to a PC via an Ethernet link or via WIFI.
2 Check on the Ethernet or WIFI setup page that the connection mode is defined to
Automatic (Home > Connectivity > Ethernet / WIFI> Mode: Dynamic).
3 On the Home page, press Connectivity icon .
4 Press Upgrade icon .
5 In the Upgrade Server box:
– On the line Address Type, select Server Name or IP Address.
– Enter the Server Name (if Server Name has been previously selected) or the
Server Address (if IP Address has been previously selected)
6 Select if the new release for SmartOTDR must be automatically detected
(Enable) or not (Disable). See “Checking new upgrade on VIAVI Server” on
page 118.
7 Press Software Upgrade > Check available version.
The message Verify IP address of PC server appears.
8 Touch Continue.
The list of the software versions available on the PC is displayed next to the
versions installed on the SmartOTDR (see Figure 77 on page 115).
Installation from a USB memory stick
You must be equipped with a USB memory stick with a minimum capacity of 128 Mo.
Before installing the upgrade, you must format the USB memory stick (see “Formatting
the USB memory stick onto the SmartOTDR” on page 127).
1 Once formatted, disconnect the USB memory stick from the SmartOTDR using
the key Eject USB available pressing Settings > Expert Tools > Media Utilities.
As for any media formatting, please note that all data present on the USB
memory stick will be irremediably lost.