
Manual
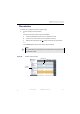


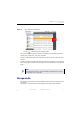


Table Of Contents
- SmartOTDR Mainframe
- Table of Contents
- About This Guide
- Chapter 1 Safety information
- Chapter 2 Introducing the SmartOTDR
- Chapter 3 Starting up
- Chapter 4 Setting-up the SmartOTDR
- Chapter 5 Optical options
- Chapter 6 Microscope application
- Chapter 7 Connectivity
- Establishing connection
- Remote Control
- Smart Access Anywhere
- Connection modes
- Pre-requisite for using the Smart Access Anywhere Application
- Downloading the VIAVI application on PC
- Downloading the VIAVI application on Tablet/ Smartphone
- Launching the SmartAccess Anywhere application
- Using Remote screen and File Transfer applications
- Working with files and directories on SmartOTDR
- Connection information and settings
- Data Transfer
- VNC
- Smart Access Anywhere
- Stratasync
- Chapter 8 File management
- Chapter 9 Technical specifications
- Chapter 10 Options and accessories
- Chapter 11 Maintenance and Troubleshooting
- Maintenance procedure
- Recycling Information
- Troubleshooting
- General information on warranty
- Index

Chapter 8 File management
Creating a screenshot
User Manual 7SMART102 Rev006 89
Creating a screenshot
You can create captures of what is displayed on the screen, directly from the Smar-
tOTDR and save it into a pdf file.
Taking a screenshot
Once the screenshot parameters are configured:
1 Reach the display which will be saved as a screenshot in a file.
2 If necessary, make modifications on this display (example: zoom on trace...)
3 Press simultaneously the left and right arrow keys for about 5 seconds
or
Touch the upper banner of the screen and, in the virtual control buttons bar, press
Export key
The icon displays until the end of process.
4 Press the
FILE key to find the PDF file in the Explorer.
For trace results, the file is saved in the same directory than the file used for
screenshot., or in the last directory selected.
For other page open and used for a screenshot, the file is saved in the directory
Print into the disk.
Name of the screenshots files
The screenshot is saved in a file, which is automatically named as follow:
• Prin
t_date (year/month/day)_time (hour/minute/second).pdf
NOTE
You can also sort files pressing on the column titles in the files list