
Manual

Operation CHAPTER 3
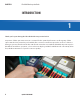
1. From FiberChek's Live Inspection View, tap the Touchscreen Display to enter
the Menu.
2. Select RADIO SETTINGS using the Manual Focus/Navigation Control, then
press the Action Button.
3. Select BT ENABLE using the Manual Focus/Navigation Control, then press the
Action Button. BT ENABLE will become highlighted.
4. For Android or iOS devices, navigate to your Bluetooth settings. Your
FiberChek probe will appear in the list of Available Devices. Select it and click
the "Connect" button.
5. Launch the FiberChekMOBILE App.
6. For Windows, launch FiberChekPRO, Navigate to FiberChekPRO's Setup and
select Bluetooth from the navigation bar at the left. (Setup > FiberChekPRO
Setup...). Your FiberChek probe will appear in the list of Available Devices.
Select it and click the "Connect" button.
Connecting
FiberCheck using
Bluetooth:
10 QUICK START GUIDE
Using the MP-60 Optical Power Meter with FiberChek
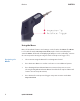
1. Connect an MP-60 Optical Power Meter to FiberChek via the Micro-USB
Interface.
2. Press the Action Button on the MP-60.
3. FiberChek is now in the Optical Power Meter View.
4. To return to FiberChek's Live Inspection View, disconnect the MP-60.
Using the MP-60 Optical Power Meter with FiberChek
1. Connect FiberChek to your computer or Android device via the Micro-USB
Interface and launch the FiberChekPRO software.
Connecting
FiberCheck using
USB: