
User guide

Cortex Microcontroller and VEXnet Joystick User Guide
Page 9 of 14
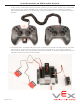
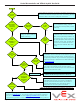
6. VEXnet Joystick Calibration Procedure:
a. The Joystick must be linked to the Cortex Microcontroller using the VEXnet Keys.
b. Hold the “6U” Back Switch depressed.
c. While the “6U” Back Switch is depressed, use a small Allen Wrench (1/16” or smaller) or similar small straight tool
to depress and hold the CONFIG Switch.
d. Hold both Switches depressed until you see the Joystick LED Flash red and green – you can now release both
Switches.
– There is a 10 second time limit to complete the following steps 5 and 6.
e. Move both Analog Joysticks to the maximum position desired in all 4 directions – Up, Back, Left, and Right.
–. If a movement is not detected in all 4 directions, a timeout will occur after about 10 seconds and the
Calibration Mode will be discontinued and the VEXnet LED will briey ash red.
–. The Joystick LED will continue to ash red and green during the calibration process.
f. After movement is detected in all 4 directions, the Joystick LED will be ON and solid green.
– To save the calibration, depress and release the “8U” top button.
– If the calibration is accepted and saved, the Joystick LED will start ashing fast green for a few seconds.
– If the calibration is not saved, a timeout will occur after about 10 seconds and the Calibration Mode will be
discontinued and the VEXnet LED will briey ash red.
– To cancel the calibration, depress and release the “7U” top button. The Calibration Mode will be discontinued
and the VEXnet LED will briey ash red.
– If the Calibration Mode is discontinued or saved, the Joystick LEDs will resume their normal function after the
VEXnet LED briey ashes.
g. If Joystick Master Firmware is downloaded into the Joystick, the Joystick will need to be recalibrated.
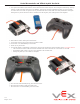
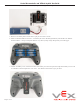
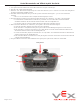
Cong Switch
7U8U
6U