
Programming instructions


ultrasonic sensor kit • 4
Inventor’s Guide insert
accessories
sensor accessories
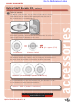
ultrasonic sensor kit, continued
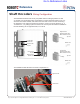
2 Connecting the ultrasonic sensor to the
microcontroller
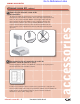
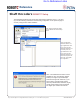
3 Reprogramming the microcontroller to enable the
ultrasonic sensor to generate a “ping”
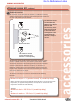
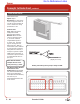
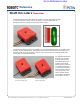
Start by plugging the “INPUT” and “OUTPUT” connectors into any two ports in
the Interrupts bank on the Vex Microcontroller.
The ultrasonic module has two three-pin connectors that will each plug into an
interrupt port on the Vex Microcontroller. These can be adjacent ports, but do not
have to be. The connector labelled “INPUT” is the trigger output of the Vex
microcontroller; the ultrasonic module receives a start signal from the Vex
microcontroller on this line. The connector labelled “OUTPUT” is the echo
response from the ultrasonic detector; this is the line through which the Vex
microcontroller receives output from the detector, indicating that it has picked
up an echo.
In order for your robot to be able to read the sensor, you will have to reprogram the
microcontroller. Sample code to help you get started is available on the VexLABS.com
website. Refer to the Programming chapter in your Vex Inventor’s Guide for
information on how to add or change code.
Go to Reference Links