
User Guide


102
Control System Guide
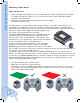
Forward Forward
Drive Normal Drive Reverse
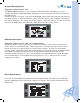
Sometimes, you may want to change which side of a robot is considered the front to make
it easier to drive. The Drive option allows you to control this, so that pushing upwards on a
joystick axis always makes your robot drive forward. To change this setting, highlight the Drive
row, and press the Check button to cycle between Normal and Reverse.
To change the direction that additional motors run, use the Up/Down arrows to highlight the
desired motor port, and press the Check button to cycle between Normal and Reversed.
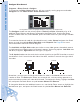
The 2 Joystick mode uses the vertical axis on both joysticks on the VEX Controller to control
the drivetrain. Axis A controls the left side of the robot, and Axis D controls the right side of
the robot.
Configure Drive Control
Programs › Driver Control › Configure
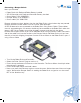
To customize the Driver Control program, exit any currently running programs and select
Configure from the Home Screen › Driver Control menu.
Control 2
Enter Exit
Configure
Drive
Motor 4
Motor 5
Motor 10
Normal
Normal
Normal
Normal
Use Up/Down arrows to highlight Configure, then press the Check button.
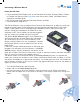
The Configure screen has two primary options: Control and Drive, followed by a list of all
additional Smart Motors and sensors connected to the Robot Brain. Use the Up/Down
arrows to select each row; while selected, press the Check button to cycle through available
options.
To customize the control mode for the robot drive train, select Control and press the Check
button to cycle through Left Stick, Right Stick, and 2 Joystick. See Page 96 for more
information about the Driver Control Program.
The Left Stick and Right Stick modes are similar to many video games, where both axes on
a single joystick are used to control all forward, reverse, and turning options. Left Stick uses
the left A/B joystick; Right Stick uses the right C/D joystick.