VEX IQ Robotics Education Guide Table of Contents Guide Overview Unit A A.1 A.2 A.3 A.4 A.5 A.6 Unit B B.1 B.2 B.3 B.4 B.5 Unit C C.1 C.2 C.3 C.4 C.5 C.6 Unit D D.1 D.2 D.3 D.4 D.5 D.6 D.7 Unit E E.1 E.2 E.3 E.4 E.5 E.6 E.7 Unit F F.1 F.2 F.3 F.4 F.5 F.6 F.7 Unit G G.1 G.2 G.3 G.
G.5 G.6 G.7 G.8 G.9 Unit H H.1 H.2 H.3 H.4 H.5 Unit I I.1 I.2 I.3 I.4 I.5 I.6 I.7 I.8 I.9 I.10 Unit J J.1 J.2 J.3 J.4 Unit K K.1 K.2 K.3 K.4 K.5 K.6 K.7 Unit L L.1 L.2 L.3 L.4 L.
VEX IQ Robotics Education Guide Overview We have developed this Robotics Education Guide, the companion Teacher Supplement, and the online VEX IQ Curriculum (available at www.vexiq.com/curriculum) as learning companions to the VEX IQ platform for elementary and middle school students. This guide details 12 flexible units of instruction that can be used in sequence, in chunks, or as individual stand-alone lessons.
A It’s Your Future
A.1 It’s Your Future Unit Overview: The world needs the students of today to become the scientists, engineers, and problem solving leaders of tomorrow. Science constantly presents us with new breakthroughs and challenges, creating greater opportunities for problem solving through technology. The solutions to such problems could help change the world, and technology-based problem solvers will be the people to make it all possible.
A.3 cont. Mechanical engineering – Using design, construction, and mechanical power to create machines and mechanical systems that solve a problem. Specialized engineering fields – These engineering fields use two or more types of engineering together to form a brand new kind of engineering. Biomedical and robotics engineers are two examples. A.4 What is Robotics? Robotics is the type of specialized engineering that deals with the design, construction, operation, and application of robots.
A.5 It’s Your Future Matching Exercise Student Name(s): Teacher/Class: Date: Instructions: Match terms from the word bank to the correct definition by writing terms on the correct line. Each term is only used once.
A.6 It’s Your Future Idea Book Exercise Student Name(s): Teacher/Class: Date: Instructions: Imagine a robot that could solve a problem that you know about. Draw a picture of what that robot might look like and give it a name in the box below. Instructions: Write about what your robot would be able to do and what problem it would solve. Write about how it would work and what type of control it would have (autonomous, teleoperated, or hybrid).
B Let’s Get Started
B.1 Let’s Get Started Unit Overview: In this unit you will learn about the VEX IQ kit contents, the VEX IQ Controller, the VEX IQ Robot Brain, and all other important parts. You may also learn how pair the Controller with the Robot Brain and how to use a protractor to identify Angle Beam types.
B.2 Using VEX IQ Hardware The VEX IQ platform kits provide easy, fun, and accessible tools to teach and learn about all four legs of STEM, no matter what your learning needs and desires may be. This curriculum unit lesson will familiarize you with the kit hardware. If you’re looking for information on the VEX IQ Controller or Robot Brain, please see our second lesson (B.2) that covers those topics. One of the best overall features of the VEX IQ hardware is its flexibility.
B.2 cont. Shaft several lengths Transmit power to, or allow rotation of, wheels, pulleys, gears, and more. Shaft Bushing Shaft Lock Plates multiple sizes Plates that lock onto shafts Interfaces shafts with beams and plates, allowing the shaft to allowing design components to spin and be held in spin with the shaft. desired location. Rubber Shaft Collars Corner Connectors several types Washers & Spacers Holds objects on shafts and/or the shaft itself in place.
B.2 cont. Pulleys several options Rubber Belts several size options Rubber Band Anchor Drive belts or make rollers and small wheels. Use with pulleys, as a form of stored energy, and/or as a fastener. Use with rubber belts and bands. Gears several lengths Wheel Hubs and Tires several size options Smart Motor Transmit power to another gear and/or mechanism. Rolling and powering movement. Creates rotary motion.
B.3 Using the VEX IQ Controller and Robot Brain The VEX IQ Controller and Robot Brain are easy to use. This lesson will introduce their key components and get you up and running in no time. Don’t forget to see your kit documentation for more useful information. Component Overview Controller Robot Brain Radio Pair the Controller with a Robot Brain and gain full control of your robot. Over 50 hours of battery life on a single charge. Use the twelve identical smart ports to connect any device to any port.
B.5 Let’s Get Started Matching Exercise Student Name(s): Teacher/Class: Date: Instructions: Match terms from the word bank and label correctly below each picture (pictures are NOT to scale).
C Your First Robot
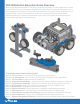
C.1 Your First Robot Unit Overview: In this unit you will build and test your first VEX IQ Robot. You will follow assembly instructions provided in your kit, and use the Your First Robot Build Rubric for evaluation. Idea Book Pages for each part of your build will be used to help you document your process and test your finished robot.
C.2 Build and Test Clawbot IQ There’s nothing quite like building your first robot. The Clawbot IQ enables even a complete beginner to build and test a fully functional teleoperated robot! Just use the easy to follow VEX IQ Clawbot Assembly Instructions and you’ll be on your way. Build Options Option 1: Follow the assembly instructions to complete and test the Standard Drive Base only. This gives you a fully functional drivetrain that can be operated and modified with your own creativity.
C.4 Your First Robot Idea Book Pages: Learning The Design Process The Your First Robot unit also comes with Idea Book Pages that help guide you through your first robot build and help you to learn about the design process. Engineering was defined in the It’s Your Future unit as using practical & scientific knowledge to create solutions for identified problems. In that unit we also learned that engineers often use an engineering notebook to help them think about and solve problems.
C.
C.6 Your First Robot Idea Book Page: Standard Drive Base Student Name(s): Teacher/Class: Date: Page #: 1.Think Instructions: Follow the steps on this page while you use the Clawbot IQ Instructions (build steps 1-19) to build the Standard Drive Base. 2. Do 3.Test 1. “THINK” - Here is where your “idea” or “problem” is written/drawn: Examples: “Idea - I want to build Clawbot’s base” or “Problem - right side wheels don’t turn.
C.6 cont. Your First Robot Idea Book Page: Clawbot IQ Tower Student Name(s): Teacher/Class: Date: Page #: Instructions: 1.Think Follow the steps on this page while you use the Clawbot IQ Instructions (build steps 20-38) to build the Clawbot IQ Tower (after Robot Base is done). 1. “THINK” - Here is where your “idea” or”problem” is written/drawn: Examples: “Idea – I want to build Clawbot IQ’s Tower.” Or “Problem – Tower doesn’t fit on the Standard Drive Base correctly.” 2. Do 3.
C.6 cont. Your First Robot Idea Book Page: Clawbot IQ Object Holder Student Name(s): Teacher/Class: Date: Page #: Instructions: 1.Think Follow the steps on this page while you use the Clawbot IQ Instructions (build steps 39-48) to build the Clawbot IQ Object Holder (after Base and Tower are done). 2. Do 3.Test 1.
C.6 cont. Your First Robot Idea Book Page: Clawbot IQ Claw Student Name(s): Teacher/Class: Date: Page #: Instructions: 1.Think Follow the steps on this page while you use the Clawbot IQ Instructions (build steps 49-87) to build the Clawbot IQ Claw (after Robot Base, Tower, and Object Holder are done). 2. Do 3.Test 1. “THINK” - Here is where your “idea” or “problem” is written/drawn: Examples: “Idea - I want to build the Clawbot IQ’s Claw” or “Problem - Claw doesn’t open or close.
D Simple Machines & Motion
D.1 Simple Machines & Motion Unit Overview: In this unit you will learn about the six types of simple machines, a seventh machine called a pendulum, and all of the scientific concepts and terms that go along with these machines. Simple machines are the basis for all mechanical systems, no matter how complex they may become.
D.2 Simple Machines & Motion This unit focuses on the most basic building blocks of design, simple machines, and motion. The basic knowledge of simple machines and motion allows students to better understand how things work, provides a foundation for designing mechanisms, and is the first step in learning the principles of mechanical design. Simple Machines Simple Machines are tools used to make work easier. In science, work is defined as a force acting on an object to move it across a distance.
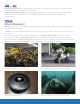
D.3 cont. Pulley - Instead of an axle, a wheel could also rotate a rope, cord, or belt. This variation of the wheel and axle is the pulley. In a pulley, a cord wraps around a wheel. As the wheel rotates, the cord moves in either direction. Attach a hook to the cord, and now you can use the wheel’s rotation to raise and lower objects, making work easier. On a flagpole, for example, a rope is attached to a pulley to raise and lower the flag more easily.
D.5 Simple Machines & Motion Matching Exercise Student Name(s): Teacher/Class: Date: Part I Instructions: Match terms from the word bank to the correct definition by writing terms on the correct line. Each term is only used once. Part I Word Bank: Force Friction Gravity Pendulum Simple Harmonic Motion Simple Machines Work are tools used to make work easier. is a force acting on an object to move it across a distance. A or shape.
D.
D.6 cont.
D.6 cont.
D.6 cont. 6 5 2x 2x 1x 304.
D.6 cont.
D.6 cont.
D.6 cont.
D.7 Simple Machines & Motion Idea Book Page Exercise: Machine Design Student Name(s): Teacher/Class: Date: 1.Think Page #: Instructions: After you have completed building the Simple Machines & Motion Sample Assemblies your teacher may ask you to design a simple machine or pendulum of your own. Following your teacher’s instructions, use this Idea Book Exercise page to document your design. 2. Do 3.Test 1.
D.7 cont. Simple Machines & Motion Idea Book Page Exercise: Robot Design Student Name(s): Teacher/Class: Date: 1.Think Page #: Instructions: Starting with the Clawbot IQ Robot Base, add one simple machine or pendulum 3.Test so the result is a teleoperated robot that moves a tennis ball, cube, or similar round object from a floor or table top onto a 1-inch to 2-inch high platform (a book will suffice for this exercise).
E Chain Reaction Challenge
E.1 Chain Reaction Challenge Unit Overview: In this unit you will use your knowledge of simple machines to learn about, build, and test Chain Reaction Devices.
E.2 What is a Chain Reaction Device? A Chain Reaction Device is a complex machine that performs a very simple task in a very complicated way. A Chain Reaction is a series of events so related to each other that each event triggers the next event. In this unit you will use a series of simple machine and/or pendulum assemblies to create Chain Reaction Devices. Each individual simple machine/pendulum assembly is known as a Stage of the overall device.
E.
E.3 cont. Inclined Plane Assembly Note for Teachers: This sample Chain Reaction Device is built using the Inclined Plane, Pulley, and Pendulum from the Simple Machines & Motion Sample Assemblies. The Lever in this sample Chain Reaction Device has its own assembly instructions, however this lever can also be created by modifying the lever that is part of the Simple Machines & Motion Sample Assemblies.
E.3 cont.
E.3 cont.
E.3 cont.
E.3 cont.
E.3 cont.
E.3 cont.
E.3 cont.
E.3 cont.
E.3 cont. 6 5 1x 1x 1x 304.
E.3 cont.
E.3 cont.
E.4 The Chain Reaction Challenge Rules: Parking the Car Challenge Goal & Overview: The goal is to build a Chain Reaction Device that successfully parks the car in the garage. Your teacher will provide you with (or ask you to build) the car and garage models to be used in this challenge. In most cases you will be asked to work together in teams, but you may be asked to work alone. Challenge Rules for Unpowered Chain Reaction Device (grades 4-6): 1.
E.
E.
E.7 Chain Reaction Challenge Idea Book Page: Design Plan Student Name(s): Teacher/Class: Date: Page #: 1.Think Plan and design a Four-Stage Chain Reaction Device that meets challenge and rubric criteria on pages 1 and 2 below. 2. Do 3.
E.7 cont. Sketch/Describe Stage 4 of your Device Here: Machine Type (One of the Simple Machines or Pendulum): Plans for Connecting Each Device Stage: Follow through with your design plan and BUILD your device, then TEST and OBSERVE. Testing Observations: Does your Device function like you expected? YES NO If you answered “YES” - Congratulations! You will score well on the Challenge Rubric. You may now move on to other lessons.
E.7 cont. Chain Reaction Challenge Idea Book Page: Troubleshooting Student Name(s): Teacher/Class: Date: 1.Think Page #: Use a copy of this Idea Book Page for each device problem you have to troubleshoot. 2. Do 3.Test Sketch/Describe Your Device Problem Here: Sketch/Describe Your Solution to the Problem Here: Follow through with your solution and MAKE PLANNED CHANGES to your device, then TEST and OBSERVE.
F Key Concepts Input Input Input Output Output Output
Input Input Input Output Output Output F.1 Key Concepts Unit Overview: In this unit you will explore key STEM concepts that many engineers use in their everyday work. These concepts are also very useful when it comes to the design of mechanical systems. Unit Content: - Friction Center of Gravity Speed, Torque, and Power Mechanical Advantage Unit Activities: - Matching Exercise Idea Book Exercise Note: Separate copies and/or printouts of activities may be used for student work.
F.2 Friction Friction is the force that resists motion through the rubbing of one object against another. It is a reaction force only. It occurs when two surfaces are in contact and a force is applied to a mass, causing the surfaces to slide against one another. If an object has no forces trying to cause motion, there is no friction. No applied force means no reaction force. F.
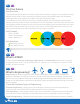
F.3 cont. Likewise, pieces that are farther out have a greater effect than pieces that are near the middle of the robot. So, if your robot has an arm that lifts and/or reaches, its center of gravity changes with that movement. Approximate Center of Gravity Approximate Center of Gravity Robot Arm Down and In Robot Arm Up and Out F.4 Speed, Torque, and Power Speed is a way of measuring how fast an object is moving. Speed measures how far an object will travel over a given period of time.
F.5 Mechanical Advantage Mechanical Advantage is the calculation of how much faster and easier a machine makes your work. It compares the output force a mechanism or machine gives you to the input force that is applied to that mechanism or machine to get it to work. Mechanical advantage can be adjusted to meet specific needs. For example, bicycle gears can be set one way to ride uphill, then adjusted to ride downhill.
F.6 Key Concepts Matching Exercise Student Name(s): Teacher/Class: Date: Instructions: Match terms from the word bank to the correct definition by writing terms on the correct line. Each term is only used once. Word Bank: Center of Gravity Feet per Second Friction Inch-Pounds Inverse Speed Weight Mechanical Advantage Torque Position Watts Power is the force that resists motion when one object rubs against another.
F.7 Key Concepts Idea Book Exercise: Mechanical Advantage Student Name(s): Teacher/Class: Date: Page #: Mechanical Advantage is the calculation of how much faster and easier a machine makes your work. It compares the output force a mechanism or machine gives you to the input force that is applied to that mechanism or machine to get it to work. Mechanical advantage can be adjusted to meet specific needs.
G Mechanisms
G.1 Mechanisms Unit Overview: This unit builds on your knowledge from the Key Concepts unit by digging deeper into certain mechanical aspects of robotics systems. These new elements will lead to higher levels of engineering process and improved designs.
G.2 Mechanisms: DC Motors (Grades 4-8) Actuators are used to act upon an environment, usually for moving or controlling a mechanism or system. Actuators drive everything that moves on a mobile robot. The most common type of actuator is a motor; in particular, VEX IQ utilizes Direct Current (DC) Motors. DC Motors convert electrical energy into mechanical energy through the use of electromagnetic fields and rotating wire coils.
G.3 Mechanisms: Gear Ratio Gear Ratio Basics (Grades 2-8) As you learned in other lessons, making a Gear Ratio change is one of the easiest ways to change Mechanical Advantage in a mechanism or system to achieve desired speed and/or torque. Gear Ratio expresses the relationship between a Driving Gear (the gear connected to the input power source, such as a motor) and a Driven Gear (the gear connected to the output, such as a wheel or mechanism) in a system.
G.3 cont. Expressing Gear Ratio and Gear Reduction (Grades 4-8) Both Gear Ratio and Gear Reduction are mathematical expressions that describe the relationship between a Driving Gear and a Driven Gear. However, it’s important to understand the different but similar ways they are expressed. Both use the number of teeth on each gear as key values, although their order is reversed.
G.3 cont. Gear Trains and Idler Gears (Grades 4-8) A simple Gear Train is a connected set of rotating gears that transmits power from an input (like a Driving Gear connected to a motor) to an output (like a Driven Gear connected to a wheel or mechanism). Simple Gear Trains can have any number of gears in a single row. All gears in between the Driving Gear and the Driven Gear that only transmit power are known as Idler Gears.
G.3 cont. Compound Gears and Compound Gear Reductions (Grades 6-8) In certain situations, a design may require more mechanical advantage than a single gear ratio can provide or is otherwise impractical. For example, if a VEX IQ robot design requires a 12:500 gear ratio it is a problem because there is no 500-tooth gear available. In this situation, a designer can use multiple gear reductions in the same mechanism. This is called a Compound Gear Reduction.
G.4 Mechanisms: Drivetrains (Grades 4-8) Mobile and Competition robots will vary greatly depending on the tasks they are designed for. However, one thing common among them is that they usually have some method for moving. The robotic subsystem that provides the ability to move is often known as a Drivetrain. Drivetrains may come in many different forms – two examples are wheels or treads (like a tank).
G.5 Mechanisms: Object Manipulation (Grades 4-8) In mobile and competition robotics, an Object Manipulator is a mechanism that allows a robot to interact with objects in its environment. There are three basic categories of Object Manipulators: Plows, Scoops, and Friction Grabbers. Plows The first Object Manipulator category applies a single force to the side of an object. Plows move objects without actually picking them up and are by far the easiest manipulator type to design and build.
G.6 Mechanisms: Lifting Mechanisms (Grades 4-8) Before discussing Lifting Mechanisms, it’s important to know what a Degree of Freedom is. A Degree of Freedom refers to an object’s ability to move in a single independent direction of motion. To be able to move in many directions means something has many Degrees of Freedom. Moving up and down is one degree of freedom, moving right and left is another; something that can move up/ down and left/right has TWO Degrees of Freedom.
G.6 cont. One of the simplest and most common linkage types is the Four-Bar Linkage. This is a linkage system that provides a wide variety of motions depending on its configuration. By varying the length of each link, one can greatly change the output motion.
G.7 Mechanisms Matching Exercise Student Name(s): Teacher/Class: Date: Instructions: Match terms from the word bank to the correct definition by writing terms on the correct line. Each term is only used once.
G.7 cont. From Object Manipulation (grades 4-8): An is a mechanism that allows a robot to interact with objects in its environment. move objects without actually picking them up and they are by far the easiest manipulator type to design and build. A applies force underneath an object such that the object can be elevated and carried. apply a force to an object in at least two places, allowing the object to be pinched or grabbed.
G.
G.8 cont. Basic Gear Assembly Note: The only gear combination that cannot be used is a 12-tooth gear on both input and output shafts.
G.8 cont.
G.8 cont.
G.9 Mechanisms Gear Ratio Exercise #1: Gear Ratio Basics (Grades 2-8) Student Name(s): Teacher/Class: Date: Instructions: After learning about Gear Ratio Basics from section G.3, demonstrate what you have learned by circling correct answers below. You may also build and use the VEX IQ Gear Ratio Simulator along with 12-tooth, 36-tooth, and 60-tooth gears to help find answers.
G.9 cont. Mechanisms Gear Ratio Exercise #2: Expressing Ratio and Reduction (Grades 4-8) Student Name(s): Teacher/Class: Date: Instructions: After learning about Expressing Gear Ratio and Gear Reduction from section G.3, demonstrate what you have learned by calculating and writing in correct answers. You may also build and use the VEX IQ Gear Ratio Simulator along with 12-tooth, 36-tooth, and 60-tooth gears to help find answers.
G.9 cont. Mechanisms Gear Ratio Exercise #3: Gear Trains and Idler Gears (Grades 6-8) Student Name(s): Teacher/Class: Date: Instructions: After learning about Gear Trains and Idler Gears from G.3, demonstrate what you have learned by calculating and writing in correct answers. You may also build and use the VEX IQ Gear Ratio Simulator along with 12-tooth, 36-tooth, and 60-tooth gears to help find answers.
G.9 cont. Mechanisms Gear Ratio Exercise #4: Compound Gear Reductions (Grades 6-8) Student Name(s): Teacher/Class: Date: Compound Gear Reduction Review of Key Points: Linked by Shared Axle In a Compound Gear system, there are multiple gear pairs. Each pair has its own Gear Ratio, and a shared axle connects the pairs to each other. The resulting Compound Gear system still has a Driving Gear and a Driven Driving Gear Gear, and still has a Gear Reduction.
H Highrise Challenge
H.1 Highrise Challenge Unit Overview: Feel the excitement of robotics competition as you apply you skills and knowledge from previous units to build a challenge-ready teleoperated robot capable of completing Teamwork Skills and Robot Skills matches in the VEX IQ Challenge game. Unit Content: - Challenge Overview Challenge Rules (http://www.vexiq.com/Highrise) Note: Your teacher may also decide to use a different VEX IQ Challenge Game for this unit or a game of their own creation.
H.2 Challenge Overview Whether you’re going to attend an official VEX IQ Challenge Event, host your own event, or just play the game in your classroom, it’s time to design and build a robot for a full teleoperated robotics game! Use your knowledge of the VEX IQ platform and all you’ve learned in previous lessons to create a VEX IQ robot for the Teamwork Challenge and/or the Robot Skills Challenge portion of the VEX IQ Challenge Game, Highrise! H.
H.
H.5 Idea Book Page: The Engineering Notebook 1.Think Student Name(s): Teacher/Class: Date: Page #: 2. Do 3.Test Use as many of these pages as you need to document your robot ideas, build, fixes, changes, and improvements for the game challenge. Remember the “Think-Do-Test Loop” you learned in the Your First Robot Unit. Number each page and use the space as you see fit for ideas, notes, observations, drawings with labels, calculations, and more.
I Smart Machines
I.1 Smart Machines Unit Overview: This unit introduces students to Sensors and Programming with VEX IQ. VEX IQ Sensors allow for autonomous and hybrid control of VEX IQ robots and other creations. VEX IQ Sensors connect to a robot or mechanism quickly and are easily programmed to help measure time, position distance, rotation, sense touch, provide feedback, allow for human-to-robot interaction, and much more.
I.2 Key Terms A Sensor is a device that detects and responds to some type of input from the physical environment. VEX IQ sensors can detect light, color, objects, motion, and more! Programming is the process of providing a computer or other machine, such as a robot and its components, with coded instructions for the automatic performance of a particular task. Ultrasonic Sound Waves are sounds that are too high of a frequency to be heard by humans.
I.3 VEX IQ Sensor Overview Sensor Name Bumper Switch Sensor Image Sensor Specs & Use Default Functionality Allows for the sense of touch in the VEX IQ platform. Detect a wall, obstacle, or limit mechanism movement. With a Bumper Switch in port 2, it disables/ enables a Smart Motor in port 4. Touch LED Smart Sensor with Enables and disables red, green, blue LEDs. Autopilot or similar robot running Driver Control Constant on, off, or blink at any desired rate.
I.4 Smart Machines Matching Exercise Student Name(s): Teacher/Class: Date: Page#: Part I Instructions: Match terms from the word bank to the correct definition or statement by writing terms on the correct line. Each term is only used once. Part I Word Bank: Degrees of Turn Gyroscope Sensor Encoder Programming Ultrasonic Sound Waves A(n) is a device that detects and responds to some type of input from the physical environment.
I.5 Autopilot Robot Build See the Autopilot Robot Assembly Instructions in your kit documentation. 1+4 I.6 Running Autopilot Modes Your teacher will decide what of the lessons below you will complete as part of the unit. Below are the lessons along with necessary information. I. Read and review Key Terms and Sensor Overview with your classmates and teacher. II. Complete the unit Matching Exercise. See separate handout. III. Build Autopilot Robot.
I.7 cont. Distance Sensor Default Functionality Exercise: “Collision Avoidance” The default Distance Sensor functionality in the Driver Control program is to prevent a robot from running into an object or wall. When the Distance Sensor sees an object, it will slow down the Autopilot Robot as it approaches the object, eventually stopping to avoid collision.
I.8 Simple Programming Exercises Using Only the Robot Brain You can make some changes to the way a robot is programmed by making simple configuration changes using only the LED screen and buttons on the VEX IQ Robot Brain. Please see your kit documentation and follow instructions to make configuration changes, testing out each change. 6 I.9 Simple Programming Exercises Using Programming Software Before you complete any of the exercises below, you will need to: 1.
I.10 Smart Machines Idea Book Page: Simple Programming Exercises Using Programming Software Student Name(s): Teacher/Class: Date: Page #: 1.Think Instructions: Before completing these exercises, be sure you are familiar with your programming software and how it works. Follow the steps on this page to document, test, troubleshoot, and refine your program. If your program includes more steps than fit on one page, use multiple copies as necessary. 2. Do 3.
I.10 cont. Smart Machines Idea Book Page: Simple Programming Exercises Using Programming Software Teacher/Class: E L P M A S John and Jane Doe Student Name(s): Mr. Smith Instructions: Date: 9/1/2013 Page #: 1 1.Think Before completing these exercises, be sure you are familiar with your programming software and how it works. Follow the steps on this page to document, test, troubleshoot, and refine your program.
J Chain Reaction Programming Challenge
J.1 Chain Reaction Programming Challenge Unit Overview: In this unit you will use your knowledge of simple machines, sensors and programming to build and test autonomous Chain Reaction Devices.
J.2 Chain Reaction Programming Challenge: The Chain Reaction Programming Challenge Rules: Parking the Car Autonomously Challenge Goal & Overview: The goal is to successfully build and program a fully autonomous Chain Reaction Device that successfully parks the car in the garage. Your teacher will provide you with (or ask you to build) the car and garage models to be used in this challenge. In most cases you will be asked to work together in teams, but you may be asked to work alone.
J.
J.4 Chain Reaction Programming Challenge Idea Book Page: Design Plan Student Name(s): 1.Think Teacher/Class: Date: Page #: Plan and design a Four-Stage Chain Reaction Device that meets challenge and rubric criteria on pages 1 and 2 below. 2. Do 3.
J.4 cont. Sketch/Describe Stage 4 of your Device Here: Machine Type (One of the Simple Machines or Pendulum): Sensor(s) to be used in this stage (if any) and function of each sensor: Plans for Connecting Each Device Stage: Follow through with your design plan and BUILD/PROGRAM your device, then TEST and OBSERVE.
J.4 cont. Chain Reaction Programming Challenge Idea Book Page: Troubleshooting 1.Think Student Name(s): Teacher/Class: Date: Page #: 2. Do Use a copy of this Idea Book Page for each device problem you have to troubleshoot. 3.Test Sketch/Describe Your Device Problem Here: Sketch/Describe Your Solution to the Problem Here: Follow through with your solution and MAKE PLANNED CHANGES to your device, then TEST and OBSERVE.
K Smarter Machines Control Commands Desired Result Robot Brain Robot Actions Actual Result (Robot position, velocity, etc.
Control Commands Desired Result Robot Brain Robot Actions Actual Result (Robot position, velocity, etc.) Sensor Feedback K.1 Smarter Machines Unit Overview: This unit will allow students to further explore sensors and programming with VEX IQ. Students will also use the VEX IQ robots they have created thus far to develop a better understanding of control.
K.2 Key Concepts and Terminology Learning to manipulate and use your VEX IQ controller well is one way to gain better control over your robot, but that is a purely Teleoperated solution. What about Autonomous and Hybrid robots? Well, you’ve already seen in the Smart Machines Unit that using sensors and programming to create desirable Autonomous and Hybrid solutions can lead to some amazing solutions.
K.3 VEX IQ Sensor Review Here is a brief review of what you learned about each VEX IQ Sensor in the Smart Machines unit. Use this chart to help make decisions about how you might solve the challenges in this unit. Bumper Switch Allows for the sense of touch in the VEX IQ platform. Detect a wall, obstacle, or limit mechanism movement. Distance Sensor Uses ultrasonic sound waves to measure distance. Measures distance from 1 inch to 10 feet. Commonly used to avoid obstacles.
K.5 Smarter Machines Unit Challenges You will be completing one or more of the challenges below. Use a VEX IQ Robot, the VEX IQ Sensors, your VEX IQ Programming Software (there are multiple options and you should be familiar with your software from the Smart Machines unit), the Robot Challenge Evaluation Rubric, and as many copies of the Idea Book Page as necessary to solve the challenge problem and document your process. Possible Clawbot IQ with Sensors Challenges: 1.
K.
K.6 cont.
K.7 Smarter Machines Idea Book Page: Program Planning & Troubleshooting Student Name(s): Teacher/Class: Date: Page #: 1.Think Instructions: Use as many copies of this Idea Book Page as you need to help plan, execute, and troubleshoot a custom program written for your VEX IQ robot with your programming software. 2. Do 3.Test Describe what you want your program to be able to do here: Describe the device/robot you will be programming: “THINK” Write step-by-step program instructions here.
L Highrise Programming Challenge
L.1 Highrise Programming Challenge Unit Overview: Feel the excitement of robotics competition as you apply you skills and knowledge from previous units to build a challenge-ready autonomous robot capable of completing Programming Skills matches in the VEX IQ Challenge game. Unit Content: - Challenge Overview Challenge Rules (http://www.vexiq.com/Highrise) Note: Your teacher may also decide to use a different VEX IQ Challenge Game for this unit or a game of their own creation. See your teacher for details.
L.2 Challenge Overview Whether you’re going to attend an official VEX IQ Challenge Event, host your own event, or just play the game in your classroom, it’s time to design and build a robot for a full autonomous robotics game! Use your knowledge of the VEX IQ platform and all you’ve learned in previous lessons to create a VEX IQ robot for the Programming Skills Challenge portion of the VEX IQ Challenge Game, Highrise! L.
L.
L.5 Idea Book Page: The Engineering Notebook Student Name(s): Teacher/Class: Date: Page #: 1.Think Use as many of these pages as you need to document your robot ideas, build, fixes, changes, and improvements for the game challenge. 2. Do Remember the “Think-Do-Test Loop” you learned in the My First 3.Test Robot Unit. Number each page and use the space as you see fit for ideas, notes, observations, drawings with labels, calculations, and more.
Robotics Education Guide Ages 8+ 228-3319 Custom manufactured in China for Innovation First Trading SARL. Distributed in the U.S.A. by VEX Robotics, Inc., 1519 Interstate 30 West, Greenville, Texas 75402, U.S.A. Distributed in Europe by Innovation First Trading SARL, 21b rue Gabriel Lippmann, L-5365 Munsbach, Luxembourg +352 27 86 04 87. Distributed in Canada by Innovation First Trading, Inc., 1519 Interstate 30 West, Greenville, Texas 75402, U.S.A. ©2014 VEX Robotics, Inc. All rights reserved.