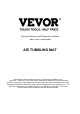
Technical Support and E-Warranty Certificate www. vevor. com/support AIR TUMBLING MAT We continue to be committed to provide you tools with competitive price. "Save Half", "Half Price" or any other similar expressions used by us only represents an estimate of savings you might benefit from buying certain tools with us compared to the major top brands and does not necessarily mean to cover all categories of tools offered by us.
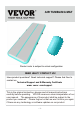
AIR TUMBLING MAT Product color is subject to actual configuration NEED HELP? CONTACT US! Have product questions? Need technical support? Please feel free to contact us: Technical Support and E-Warranty Certificate www. vevor. com/support This is the original instruction, please read all manual instructions carefully before operating. VEVOR reserves a clear interpretation of our user manual. The appearance of the product shall be subject to the product you received.
IMPORTANT SAFEGUARDS CAUTION:Anv activity involving motion, rotation, and height creates the possibility of catastrophic injury, paralysis, or even death. You assume the risk of serious injury when using this equipment; this equipment is intended for use only by properly trained and qualified participants under supervised conditions. Before using, know your imitations. If in doubt, always consult a teacher. Qualified instructor.
consequences may incur. 5. Operation of the product is not allowed in case of damage to the power line or the shell. 6. Disassembling and dismounting of the product by lay-people is not allowed. 7. In case the air pump drops into water, please cut off the power supply before dredging it out. Then it should be handed over to professionals for check and maintenance. 8. Electrical shock hazard: Do not touch the air pump with wet hands or while standing on a wet surface.
of experience and knowledge if they have been given supervision or instruction concerning the use of the appliance in a safe way and understand the hazards involved. Children shall not play with the appliance. Cleaning and user maintenance shall not be made by children without supervision.
reception,which can be determined by turning the product off and on, the user is encouraged to try to correct the interference by one or more of the following measures. · Reorient or relocate the receiving antenna. · Increase the distance between the product and receiver. · Connect the product to an outlet on a circuit different from that to which the receiver is connected. · Consult the dealer or an experienced radio/TV technician for assistance.
PRODUCT PARAMETERS MODEL SIZE/COLOR AIR PUMP TT-M-40-24 40×Φ24inch /Pink US PLUG(AC110-120V 60Hz 600W) TT-E-40-24 40×Φ24INCH /PINK EU PLUG(AC220-240V 50/60Hz 600W) TT-M-40-31.5 40×Φ31.5inch /Green US PLUG(AC110-120V 60Hz 600W) TT-E-40-31.5 40×Φ31.
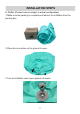
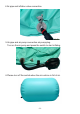
INSTALLATION STEPS A: Roller (Product color is subject to actual configuration) 1.Make sure the packing is complete and takeout the inflatable from the packing box. 2.Place the air cushion on the ground to open. 3.Turn the inflatable valve open against clockwise.
4.Air pipe and inflation valve connection. 5.Air pipe and air pump connection air pump plug. Turn on the air pump and press the switch to start inflating. 6.Please turn off the switch when the air cushion is full of air.
7.Take out the inflatable tube.(When the valve does not pop up automatically, please press it to close manually. 8.To avoid the leakage of the pressure relief valve for a long time,the valve wrench is tightened clockwise using the valve wrench in the case of loosening of the outer ring of the valve.
B: Rectangle (Product color is subject to actual configuration) 1、Make sure the packing is complete and takeout the inflatable from the packing box. 2.Place the air cushion on the ground to open.
3.Turn the inflatable valve open against clockwise. 4.Air pipe and inflation valve connection.
5.Air pipe and air pump connection air pump plug. Turn on the air pump and press the switch to start inflating. 6.Please turn off the switch when the air cushion is full of air.
7.Take out the inflatable tube.(When the valve does not pop up automatically, please press it to close manually. 8.To avoid the leakage of the pressure relief valve for a long time,the valve wrench is tightened clockwise using the valve wrench in the case of loosening of the outer ring of the valve.
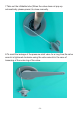
9.The shoulder strap is installed as shown in the picture and fastened with a lock buckle. The length can be adjusted according to personal usage habits.
PATCHING GUIDELINES Tips:This product is equipped with repair materials (except glue). When air leakage is caused by sharp objects during use, it can be repaired. Because the product material is PVC, you need to purchase PVC glue to repair the glue. 1、Before repairing, clean the area around the damage to ensure the surface is dry. 2. Apply a thin layer of glue evenly on the surface of the repair material and the surface around the damaged air cushion. 3. Stick the repair material and air cushion firmly.
2.As shown in the picture, a square repair material is configured. When air leakage is found around the perimeter, the configured glue and repair materials can be used to repair it. (Different colors of edging are equipped with different colors of repair materials) 3.When air leakage occurs above or at the bottom of the air cushion, please use the provided gray square repair block and glue it together.
CLEANING AND STORAGE 1. Wipe with soft damp cloth. 2. Never use an abrasive cleanser or harsh pad. 3. Be sure to keep the product dry. 4. Please keep the product dry. Moisture can cause products to become moldy.
Address:Baoshanqu Shuangchenglu 803long 11hao 1602A-1609shi Shanghai Imported to USA: Sanven Technology Ltd.
Technical Support and E-Warranty Certificate www. vevor.
Technisch Ondersteuning en e-garantiecertificaat www.vevor.com/support _ _ _ _ LUCHTTUIMELMAT We continue to be committed to provide you tools with competitive price. "Save Half", "Half Price" or any other similar expressions used by us only represents an estimate of savings you might benefit from buying certain tools with us compared to the major top brands and does not necessarily mean to cover all categories of tools offered by us.
AIR TUMBLING MAT De productkleur is afhankelijk van de daadwerkelijke configuratie NEED HELP? CONTACT US! Have product questions? Need technical support? Please feel free to contact us: Technical Support and E-Warranty Certificate www. vevor.
This is the original instruction, please read all manual instructions carefully before operating. VEVOR reserves a clear interpretation of our user manual. The appearance of the product shall be subject to the product you received. Please forgive us that we won't inform you again if there are any technology or software updates on our product.
opvolgen van alle onderstaande instructies kan leiden tot elektrische schokken, brand en/of ernstig letsel. Basisveiligheidsinformatie: 1. Dit product is uitsluitend bedoeld voor het oppompen. 2. Het is niet toegestaan om het product met de stroomkabel te trekken of te slepen. 3. Houd bij het uittrekken van de stekker de stekker zelf vast; trek niet aan de voedingskabel. 4. Knip de stekker niet zelf door en vervang deze niet, anders kunnen er ernstige gevolgen optreden. 5.
luchtpomp niet met gassen die metalen kunnen aantasten of chemische ladingen kunnen uitoefenen. Controleer de compatibiliteit van het gas met de materialen van de vijverbeluchting en de accessoires ervan. Gebruik altijd beschermende handschoenen en een veiligheidsbril bij het hanteren van corrosieve materialen. 12. Gebruik geen beschadigde stekker of stopcontact, aangezien dit een elektrische schok of brand kan veroorzaken. 13.
interferentie die een ongewenste werking kan veroorzaken. WAARSCHUWING: Wijzigingen of aanpassingen aan dit product die niet uitdrukkelijk zijn goedgekeurd door de partij. Verantwoordelijk voor naleving kan de bevoegdheid van de gebruiker om het product te bedienen ongeldig maken. Opmerking: Dit product is getest en voldoet aan de limieten voor een digitaal apparaat van Klasse B overeenkomstig Deel 15 van de FCC-regels.
accessoires die met dit symbool zijn gemarkeerd. Producten die als zodanig zijn gemarkeerd, mogen niet bij het normale huisvuil worden weggegooid, maar moeten worden ingeleverd bij een inzamelpunt voor recycling van elektrische en elektronische apparaten. PRODUCT PARAMETERS MODEL Maat /KLEUR LUCHTPOMP TT-M-40-24 40× Φ 24 inch / roze AMERIKAANSE STEKKER (AC110-120V 60H tot 600W) TT-E-40-24 40×Φ24INCH/ROZE EU-STEKKER (AC220-240V 50/60H z 600W) TT-M-40-31.
TT-M-10-G 3 meter / Groen AMERIKAANSE STEKKER (AC110-120V 60H tot 600W) TT-E-10-G 3 meter / Groen EU-STEKKER (AC220-240V 50/60H z 600W) TT-M-10-P 10ft /P- inkt AMERIKAANSE STEKKER (AC110-120V 60H tot 600W) TT-E-10-P 10ft /P- inkt EU-STEKKER (AC220-240V 50/60H z 600W) TT-M-10-B 3 meter / Blauw AMERIKAANSE STEKKER (AC110-120V 60H tot 600W) TT-E-10-B 3 meter / Blauw EU-STEKKER (AC220-240V 50/60H z 600W) TT-M-13-G 13ft / Groen AMERIKAANSE STEKKER (AC110-120V 60H tot 600W) TT-E-13-G 13ft /
(AC110-120V 60H tot 600W) TT-E-16-B 16ft / Blauw EU-STEKKER (AC220-240V 50/60H z 600W) TT-M-20-G 20ft / Groen AMERIKAANSE STEKKER (AC110-120V 60H tot 600W) TT-E-20-G 20ft / Groen EU-STEKKER (AC220-240V 50/60H z 600W) TT-M-20-P 20ft /P- inkt AMERIKAANSE STEKKER (AC110-120V 60H tot 600W) TT-E-20-P 20ft /P- inkt EU-STEKKER (AC220-240V 50/60H z 600W) TT-M-20-B 20ft / Blauw AMERIKAANSE STEKKER (AC110-120V 60H tot 600W) TT-E-20-B 20ft / Blauw EU-STEKKER (AC220-240V 50/60H z 600W) INSTALLATION
3.Draai het opblaasbare ventiel open tegen de klok in. 4. Aansluiting luchtleiding en opblaasventiel. 5. Luchtleiding en luchtpompaansluiting luchtpompstekker. Zet de luchtpomp aan en druk op de schakelaar om het opblazen te starten.
6. Schakel de schakelaar uit als het luchtkussen vol lucht is. 7. Haal de opblaasbare buis eruit. (Als de klep niet automatisch omhoog komt, druk er dan op om deze handmatig te sluiten.
8. Om langdurig lekken van het overdrukventiel te voorkomen, wordt de ventielsleutel met de klok mee vastgedraaid met behulp van de ventielsleutel in het geval dat de buitenring van het ventiel losraakt.
1. Zorg ervoor dat de verpakking compleet is en haal het springkussen uit de verpakking . 2. Plaats het luchtkussen op de grond om het te openen. 3.Draai het opblaasbare ventiel open tegen de klok in.
4. Aansluiting luchtleiding en opblaasventiel. 5. Luchtleiding en luchtpompaansluiting luchtpompstekker.
Zet de luchtpomp aan en druk op de schakelaar om het opblazen te starten. 6. Schakel de schakelaar uit als het luchtkussen vol lucht is.
7. Haal de opblaasbare buis eruit. (Als de klep niet automatisch omhoog komt, druk er dan op om deze handmatig te sluiten. 8. Om langdurig lekken van het overdrukventiel te voorkomen, wordt de ventielsleutel met de klok mee vastgedraaid met behulp van de ventielsleutel in het geval dat de buitenring van het ventiel losraakt.
9. De schouderriem wordt geïnstalleerd zoals weergegeven in de afbeelding en vastgemaakt met een slotgesp. De lengte kan worden aangepast aan de persoonlijke gebruiksgewoonten .
PATCHING GUIDELINES Tips: Dit product is uitgerust met reparatiematerialen (behalve lijm).Als tijdens gebruik luchtlekkage wordt veroorzaakt door scherpe voorwerpen, kan dit worden gerepareerd. Omdat het productmateriaal PVC is, moet u PVC-lijm aanschaffen om de lijm te repareren. 1. Maak vóór reparatie het gebied rond de schade schoon om er zeker van te zijn dat het oppervlak droog is. 2.
2. Zoals op de afbeelding te zien is, is een vierkant reparatiemateriaal geconfigureerd. Wanneer er luchtlekkage rond de omtrek wordt gevonden, kunnen de geconfigureerde lijm- en reparatiematerialen worden gebruikt om het te repareren. (Verschillende kleuren randen zijn uitgerust met verschillende kleuren reparatiematerialen ) 3.
luchtkussen, gebruik dan het meegeleverde grijze vierkante reparatieblok en lijm dit aan elkaar. CLEANING AND STORAGE 1. Veeg af met een zachte, vochtige doek. 2. Gebruik nooit een schurend reinigingsmiddel of een schuursponsje. 3. Zorg ervoor dat het product droog blijft. 4. Houd het product droog. Vocht kan ervoor zorgen dat producten gaan schimmelen.
- 20 -
Adres: Baoshanqu Shuangchenglu 803long 11hao 1602A-1609shi Shanghai Geïmporteerd naar de VS: Sanven Technology Ltd.
Technisch Ondersteuning en e-garantiecertificaat www.vevor.
Techniczny Certyfikat wsparcia i e-gwarancji www.vevor.com/support _ _ _ _ MATA DO PRZEWRACANIA POWIETRZA We continue to be committed to provide you tools with competitive price. "Save Half", "Half Price" or any other similar expressions used by us only represents an estimate of savings you might benefit from buying certain tools with us compared to the major top brands and does not necessarily mean to cover all categories of tools offered by us.
AIR TUMBLING MAT Kolor produktu zależy od aktualnej konfiguracji NEED HELP? CONTACT US! Have product questions? Need technical support? Please feel free to contact us: Technical Support and E-Warranty Certificate www. vevor. com/support This is the original instruction, please read all manual instructions carefully before operating. VEVOR reserves a clear interpretation of our user manual. The appearance of the product shall be subject to the product you received.
IMPORTANT SAFEGUARDS UWAGA : Aktywność Anv obejmująca ruch, obrót i wysokość stwarza możliwość katastrofalnych obrażeń, paraliżu, a nawet śmierci. Korzystając z tego sprzętu, ponosisz ryzyko poważnych obrażeń; sprzęt ten jest przeznaczony do użytku wyłącznie przez odpowiednio przeszkolonych i wykwalifikowanych uczestników zgodnie z nadzorowanych warunkach. Przed użyciem poznaj swoje imitacje. W razie wątpliwości zawsze skonsultuj się z nauczycielem. Wykwalifikowany instruktor.
2. Ciągnięcie lub ciągnięcie produktu za przewód zasilający jest niedozwolone. 3. Wyciągając wtyczkę, należy trzymać za wtyczkę; nie ciągnąć za przewód zasilający. 4. Nie przecinaj ani nie wymieniaj wtyczki samodzielnie, w przeciwnym razie mogą wystąpić poważne konsekwencje. 5. Eksploatacja produktu jest niedozwolona w przypadku uszkodzenia zasilania linia lub skorupa. 6. Niedopuszczalny jest demontaż i demontaż produktu przez osoby niebędące laikami. 7.
Sprawdź kompatybilność gazu z materiałami napowietrzania stawu i jego akcesoriami. Zawsze używaj rękawic i okularów ochronnych podczas pracy z materiałami żrącymi. 12. Nie używaj uszkodzonej wtyczki lub gniazdka, gdyż może to spowodować porażenie prądem lub pożar. 13. Jeżeli przewód zasilający jest uszkodzony, musi zostać wymieniony przez producenta, jego przedstawiciela serwisowego lub osobę o podobnych kwalifikacjach, aby uniknąć zagrożenia. 14.
może unieważnić uprawnienia użytkownika do obsługi produktu. Uwaga: ten produkt został przetestowany i stwierdzono, że spełnia ograniczenia dla urządzeń cyfrowych klasy B zgodnie z częścią 15 przepisów FCC. Ograniczenia te mają na celu zapewnienie rozsądnej ochrony przed szkodliwymi zakłóceniami w instalacjach domowych.
elektronicznych.
600W) TT-M-10-P Atrament 10 stóp / P WTYCZKA AMERYKAŃSKA (AC110-120V 60H z 600W) TT-E-10-P Atrament 10 stóp / P WTYCZKA EU (AC220-240V 50/60H z 600W) TT-M-10-B 10 stóp / niebieski WTYCZKA AMERYKAŃSKA (AC110-120V 60H z 600W) TT-E-10-B 10 stóp / niebieski WTYCZKA EU (AC220-240V 50/60H z 600W) TT-M-13-G 13 stóp / zielony WTYCZKA AMERYKAŃSKA (AC110-120V 60H z 600W) TT-E-13-G 13 stóp / zielony WTYCZKA EU (AC220-240V 50/60H z 600W) TT-M-13-P Atrament 13 stóp / P WTYCZKA AMERYKAŃSKA (AC110-120V
TT-M-20-G 20 stóp / zielony WTYCZKA AMERYKAŃSKA (AC110-120V 60H z 600W) TT-E-20-G 20 stóp / zielony WTYCZKA EU (AC220-240V 50/60H z 600W) TT-M-20-P Atrament 20 stóp /P WTYCZKA AMERYKAŃSKA (AC110-120V 60H z 600W) TT-E-20-P Atrament 20 stóp /P WTYCZKA EU (AC220-240V 50/60H z 600W) TT-M-20-B 20 stóp / niebieski WTYCZKA AMERYKAŃSKA (AC110-120V 60H z 600W) TT-E-20-B 20 stóp / niebieski WTYCZKA EU (AC220-240V 50/60H z 600W) INSTALLATION STEPS Odp.
3. Otwórz nadmuchiwany zawór w kierunku przeciwnym do ruchu wskazówek zegara. 4. Połączenie przewodu powietrznego i zaworu inflacyjnego. 5. Wtyczka pompy powietrza łącząca rurę powietrzną i pompę powietrza.
pompowanie. 6. Wyłącz przełącznik, gdy poduszka powietrzna jest pełna powietrza. 7. Wyjmij nadmuchiwaną rurkę. (Gdy zawór nie wyskoczy automatycznie, naciśnij go, aby zamknąć ręcznie.
8. Aby uniknąć nieszczelności ciśnieniowego zaworu nadmiarowego przez długi czas, klucz do zaworu dokręca się w kierunku zgodnym z ruchem wskazówek zegara za pomocą klucza do zaworu w przypadku poluzowania zewnętrznego pierścienia zaworu.
1. Upewnij się, że opakowanie jest kompletne i wyjmij nadmuchiwany element z opakowania . 2. Połóż poduszkę powietrzną na ziemi, aby ją otworzyć. 3.
wskazówek zegara. 4. Połączenie przewodu powietrznego i zaworu inflacyjnego.
5. Wtyczka pompy powietrza łącząca rurę powietrzną i pompę powietrza. Włącz pompę powietrza i naciśnij przełącznik, aby rozpocząć pompowanie. 6. Wyłącz przełącznik, gdy poduszka powietrzna jest pełna powietrza.
7. Wyjmij nadmuchiwaną rurkę. (Gdy zawór nie wyskoczy automatycznie, naciśnij go, aby zamknąć ręcznie. 8. Aby uniknąć nieszczelności ciśnieniowego zaworu nadmiarowego przez długi czas, klucz do zaworu dokręca się w kierunku zgodnym z ruchem wskazówek zegara za pomocą klucza do zaworu w przypadku poluzowania zewnętrznego pierścienia zaworu.
9. Pasek na ramię zakłada się w sposób pokazany na rysunku i zapina za pomocą klamry zamykającej. Długość można dostosować do osobistych nawyków użytkowania .
PATCHING GUIDELINES Wskazówki: Ten produkt jest wyposażony w materiały naprawcze (z wyjątkiem kleju). Jeśli wyciek powietrza jest spowodowany ostrymi przedmiotami podczas użytkowania, można go naprawić. Ponieważ materiałem produktu jest PVC, musisz kupić klej do PVC, aby naprawić klej. 1. Przed naprawą oczyść obszar wokół uszkodzenia, aby upewnić się, że powierzchnia jest sucha. 2.
2.Jak pokazano na rysunku, skonfigurowany jest kwadratowy materiał naprawczy.W przypadku stwierdzenia wycieku powietrza na obwodzie, można go naprawić za pomocą skonfigurowanego kleju i materiałów naprawczych.(Różne kolory obrzeży są wyposażone w różne kolory materiałów naprawczych ) 3.
należy użyć dostarczonego szarego kwadratowego bloku naprawczego i skleić go ze sobą. CLEANING AND STORAGE 1. Wycierać miękką, wilgotną szmatką. 2. Nigdy nie używaj ściernych środków czyszczących ani szorstkich podkładek. 3. Pamiętaj, aby produkt był suchy. 4. Produkt powinien być suchy. Wilgoć może powodować pleśń.
- 20 -
Adres: Baoshanqu Shuangchenglu 803long 11hao 1602A-1609shi Szanghaj Import do USA: Sanven Technology Ltd.
Techniczny Certyfikat wsparcia i e-gwarancji www.vevor.
Technisch Support- und E-Garantiezertifikat www.vevor.com/support _ _ _ _ LUFTTAUMELMATTE We continue to be committed to provide you tools with competitive price. "Save Half", "Half Price" or any other similar expressions used by us only represents an estimate of savings you might benefit from buying certain tools with us compared to the major top brands and does not necessarily mean to cover all categories of tools offered by us.
AIR TUMBLING MAT Die Produktfarbe Konfiguration ab hängt von der tatsächlichen NEED HELP? CONTACT US! Have product questions? Need technical support? Please feel free to contact us: Technical Support and E-Warranty Certificate www. vevor.
This is the original instruction, please read all manual instructions carefully before operating. VEVOR reserves a clear interpretation of our user manual. The appearance of the product shall be subject to the product you received. Please forgive us that we won't inform you again if there are any technology or software updates on our product. IMPORTANT SAFEGUARDS VORSICHT : Jede Aktivität, die Bewegung, Rotation und Höhe beinhaltet, kann zu katastrophalen Verletzungen, Lähmungen oder sogar zum Tod führen.
WARNUNG: Lesen Sie alle Sicherheitswarnungen, Anweisungen, Abbildungen und Spezifikationen, die dieser Luftpumpe beiliegen. Die Nichtbeachtung aller unten aufgeführten Anweisungen kann zu Stromschlägen, Bränden und/oder schweren Verletzungen führen. Grundlegende Sicherheitsinformationen: 1. Dieses Produkt ist nur zum Aufpumpen bestimmt. 2. Das Ziehen oder Ziehen des Produkts an der Stromleitung ist nicht gestattet. 3.
brennbar, explosiv oder giftig sind. Überprüfen Sie immer das Sicherheitsdatenblatt (SDB) des Gases, bevor Sie es mit der Luftpumpe verwenden . Überschreiten Sie außerdem nicht den angegebenen Druck Reichweite für die Luftpumpe . Luftpumpe nicht mit Gasen, die Metalle angreifen oder chemische Ladungen erzeugen können. Überprüfen Sie die Verträglichkeit des Gases mit den Materialien der Teichbelüftung und deren Zubehör.
führen! Dieses Gerät entspricht Teil 15 der FCC-Bestimmungen. Der Betrieb unterliegt den folgenden zwei Bedingungen: 1) Dieses Produkt kann schädliche Störungen verursachen. 2) Dieses Produkt muss alle empfangenen Störungen akzeptieren, einschließlich Störungen, die zu unerwünschtem Betrieb führen können. WARNUNG: Änderungen oder Modifikationen an diesem Produkt, die nicht ausdrücklich von der Partei genehmigt wurden.
Radio-/TV-Techniker. CORRECT DISPOSAL OF AIR PUMP Dieses Produkt unterliegt den Bestimmungen der europäischen Richtlinie 2012/19/EU. Das Symbol mit der durchgestrichenen Mülltonne auf Rädern weist darauf hin, dass das Produkt in der Europäischen Union einer getrennten Müllsammlung bedarf. Dies gilt für das Produkt und alle Zubehörteile, die mit diesem Symbol gekennzeichnet sind.
600W) TT-M-40-31,5 40× Φ 31,5 Zoll / Grün US-STECKER (AC110-120V 60H bei 600W) TT-E-40-31,5 40× Φ 31,5 Zoll / Grün EU-STECKER (AC220-240V 50/60H und 600W) TT-M-40-24-10 TT-E-40-24-10 TT-M-10-G Anzug : 10 Fuß + 40 X 24 US-STECKER (AC110-120V 60H bei Zoll/ P -Tinte 600W) Anzug : 10 Fuß + 40 X 24 EU-STECKER (AC220-240V 50/60H und Zoll/ P -Tinte 600W) 10 Fuß / Grün US-STECKER (AC110-120V 60H bei 600W) TT-E-10-G 10 Fuß / Grün EU-STECKER (AC220-240V 50/60H und 600W) TT-M-10-P 10ft /P- Tinte
TT-M-16-G 16 Fuß / Grün US-STECKER (AC110-120V 60H bei 600W) TT-E-16-G 16 Fuß / Grün EU-STECKER (AC220-240V 50/60H und 600W) TT-M-16-P 16ft /P -Tinte US-STECKER (AC110-120V 60H bei 600W) TT-E-16-P 16ft /P -Tinte EU-STECKER (AC220-240V 50/60H und 600W) TT-M-16-B 16 Fuß / Blau US-STECKER (AC110-120V 60H bei 600W) TT-E-16-B 16 Fuß / Blau EU-STECKER (AC220-240V 50/60H und 600W) TT-M-20-G 20 Fuß / Grün US-STECKER (AC110-120V 60H bei 600W) TT-E-20-G 20 Fuß / Grün EU-STECKER (AC220-240V 50/6
2.Legen Sie das Luftkissen zum Öffnen auf den Boden. 3. Drehen Sie das aufblasbare Ventil gegen den Uhrzeigersinn auf. 4. Luftrohr- und Füllventilanschluss.
5.Luftrohr und Luftpumpenanschluss, Luftpumpenstecker. Schalten Sie die Luftpumpe ein und drücken Sie den Schalter, um mit dem Aufpumpen zu beginnen. 6.Bitte schalten Sie den Schalter aus, wenn das Luftkissen mit Luft gefüllt ist.
7. Nehmen Sie den aufblasbaren Schlauch heraus. (Wenn das Ventil nicht automatisch aufspringt, drücken Sie es bitte manuell, um es zu schließen. 8.Um eine Undichtigkeit des Überdruckventils für längere Zeit zu vermeiden, wird der Ventilschlüssel im Falle einer Lockerung des Außenrings des Ventils mit dem Ventilschlüssel im Uhrzeigersinn festgezogen.
B: Rechteck _ ( Die Produktfarbe hängt von der tatsächlichen Konfiguration ab .) 1. Stellen Sie sicher, dass die Verpackung vollständig ist, und nehmen Sie das Schlauchboot aus der Verpackung . 2.Legen Sie das Luftkissen zum Öffnen auf den Boden.
3. Drehen Sie das aufblasbare Ventil gegen den Uhrzeigersinn auf. 4. Luftrohr- und Füllventilanschluss.
5.Luftrohr und Luftpumpenanschluss, Luftpumpenstecker. Schalten Sie die Luftpumpe ein und drücken Sie den Schalter, um mit dem Aufpumpen zu beginnen. 6.Bitte schalten Sie den Schalter aus, wenn das Luftkissen mit Luft gefüllt ist.
7. Nehmen Sie den aufblasbaren Schlauch heraus. (Wenn das Ventil nicht automatisch aufspringt, drücken Sie es bitte manuell, um es zu schließen.
8.Um eine Undichtigkeit des Überdruckventils für längere Zeit zu vermeiden, wird der Ventilschlüssel im Falle einer Lockerung des Außenrings des Ventils mit dem Ventilschlüssel im Uhrzeigersinn festgezogen. 9. Der Schultergurt wird wie im Bild gezeigt angebracht und mit einer Schlossschnalle befestigt. Die Länge kann den persönlichen Nutzungsgewohnheiten angepasst werden .
PATCHING GUIDELINES Tipps: Dieses Produkt ist mit Reparaturmaterialien (außer Kleber) ausgestattet. Wenn während des Gebrauchs durch scharfe Gegenstände Luftlecks verursacht werden, kann es repariert werden. Da das Produktmaterial PVC ist, müssen Sie PVC-Kleber kaufen, um den Kleber zu reparieren. 1. Reinigen Sie vor der Reparatur den Bereich um den Schaden herum, um sicherzustellen, dass die Oberfläche trocken ist. 2.
drücken Sie es dann vor dem Gebrauch 40-60 Minuten lang mit einem Gegenstand . Tipps zum Einsatzort des ausgestatteten Reparaturmaterials 1. Wie im Bild gezeigt, ist ein ringförmiges Reparaturmaterial konfiguriert. Wenn in der Nähe der Aufblasöffnung ein Luftleck festgestellt wird, können der konfigurierte Kleber und die Reparaturmaterialien zur Reparatur verwendet werden. 2. Wie in der Abbildung gezeigt, ist ein quadratisches Reparaturmaterial konfiguriert.
3.Wenn Luftlecks über oder an der Unterseite des Luftkissens auftreten, verwenden Sie bitte den mitgelieferten grauen quadratischen Reparaturblock und kleben Sie ihn zusammen. CLEANING AND STORAGE 1. Mit einem weichen, feuchten Tuch abwischen.
2. Verwenden Sie niemals Scheuermittel oder scharfe Schwämme. 3. Achten Sie darauf, das Produkt trocken zu halten. 4. Bitte halten Sie das Produkt trocken. Feuchtigkeit kann dazu führen, dass Produkte schimmeln.
Adresse: Baoshanqu Shuangchenglu 803long 11hao 1602A-1609shi Shanghai In die USA importiert: Sanven Technology Ltd.
Technisch Support- und E-Garantiezertifikat www.vevor.
Technique Assistance et certificat de garantie électronique www.vevor.com/support _ _ _ _ TAPIS DE CULBUTAGE D'AIR We continue to be committed to provide you tools with competitive price. "Save Half", "Half Price" or any other similar expressions used by us only represents an estimate of savings you might benefit from buying certain tools with us compared to the major top brands and does not necessarily mean to cover all categories of tools offered by us.
AIR TUMBLING MAT La couleur du produit est soumise à la configuration réelle NEED HELP? CONTACT US! Have product questions? Need technical support? Please feel free to contact us: Technical Support and E-Warranty Certificate www. vevor. com/support This is the original instruction, please read all manual instructions carefully before operating. VEVOR reserves a clear interpretation of our user manual. The appearance of the product shall be subject to the product you received.
IMPORTANT SAFEGUARDS ATTENTION : Toute activité impliquant un mouvement, une rotation et une hauteur crée la possibilité de blessures catastrophiques, de paralysie ou même de mort. Vous assumez le risque de blessures graves lors de l'utilisation de cet équipement ; cet équipement est destiné à être utilisé uniquement par des participants correctement formés et qualifiés sous conditions surveillées. Avant utilisation, connaissez vos imitations. En cas de doute, consultez toujours un enseignant.
3. Lorsque vous retirez la fiche, veuillez la tenir elle-même ; ne tirez pas sur la ligne électrique. 4. Ne coupez pas et ne remplacez pas la fiche d'alimentation par vous-même, car cela pourrait entraîner de graves conséquences. 5. Le fonctionnement du produit n'est pas autorisé en cas de dommages à l'alimentation ligne ou la coquille. 6. Le démontage et le démontage du produit par des profanes ne sont pas autorisés. 7.
protection lors de la manipulation de matériaux corrosifs. 12. N'utilisez pas de fiche ou de prise endommagée, car cela pourrait provoquer un choc électrique ou un incendie. 13. Si le cordon d'alimentation est endommagé, il doit être remplacé par le fabricant, son agent de service ou des personnes de qualification similaire afin d'éviter tout danger. 14.
Remarque : Ce produit a été testé et déclaré conforme aux limites d'un appareil numérique de classe B conformément à la partie 15 des règles de la FCC. Ces limites sont conçues pour fournir une protection raisonnable contre les interférences nuisibles dans une installation résidentielle. Ce produit génère, utilise et peut émettre de l'énergie radiofréquence et, s'il n'est pas installé et utilisé conformément aux instructions, il peut provoquer des interférences nuisibles aux communications radio.
PRODUCT PARAMETERS MODÈLE Taille /COULEUR POMPE À AIR TT-M-40-24 40 × Φ 24 pouces / rose PRISE AMÉRICAINE (AC110-120V 60H z 600W) TT-E-40-24 40 × Φ24 POUCES/ROSE PRISE UE (AC220-240V 50/60H z 600W) TT-M-40-31.5 40 × Φ 31,5 pouces / Vert PRISE AMÉRICAINE (AC110-120V 60H z 600W) TT-E-40-31.
TT-M-10-P Encre 10 pieds /P PRISE AMÉRICAINE (AC110-120V 60H z 600W) TT-E-10-P Encre 10 pieds /P PRISE UE (AC220-240V 50/60H z 600W) TT-M-10-B 10 pieds / Bleu PRISE AMÉRICAINE (AC110-120V 60H z 600W) TT-E-10-B 10 pieds / Bleu PRISE UE (AC220-240V 50/60H z 600W) TT-M-13-G 13 pieds / Vert PRISE AMÉRICAINE (AC110-120V 60H z 600W) TT-E-13-G 13 pieds / Vert PRISE UE (AC220-240V 50/60H z 600W) TT-M-13-P Encre 13 pieds /P PRISE AMÉRICAINE (AC110-120V 60H z 600W) TT-E-13-P Encre 13 pieds /P P
z 600W) TT-E-20-G 20 pieds / Vert PRISE UE (AC220-240V 50/60H z 600W) TT-M-20-P Encre 20 pieds /P PRISE AMÉRICAINE (AC110-120V 60H z 600W) TT-E-20-P Encre 20 pieds /P PRISE UE (AC220-240V 50/60H z 600W) TT-M-20-B 20 pieds / Bleu PRISE AMÉRICAINE (AC110-120V 60H z 600W) TT-E-20-B 20 pieds / Bleu PRISE UE (AC220-240V 50/60H z 600W) INSTALLATION STEPS R : Rouleau ( la couleur du produit est soumise à la configuration réelle ) 1.
3. Tournez la valve gonflable dans le sens inverse des aiguilles d'une montre. 4. Connexion du tuyau d'air et de la valve de gonflage. 5. Bouchon de pompe à air de connexion de tuyau d'air et de pompe à air.
Allumez la pompe à air et appuyez sur l'interrupteur pour commencer à gonfler. 6. Veuillez éteindre l'interrupteur lorsque le coussin d'air est plein d'air. 7. Retirez le tube gonflable. (Lorsque la valve ne s'ouvre pas automatiquement, veuillez appuyer dessus pour la fermer manuellement.
8. Pour éviter les fuites de la soupape de surpression pendant une longue période, la clé à soupape est serrée dans le sens des aiguilles d'une montre à l'aide de la clé à soupape en cas de desserrage de la bague extérieure de la soupape.
configuration réelle ) 1. Assurez-vous que l'emballage est complet et sortez le gonflable de la boîte d'emballage . 2. Placez le coussin d'air sur le sol pour l'ouvrir.
3. Tournez la valve gonflable dans le sens inverse des aiguilles d'une montre. 4. Connexion du tuyau d'air et de la valve de gonflage.
5. Bouchon de pompe à air de connexion de tuyau d'air et de pompe à air. Allumez la pompe à air et appuyez sur l'interrupteur pour commencer à gonfler. 6. Veuillez éteindre l'interrupteur lorsque le coussin d'air est plein d'air.
7. Retirez le tube gonflable. (Lorsque la valve ne s'ouvre pas automatiquement, veuillez appuyer dessus pour la fermer manuellement. 8.
période, la clé à soupape est serrée dans le sens des aiguilles d'une montre à l'aide de la clé à soupape en cas de desserrage de la bague extérieure de la soupape. 9. La bandoulière est installée comme indiqué sur l'image et fixée avec une boucle de verrouillage. La longueur peut être ajustée en fonction des habitudes d'utilisation personnelles .
PATCHING GUIDELINES Conseils: Ce produit est équipé de matériaux de réparation (à l'exception de la colle).Lorsque la fuite d'air est causée par des objets pointus lors de l'utilisation, elle peut être réparée. Étant donné que le matériau du produit est du PVC, vous devez acheter de la colle PVC pour réparer la colle. 1. Avant de réparer, nettoyez la zone autour des dommages pour vous assurer que la surface est sèche. 2.
dessus avec un objet pendant 40 à 60 minutes avant utilisation. . Conseils d'emplacement pour l'utilisation du matériel de réparation équipé 1. Comme le montre l'image, un matériau de réparation en forme d'anneau est configuré. Lorsqu'une fuite d'air est détectée près du port de gonflage, la colle configurée et les matériaux de réparation peuvent être utilisés pour la réparer. 2. Comme le montre l'image, un matériau de réparation carré est configuré.
3. Lorsqu'une fuite d'air se produit au-dessus ou au bas du coussin d'air, veuillez utiliser le bloc de réparation carré gris fourni et collez-le ensemble. CLEANING AND STORAGE 1. Essuyer avec un chiffon doux et humide. 2. N'utilisez jamais de nettoyant abrasif ou de tampon agressif.
3. Assurez-vous de garder le produit au sec. 4. Veuillez garder le produit au sec. L'humidité peut provoquer la moisissure des produits.
Adresse : Baoshanqu Shuangchenglu 803long 11hao 1602A-1609shi Shanghai Importé aux États-Unis : Sanven Technology Ltd.
Technique Assistance et certificat de garantie électronique www.vevor.
Teknisk Support och e-garanticertifikat www.vevor.com/support _ _ _ _ LUFTTUMLANDE MATTA We continue to be committed to provide you tools with competitive price. "Save Half", "Half Price" or any other similar expressions used by us only represents an estimate of savings you might benefit from buying certain tools with us compared to the major top brands and does not necessarily mean to cover all categories of tools offered by us.
AIR TUMBLING MAT Produktens färg är föremål för faktisk konfiguration NEED HELP? CONTACT US! Have product questions? Need technical support? Please feel free to contact us: Technical Support and E-Warranty Certificate www. vevor. com/support This is the original instruction, please read all manual instructions carefully before operating. VEVOR reserves a clear interpretation of our user manual. The appearance of the product shall be subject to the product you received.
IMPORTANT SAFEGUARDS FÖRSIKTIGHET : Anv-aktivitet som involverar rörelse, rotation och höjd skapar risken för katastrofala skador, förlamning eller till och med dödsfall. Du antar risken för allvarliga skador när du använder denna utrustning; denna utrustning är endast avsedd att användas av korrekt utbildade och kvalificerade deltagare under övervakade förhållanden. Innan du använder, känna till dina imitationer. Om du är osäker, kontakta alltid en lärare. Kvalificerad instruktör.
konsekvenser. 5. Användning av produkten är inte tillåten i händelse av skada på strömmen lina eller skalet. 6. Demontering och demontering av produkten av lekmän är inte tillåtet. 7. Om luftpumpen faller i vatten, bryt strömförsörjningen innan du muddrar ut den. Sedan ska den överlämnas till fackmän för kontroll och underhåll. 8. Risk för elektriska stötar: Rör inte luftpumpen med våta händer eller när du står på en våt yta.
erfarenhet och kunskap om de har fått övervakning eller instruktioner om hur apparaten används på ett säkert sätt och förstå riskerna. Barn får inte leka med apparaten. Rengöring och användarunderhåll får inte utföras av barn utan uppsikt.
uppmanas användaren att försöka korrigera störningen med en eller flera av följande åtgärder. · Rikta om eller flytta mottagningsantennen. · Öka avståndet mellan produkten och mottagaren. · Anslut produkten till ett uttag på en annan krets än den som mottagaren är ansluten till. · Kontakta återförsäljaren eller en erfaren radio/TV-tekniker för hjälp. CORRECT DISPOSAL OF AIR PUMP Denna produkt omfattas av bestämmelserna i det europeiska direktivet 2012/19/EU.
PRODUCT PARAMETERS MODELL Storlek /FÄRG LUFT PUMP TT-M-40-24 40× Φ 24 tum / rosa USA-KONTAKT (AC110-120V 60H z 600W) TT-E-40-24 40×Φ24TUM/ROSA EU-KONTAKT (AC220-240V 50/60H z 600W) TT-M-40-31,5 40× Φ 31,5 tum / grön USA-KONTAKT (AC110-120V 60H z 600W) TT-E-40-31.
TT-E-13-P 13 fot /P bläck EU-KONTAKT (AC220-240V 50/60H z 600W) TT-M-13-B 13 fot / blå USA-KONTAKT (AC110-120V 60H z 600W) TT-E-13-B 13 fot / blå EU-KONTAKT (AC220-240V 50/60H z 600W) TT-M-16-G 16 fot / grön USA-KONTAKT (AC110-120V 60H z 600W) TT-E-16-G 16 fot / grön EU-KONTAKT (AC220-240V 50/60H z 600W) TT-M-16-P 16ft /P bläck USA-KONTAKT (AC110-120V 60H z 600W) TT-E-16-P 16ft /P bläck EU-KONTAKT (AC220-240V 50/60H z 600W) TT-M-16-B 16 fot / blå USA-KONTAKT (AC110-120V 60H z 600W) T
1. Se till att packningen är komplett och ta ut den uppblåsbara båten från packboxen . 2. Placera luftkudden på marken för att öppna. 3. Vrid den uppblåsbara ventilen öppen moturs. 4.Anslutning av luftrör och uppblåsningsventil.
5.Anslutning av luftrör och luftpump luftpumpsplugg. Slå på luftpumpen och tryck på strömbrytaren för att börja blåsa upp. 6. Stäng av strömbrytaren när luftkudden är full med luft. 7.Ta ut det uppblåsbara röret.
tryck på den för att stänga manuellt. 8.För att undvika läckage av övertrycksventilen under en längre tid, dras ventilnyckeln åt medurs med ventilnyckeln vid lossning av ventilens yttre ring.
1. Se till att packningen är komplett och ta ut den uppblåsbara båten från packboxen . 2. Placera luftkudden på marken för att öppna. 3. Vrid den uppblåsbara ventilen öppen moturs.
4.Anslutning av luftrör och uppblåsningsventil. 5.Anslutning av luftrör och luftpump luftpumpsplugg.
Slå på luftpumpen och tryck på strömbrytaren för att börja blåsa upp. 6. Stäng av strömbrytaren när luftkudden är full med luft. 7.Ta ut det uppblåsbara röret.
tryck på den för att stänga manuellt. 8.För att undvika läckage av övertrycksventilen under en längre tid, dras ventilnyckeln åt medurs med ventilnyckeln vid lossning av ventilens yttre ring.
9. Axelremmen monteras som på bilden och fästs med låsspänne. Längden kan justeras efter personliga bruksvanor .
Tips: Denna produkt är utrustad med reparationsmaterial (förutom lim) När luftläckage orsakas av vassa föremål under användning kan det repareras. Eftersom produktmaterialet är PVC måste du köpa PVC-lim för att reparera limmet. 1. Innan du reparerar, rengör området runt skadan för att säkerställa att ytan är torr. 2. Applicera ett tunt lager lim jämnt på ytan av reparationsmaterialet och ytan runt den skadade luftkudden. 3. Sätt fast reparationsmaterialet och luftkudden ordentligt.
luftläckage hittas runt omkretsen kan det konfigurerade limmet och reparationsmaterialen användas för att reparera det. (Olika färger på kanter är utrustade med olika färger av reparationsmaterial ) 3. När luftläckage uppstår ovanför eller i botten av luftkudden, använd det medföljande gråa fyrkantiga reparationsblocket och limma ihop det.
CLEANING AND STORAGE 1. Torka av med en mjuk fuktig trasa. 2. Använd aldrig ett slipande rengöringsmedel eller en hård pad. 3. Se till att hålla produkten torr. 4. Håll produkten torr. Fukt kan göra att produkterna blir mögliga.
Adress: Baoshanqu Shuangchenglu 803long 11hao 1602A-1609shi Shanghai Importerad till USA: Sanven Technology Ltd.
Teknisk Support och e-garanticertifikat www.vevor.
Técnico Certificado de soporte y garantía electrónica www.vevor.com/support _ _ _ _ ESTERA DE CAÍDA DE AIRE We continue to be committed to provide you tools with competitive price. "Save Half", "Half Price" or any other similar expressions used by us only represents an estimate of savings you might benefit from buying certain tools with us compared to the major top brands and does not necessarily mean to cover all categories of tools offered by us.
AIR TUMBLING MAT El color del producto está sujeto a la configuración real. NEED HELP? CONTACT US! Have product questions? Need technical support? Please feel free to contact us: Technical Support and E-Warranty Certificate www. vevor. com/support This is the original instruction, please read all manual instructions carefully before operating. VEVOR reserves a clear interpretation of our user manual. The appearance of the product shall be subject to the product you received.
IMPORTANT SAFEGUARDS PRECAUCIÓN : Cualquier actividad que involucre movimiento, rotación y altura crea la posibilidad de lesiones catastróficas, parálisis o incluso la muerte. Usted asume el riesgo de sufrir lesiones graves al utilizar este equipo; este equipo está diseñado para ser utilizado únicamente por participantes debidamente capacitados y calificados bajo condiciones supervisadas. Antes de usarlo, conozca sus imitaciones. En caso de duda, consulte siempre a un maestro. Instructor calificado.
alimentación. 4. No corte ni reemplace el enchufe usted mismo, ya que podría sufrir graves consecuencias. 5. No se permite el funcionamiento del producto en caso de daños en la fuente de alimentación. línea o el caparazón. 6. No está permitido el desmontaje y desmontaje del producto por parte de personas no profesionales. 7. En caso de que la bomba de aire caiga al agua, corte el suministro eléctrico antes de dragarla y luego entreguela a profesionales para su revisión y mantenimiento. 8.
12. No utilice un enchufe o toma de corriente dañado, ya que esto puede provocar una descarga eléctrica o un incendio. 13. Si el cable de alimentación está dañado, debe ser reemplazado por el fabricante, su agente de servicio o personas igualmente calificadas para evitar riesgos. 14.
la FCC. Estos límites están diseñados para brindar una protección razonable contra interferencias dañinas en una instalación residencial. Este producto genera, usa y puede irradiar energía de radiofrecuencia y, si no se instala y usa de acuerdo con las instrucciones, puede causar interferencias dañinas en las comunicaciones por radio. Sin embargo, no hay garantía de que no se produzcan interferencias en una instalación en particular.
PRODUCT PARAMETERS MODELO Tamaño /COLOR BOMBA DE AIRE TT-M-40-24 40× Φ 24 pulgadas / rosa ENCHUFE ESTADOUNIDENSE (AC110-120V 60H z 600W) TT-E-40-24 40×Φ24PULGADAS/ROSA ENCHUFE EUROPEO (AC220-240V 50/60H z 600W) TT-M-40-31.5 40× Φ 31,5 pulgadas / Verde ENCHUFE ESTADOUNIDENSE (AC110-120V 60H z 600W) TT-E-40-31.
TT-M-10-B 10 pies / Azul ENCHUFE ESTADOUNIDENSE (AC110-120V 60H z 600W) TT-E-10-B 10 pies / Azul ENCHUFE EUROPEO (AC220-240V 50/60H z 600W) TT-M-13-G 13 pies / Verde ENCHUFE ESTADOUNIDENSE (AC110-120V 60H z 600W) TT-E-13-G 13 pies / Verde ENCHUFE EUROPEO (AC220-240V 50/60H z 600W) TT-M-13-P Tinta de 13 pies /P ENCHUFE ESTADOUNIDENSE (AC110-120V 60H z 600W) TT-E-13-P Tinta de 13 pies /P ENCHUFE EUROPEO (AC220-240V 50/60H z 600W) TT-M-13-B 13 pies / Azul ENCHUFE ESTADOUNIDENSE (AC110-120V
(AC110-120V 60H z 600W) TT-E-20-P Tinta de 20 pies /P ENCHUFE EUROPEO (AC220-240V 50/60H z 600W) TT-M-20-B 20 pies / Azul ENCHUFE ESTADOUNIDENSE (AC110-120V 60H z 600W) TT-E-20-B 20 pies / Azul ENCHUFE EUROPEO (AC220-240V 50/60H z 600W) INSTALLATION STEPS R: Rodillo ( el color del producto está sujeto a la configuración real ) 1. Asegúrese de que el embalaje esté completo y saque el inflable de la caja de embalaje . 2.Coloque el cojín de aire en el suelo para abrirlo. 3.
4. Conexión de tubería de aire y válvula de inflado. 5. Enchufe de la bomba de aire de conexión del tubo de aire y de la bomba de aire. Encienda la bomba de aire y presione el interruptor para comenzar a inflar.
6. Apague el interruptor cuando el cojín de aire esté lleno de aire. 7. Saque el tubo inflable. (Cuando la válvula no se abre automáticamente, presiónela para cerrarla manualmente. 8. Para evitar fugas de la válvula de alivio de presión durante mucho tiempo, la llave de la válvula se aprieta en el sentido de las agujas del reloj usando la llave de la válvula en el caso de que se afloje el anillo exterior de la válvula.
B: Rectángulo _ ( El color del producto está sujeto a la configuración real ) 1. Asegúrese de que el embalaje esté completo y saque el inflable de la caja de embalaje . 2.Coloque el cojín de aire en el suelo para abrirlo.
3. Gire la válvula inflable para abrirla en el sentido de las agujas del reloj. 4. Conexión de tubería de aire y válvula de inflado.
5. Enchufe de la bomba de aire de conexión del tubo de aire y de la bomba de aire. Encienda la bomba de aire y presione el interruptor para comenzar a inflar.
6. Apague el interruptor cuando el cojín de aire esté lleno de aire. 7. Saque el tubo inflable. (Cuando la válvula no se abre automáticamente, presiónela para cerrarla manualmente.
8. Para evitar fugas de la válvula de alivio de presión durante mucho tiempo, la llave de la válvula se aprieta en el sentido de las agujas del reloj usando la llave de la válvula en el caso de que se afloje el anillo exterior de la válvula.
9. La correa para el hombro se instala como se muestra en la imagen y se fija con una hebilla de bloqueo. La longitud se puede ajustar según los hábitos de uso personales .
PATCHING GUIDELINES Consejos: Este producto está equipado con materiales de reparación (excepto pegamento). Cuando la fuga de aire es causada por objetos afilados durante el uso, se puede reparar. Debido a que el material del producto es PVC, debe comprar pegamento de PVC para reparar el pegamento. 1. Antes de reparar, limpie el área alrededor del daño para asegurarse de que la superficie esté seca. 2.
2. Como se muestra en la imagen, se configura un material de reparación cuadrado. Cuando se encuentran fugas de aire alrededor del perímetro, se pueden usar el pegamento y los materiales de reparación configurados para repararlo. (Diferentes colores de bordes están equipados con diferentes colores de materiales de reparación ) 3.
colchón de aire, utilice el bloque de reparación cuadrado gris proporcionado y péguelo. CLEANING AND STORAGE 1. Limpiar con un paño suave y húmedo. 2. Nunca utilice un limpiador abrasivo o una almohadilla áspera. 3. Asegúrese de mantener el producto seco. 4. Mantenga el producto seco. La humedad puede provocar que los productos se enmohezcan.
- 20 -
Dirección: Baoshanqu Shuangchenglu 803long 11hao 1602A-1609shi Shanghai Importado a EE. UU.: Sanven Technology Ltd.
Técnico Certificado de soporte y garantía electrónica www.vevor.
Tecnico Supporto e certificato di garanzia elettronica www.vevor.com/support _ _ _ _ TAPPETINO ROTANTE AD ARIA We continue to be committed to provide you tools with competitive price. "Save Half", "Half Price" or any other similar expressions used by us only represents an estimate of savings you might benefit from buying certain tools with us compared to the major top brands and does not necessarily mean to cover all categories of tools offered by us.
AIR TUMBLING MAT Il colore del prodotto è soggetto alla configurazione effettiva NEED HELP? CONTACT US! Have product questions? Need technical support? Please feel free to contact us: Technical Support and E-Warranty Certificate www. vevor.
This is the original instruction, please read all manual instructions carefully before operating. VEVOR reserves a clear interpretation of our user manual. The appearance of the product shall be subject to the product you received. Please forgive us that we won't inform you again if there are any technology or software updates on our product.
illustrazioni e le specifiche fornite con questa pompa ad aria. La mancata osservanza di tutte le istruzioni elencate di seguito può provocare scosse elettriche, incendi e/o lesioni gravi. Informazioni di sicurezza di base: 1. Questo prodotto serve solo per il pompaggio. 2. Non è consentito tirare o trascinare il prodotto con la linea elettrica. 3. Quando si stacca la spina, tenere la spina stessa; non tirare la linea di alimentazione. 4.
11. Pericolo di corrosione: Non utilizzare la pompa dell'aria con gas che possono corrodere i metalli o esercitare cariche chimiche. Verificare la compatibilità del gas con i materiali di aerazione del laghetto e dei suoi accessori. Utilizzare sempre guanti e occhiali protettivi quando si maneggiano materiali corrosivi. 12. Non utilizzare una spina o una presa danneggiata, poiché ciò potrebbe causare scosse elettriche o incendi. 13.
indesiderato. ATTENZIONE: cambiamenti o modifiche a questo prodotto non espressamente approvati dalla parte responsabile della conformità potrebbero annullare l'autorità dell'utente a utilizzare il prodotto. Nota: questo prodotto è stato testato ed è risultato conforme ai limiti per un dispositivo digitale di Classe B ai sensi della Parte 15 delle norme FCC. Questi limiti sono progettati per fornire una protezione ragionevole contro interferenze dannose in un'installazione residenziale.
domestici, ma devono essere portati in un punto di raccolta per il riciclaggio di dispositivi elettrici ed elettronici. PRODUCT PARAMETERS MODELLO Taglia /COLORE POMPA D'ARIA TT-M-40-24 40× Φ 24 pollici / rosa SPINA AMERICANA (AC110-120V 60H z 600W) TT-E-40-24 40×Φ24 POLLICI/ROSA SPINA UE (AC220-240V 50/60H z 600W) TT-M-40-31.5 40× Φ 31,5 pollici / Verde SPINA AMERICANA (AC110-120V 60H z 600W) TT-E-40-31.
TT-E-10-G 10 piedi / Verde SPINA UE (AC220-240V 50/60H z 600W) TT-M-10-P Inchiostro da 10 piedi /P SPINA AMERICANA (AC110-120V 60H z 600W) TT-E-10-P Inchiostro da 10 piedi /P SPINA UE (AC220-240V 50/60H z 600W) TT-M-10-B 10 piedi / Blu SPINA AMERICANA (AC110-120V 60H z 600W) TT-E-10-B 10 piedi / Blu SPINA UE (AC220-240V 50/60H z 600W) TT-M-13-G 13 piedi / Verde SPINA AMERICANA (AC110-120V 60H z 600W) TT-E-13-G 13 piedi / Verde SPINA UE (AC220-240V 50/60H z 600W) TT-M-13-P Inchiostro da
600W) TT-M-20-G 20 piedi / Verde SPINA AMERICANA (AC110-120V 60H z 600W) TT-E-20-G 20 piedi / Verde SPINA UE (AC220-240V 50/60H z 600W) TT-M-20-P Inchiostro da 20 piedi /P SPINA AMERICANA (AC110-120V 60H z 600W) TT-E-20-P Inchiostro da 20 piedi /P SPINA UE (AC220-240V 50/60H z 600W) TT-M-20-B 20 piedi / Blu SPINA AMERICANA (AC110-120V 60H z 600W) TT-E-20-B 20 piedi / Blu SPINA UE (AC220-240V 50/60H z 600W) INSTALLATION STEPS A: Rullo ( il colore del prodotto è soggetto alla configurazione
3. Ruotare la valvola gonfiabile in senso antiorario. 4. Collegamento del tubo dell'aria e della valvola di gonfiaggio. 5. Spina della pompa dell'aria per il collegamento del tubo dell'aria e della pompa dell'aria.
gonfiare. 6.Si prega di spegnere l'interruttore quando il cuscino d'aria è pieno d'aria. 7. Estrarre il tubo gonfiabile. (Quando la valvola non si apre automaticamente, premerla per chiuderla manualmente.
8. Per evitare perdite dalla valvola limitatrice di pressione per lungo tempo, la chiave della valvola viene serrata in senso orario utilizzando la chiave della valvola in caso di allentamento dell'anello esterno della valvola.
1. Assicurarsi che l'imballaggio sia completo ed estrarre il gonfiabile dalla scatola di imballaggio . 2.Posizionare il cuscino d'aria a terra per aprirlo. 3. Ruotare la valvola gonfiabile in senso antiorario.
4. Collegamento del tubo dell'aria e della valvola di gonfiaggio. 5.
pompa dell'aria. Accendere la pompa dell'aria e premere l'interruttore per iniziare a gonfiare. 6.Si prega di spegnere l'interruttore quando il cuscino d'aria è pieno d'aria.
7. Estrarre il tubo gonfiabile. (Quando la valvola non si apre automaticamente, premerla per chiuderla manualmente. 8. Per evitare perdite dalla valvola limitatrice di pressione per lungo tempo, la chiave della valvola viene serrata in senso orario utilizzando la chiave della valvola in caso di allentamento dell'anello esterno della valvola.
9. La tracolla è installata come mostrato nell'immagine e fissata con una fibbia di bloccaggio. La lunghezza può essere regolata in base alle abitudini di utilizzo personali .
PATCHING GUIDELINES Suggerimenti: questo prodotto è dotato di materiali di riparazione (tranne la colla).Se la perdita d'aria è causata da oggetti appuntiti durante l'uso, può essere riparata. Poiché il materiale del prodotto è il PVC, è necessario acquistare la colla per PVC per ripararla. 1. Prima della riparazione, pulire l'area attorno al danno per garantire che la superficie sia asciutta. 2.
2.Come mostrato nell'immagine, è configurato un materiale di riparazione quadrato. Quando si riscontra una perdita d'aria attorno al perimetro, è possibile utilizzare la colla e i materiali di riparazione configurati per ripararlo. (Diversi colori dei bordi sono dotati di diversi colori di materiali di riparazione ) 3.
d'aria, utilizzare il blocco di riparazione quadrato grigio fornito e incollarlo insieme. CLEANING AND STORAGE 1. Pulisci con un panno morbido e umido. 2. Non utilizzare mai un detergente abrasivo o un tampone ruvido. 3. Assicurati di mantenere il prodotto asciutto. 4. Si prega di mantenere il prodotto asciutto. L'umidità può far ammuffire i prodotti.
Indirizzo: Baoshanqu Shuangchenglu 803long 11hao 1602A-1609shi - 20 -
Shanghai Importato negli Stati Uniti: Sanven Technology Ltd.
Tecnico Supporto e certificato di garanzia elettronica www.vevor.