
Instructions / Assembly
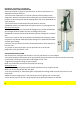


conditions, this pump will lift to a maximum of about 6m.
FREEZING PROTECTION
In freezing weather, the plug valve gasket (19) and the cup leather (9) may freeze to the pump body. If you
start pumping, these two pieces may tear, making the pump inoperable.
• You can protect the pump against freezing by keeping the handle in the ’up’ position, since in this case,
the pitcher pump will self-drain
IT
ENTRETIEN
REMPLACEMENT DU JOINT EN CUIR
1. Dévissez le boulon de fixation situé sur le couvercle de la pompe (16) et soulevez toute la construction
du piston de la pompe.
2. Dévissez l’écrou du piston (7).
3. Retirez le joint en cuir (9) usagé et placez le nouveau joint en cuir.
4. Vissez de nouveau l’écrou du piston (7) dans sa position d’origine.
5. Assemblez de nouveau la construction du piston ainsi que le couvercle de la pompe (13).
6. Placez les boulons de fixation pour le couvercle de la pompe (16) et vissez-les fermement.
REMPLACEMENT DES JOINTS
1. Desserrez les boulons de fixation (10) et retirez le corps de la pompe (4) de la vasque (1).
2. Prenez le clapet aiguille inférieur (3). Puis retirez les joints usagés pour clapet aiguille inférieur (19) et
placez le nouveau joint.
3. Retirez les joints usagés (2) de la vasque (1) et placez les nouveaux joints sur la vasque.
ATTENTION: avant de positionner les nouveaux joints sur la vasque (1), retirez tout d’abord les saletés
restantes.
4. Positionnez de nouveau le clapet aiguille inférieur (3) dans son emplacement d’origine.
5. Placez le corps de la pompe (4) de nouveau dans la vasque (1) tout en vissant fermement les boulons de
fixation (10).
MAINTENANCE
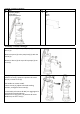
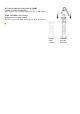
REPLACING THE CUP LEATHER
1. Loosen the fastening bolt for top cap (16) and lift the plunger assembly out of the pump.
2. Unscrew the cup leather holder (7).
3. Remove the old cup leather (9) and put on a new cup leather.
4. Screw the cup leather holder (7) back into the original position.
5. Reinstall the plunger assembly and top cap (13).
6. Insert the fastening bolt (16) and tighten.
REPLACING THE PLUG VALVE GASKET AND THE SEALING GASKET
1. Unscrew the fastening bolt (10) and remove the pump body (4) from the flange (1).
2. Take out of the plug valve (3), remove the old plug valve gasket (19) from the plug valve and then put
on new plug valve gasket.
3. Remove the old sealing gasket (2) from the flange (1) and put a new sealing gasket on the flange. NOTE:
Before placing the new sealing gasket on the flange (1), clean the flange by removing dirt/debris that
could be left over.
4. Place the plug valve (3) back into the original position.
5. Reattach the pump body (4) to the flange (1) by tightening the fastening bolt (10).
IT