Support and E-Warranty Certificate https://www.vevor.com/support EV CHARGER USR MANUAL We continue to be committed to provide you tools with competitive price. "Save Half", "Half Price" or any other similar expressions used by us only represents an estimate of savings you might benefit from buying certain tools with us compared to the major top brands and doses not necessarily mean to cover all categories of tools offered by us.
-1-
EV CHARGER MODEL:EV-A01-US009A EV-A01-US009B EV-A01-US011A EV-A01-US011B NEED HELP? CONTACT US! Have product questions? Need technical support? Please feel free to contact us: CustomerService@vevor.com This is the original instruction, please read all manual instructions carefully before operating. VEVOR reserves a clear interpretation of our user manual. The appearance of the product shall be subject to the product you received.
Before the operation, please read the operation manual carefully to know the equipment and the correct method of use. Please keep it for future reference. SAFETY PRECAUTIONS 1.Before installation, please check the grid for the Level II 240 v ~ + / - 10% (60 Hz) ". Otherwise unable to use it. 2.
7.Hybrid car, please recharge again after flameout. In the process of charging, vehicle driving is prohibited. 8.Children do not get close to the process of charging so as not to cause harm. 9.In case of rain, thunder, or weather, be a cautious charge, please. 10.It is strictly prohibited that the charging cable breaks, wear and tear, charging cable nudity, charging pile has obviously been knocked down, damaged, etc.
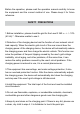
1.1 Product Parameters Type no. EV-A01-US00 EV-A01-US00 EV-A01-US01 EV-A01-US01 9A 9B 1A 1B Input voltage Level II 240V~±15%(60Hz) Output voltage Level II 240V~±15%(60Hz) Power output 9.6KW 11.
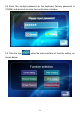
Overall dimensions Standard of reference 333*213*92mm(H*W*D) CCS1 (combo/Type 1) AC Level 2 charging TOUCH SCREEN CHARGING INSTRUCTIONS 2.0Touch screen Charging Instructions (EV-A01-US011A/EV-A01-US011B only) 2.1 After powering on the device, the device enters the standby state.
2.2 Click the lower left icon 2.
2.4 Enter the six-digit password on the keyboard (factory password is 123456) and press ok to enter the confirmation interface: 2.
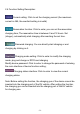
2.6 Function Setting Description: Current setting: Click to set the charging current (the maximum current is 48A, the overlimit setting is invalid) Reservation function: Click to enter, you can set the reservation charging time; The reservation time is between 0 and 12 hours. Set (integer), automatically start charging after reaching the set time. Password charging: You can directly start charging or end charging by clicking on it.
2.7 Setting of charging current a. Click the icon in the main interface of function setting to enter charging current setting: b.
c. Minimum current 8A, maximum current 48A, step 8A; After selecting the appropriate current, click the icon .If the charging current is successfully set, enter the setting success interface: d. Click back to the main screen of function Settings . 2.8 Setting the charging Schedule a. Click the icon in the main interface of function setting to enter the setting of reservation charging function, as shown in the picture: b. Click to increase the reservation time and click the reservation time.
c. After selecting the appropriate charging time, click the icon to enter the countdown interface: After the appointment time, it will automatically enter the charging state. 2.9 Password Charging Settings. a. Click the icon in the function setting interface to enter the password charging start/Stop interface: b.
communication with the EV vehicle is normal. If the communication is normal, the device will start charging and enter the charging state display interface: c. If the communication is abnormal, the device automatically returns to the standby screen after 60 seconds. d. During password charging, if you want to end charging, click the icon e. Click f.
g. Tap the icon to disable charging. The charged information screen is displayed, showing the charging duration and the charged power. h. Click the icon again to return to the main screen of function setting 2.10 Setting Charging Mode.
a. Tap the icon on the main screen of function setting to enter the screen of charging mode selection; b. Click the icon to enter the plug and charge function (plug the gun to charge, draw the gun to stop charging); At this point, the device enters the state of plugging in the gun and charging while drawing the gun stops charging. The RFID card charging function is turned off. c. Tap the icon again to return to the main screen of function setting. d.
2.11 Device Password Change Settings. a. On the function setting main screen, tap the icon to enter the password change screen. b. Tap and enter a new six-digit password c. Tap and enter the six-digit password d. Click OK. The password is changed successfully.
e. Tap the icon again to return to the main screen of function setting. 2.12 Charging Status Display interface a. On the main screen of function setting, tap the icon to enter the charging status display screen; Display real-time charging voltage/current/power/quantity. (voltageA/voltageB/voltageC with CurrentA/CurrentB/CurrentC, for three-phase power value, when the single-phase power supply only voltageA and CurrentA numerical display) b. Tap again to return to the standby screen.
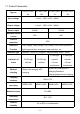
MOBILE PHONE APP CHARGING OPERATION INSTRUCTIONS 3.0 APP download and binding use a. To download the smart APP, enter the following address in the mobile browser: https://developer.tuya.com/cn/docs/iot/tuya-smart-app-smart-life-appadvantages? id=K989rqa49rluq Click the website and follow the prompts to install. b. Qr code download: Open the mobile browser or other social software, scan the QR code, and follow the APP according to the prompts. 3.1 Binding and Using Devices a.
c. Click Add to add the device, enter the WIFI pairing interface, automatically identify the WIFI name of the phone.Click Next, and the device will be automatically bound. After the binding is successful, a message will be displayed indicating that the device has been successfully added. Finally, click the icon of "Finish" and wait about 5 seconds for the device to be bound. d.
Device Status Three-color indicator status (green light: standby, yellow light: charging, red light: failure) Standby mode Green light steady on The gun has been fired.
still does not respond, open the front door of the electrical cabinet, disconnect the air switch, and then close the air switch again. 5.2 Controller Boot Failure Cause of the problem: The gun is not inserted properly; During the charging process, someone pressed a button on the charging handle. Solution: Put the gun back in place; Strengthen supervision after normal charging to prevent someone from pressing the handle button during charging. 5.
6.1 The installation method is wall hanging a. Take out the mounting plate of the charging pile at the bottom of the device, and carefully check the mounting size of the screw holes. b. Select the parking space where the charging pile is to be installed. The lowest position of the fixing plate of the charging pile should be 120cm above the ground. 120 cmcm EV c.
This product is subject to the provision of European Directive 2012/19/EC. The symbol showing a wheelie bin crossed through indicates that the product requires separate refuse collection in the European Union. This applies to the product and all accessories marked with this symbol.
This device complies with Part 15 of the FCC Rules. Operation is subject to the following two conditions:(1)This device may not cause harmful interference, and (2)this device must accept any interference received, including interference that may cause undesired operation. RF Exposure : This equipment complies with FCC radiation exposure limits set forth for an uncontrolled environment. This equipment should be installed and operated with minimum distance 20cm between the radiator & your body.
which the receiver is connected. --- Consult the dealer or an experienced radio/TV technician for help. Warning: Changes or modifications to this unit not expressly approved by the part responsible for compliance could void the user’s authority to operate the equipment.
Manufacturer: Dongguan xinhailin New Energy Technology Co. , Ltd. Address:No.
Support and E-Warranty Certificate https://www.vevor.
Unterstützung und E-Garantie-Zertifikat https://www.vevor.com/support EV-LADEGERÄT BENUTZERHANDBUCH Wir sind immer bestrebt, Ihnen Werkzeuge zu wettbewerbsfähigen Preisen anzubieten.
EV-LADEGERÄT MODELL:EV-A01-US009A EV-A01-US009B EV-A01-US011A EV-A01-US011B BRAUCHEN SIE HILFE? KONTAKTIEREN SIE UNS! Haben Sie Fragen zum Produkt? Benötigen Sie Unterstützung? Bitte kontaktieren Sie uns: CustomerService@vevor.com technische Dies ist die Original-Bedienungsanleitung, bitte lesen Sie alle Anweisungen vor der Inbetriebnahme sorgfältig durch. VEVOR behält sich eine klare Auslegung unserer Bedienungsanleitung vor. Das Aussehen des Produkts entspricht dem Produkt, das Sie erhalten haben.
Bitte lesen Sie die Bedienungsanleitung vor der Inbetriebnahme sorgfältig durch, um sich mit dem Gerät und der korrekten Bedienung vertraut zu machen. Bitte bewahren Sie sie zum späteren Nachschlagen auf. SICHERHEITSHINWEISE 1. Vor der Installation überprüfen Sie bitte das Netz für die Stufe II 240 V ~ + / - 10% (60 Hz), sonst nicht verwendbar. 2.
der Nähe des Ladegeräts. 6. Halten Sie trocken, und reinigen Sie die Ladestation, wenn es irgendwelche Verschmutzungen gibt, verwenden Sie bitte ein sauberes, trockenes Tuch zum Abwischen, es ist verboten, den Stift zu berühren. 7. Hybridauto nach Flammabriss bitte wieder aufladen, während des Ladevorgangs ist das Fahren des Fahrzeugs verboten. 8. Kinder sollten während des Ladevorgangs nicht zu nahe kommen, um keinen Schaden zu verursachen. 9. Bei Regen und Gewitter bitte vorsichtige Aufladung. 10.
perfekte Schutzfunktion usw., mit guter Kompatibilität und erfüllt die Ladeanforderungen des Standards SAE J1772. EV-A01-US Serie AC Ladegerät Schutzart IP66, mit guten staubdicht, wasserdicht Funktionen, kann sicher im Innen- und Außenbereich betrieben werden. 1.1 Produkt Parameters Typ Nr. EV-A01-US00 EV-A01-US00 EV-A01-US01 EV-A01-US01 9A 9B 1A 1B Eingangsspannung Stufe II 240V~±15%(60Hz) Ausgangsspannung Stufe II 240V~±15%(60Hz) Ausgangsleistung Max. Ausgangsstrom 9.6KW 11.
SAE J1772 Ladeschnittstelle Eingangsstecker NEME6-50P NEME14-50P Material des -30℃~50℃ Betriebstemperatur Luftfeuchtigkeit Gesamtabmessungen Standard der Referenz NEME14-50P PC+ABS Gehäuses Relative NEME6-50P 5% bis 95% ohne Kondensation 333*213*92mm(H*B*T) CCS1 (Combo/Typ 1) AC Stufe 2 Aufladung TOUCHSCREEN LADEANLEITUNG 2.Touchscreen-Ladeanleitung (nur für EV-A01-US011A/EV-A01-US011B) 2.1 Nach dem Einschalten des Geräts geht das Gerät in den Standby-Zustand über.
2.2 Klicken Sie auf das untere linke Symbol , um die Passworteingabe zu öffnen: 2.
2.4 Geben Sie das sechsstellige Kennwort über die Tastatur ein (das werkseitige Kennwort lautet 123456) und drücken Sie ok, um die Bestätigungsschnittstelle aufzurufen: 2.
2.6 Beschreibung der Funktionseinstellung: Stromeinstellung: Klicken Sie hier, um den Ladestrom einzustellen (der maximale Strom beträgt 32A, die Einstellung für die Überschreitung des Grenzwertes ist ungültig) Reservierung-Funktion: Klicken Sie hier, um die Reservierung-Ladezeit einzustellen; die Reservierung-Ladezeit liegt zwischen 0 und 12 Stunden. Einstellen (ganzzahlig), automatischer Beginn des Ladevorgangs nach Erreichen der eingestellten Zeit.
2.7 Einstellung des Ladestroms a. Klicken Sie auf das Symbol Funktionseinstellungen in der Hauptschnittstelle der , um die aktuellen Ladeeinstellungen aufzurufen: b.
c. Mindeststrom 8A, Maximalstrom 48A, Stufe 8A; nachdem Sie den entsprechenden Strom ausgewählt haben, klicken Sie auf das Symbol . Wenn der Ladestrom erfolgreich eingestellt wurde, geben Sie die Schnittstelle für die erfolgreiche Einstellung ein: d. Klicken Sie Einstellungen zurück zum Hauptbildschirm Funktion . 2.8 Einstellung des Ladezeitplans a.
b. Klicken Sie auf , um die Reservierung-Ladezeit zu erhöhen, und auf , um die Reservierung-Ladezeit zu reduzieren. Sie können zwischen 0 und 12 Stunden wählen. c. Nachdem Sie die entsprechende Ladezeit ausgewählt haben, klicken Sie auf das Symbol , um die Countdown-Schnittstelle zu öffnen: Nach der vereinbarten Zeit wird das Gerät automatisch in den Ladezustand versetzt. 2.9 Passwort-Ladeeinstellungen. a.
b. Klicken Sie auf das Symbol , und das Gerät erkennt, ob die Kommunikation mit dem Elektrofahrzeug normal verläuft. Wenn die Kommunikation normal verläuft, beginnt das Gerät mit dem Ladevorgang und zeigt den Ladezustand auf dem Display an: c. Wenn die Kommunikation gestört ist, kehrt das Gerät nach 60 Sekunden automatisch zum Standby-Bildschirm zurück. d.
e. Klicken Sie auf , um erneut in die Hauptschnittstelle der Funktionseinstellungen zu gelangen: f. Klicken Sie auf , um die Schnittstelle für die Start- und Stoppfunktion des Ladevorgangs zu öffnen: g. Tippen Sie auf das Symbol , um den Ladevorgang zu deaktivieren. Der Bildschirm mit den Ladeinformationen wird angezeigt, wobei die Ladedauer und die geladene Leistung angegeben werden.
h. Klicken Sie erneut auf das Symbol , um zum Hauptbildschirm der Funktionseinstellung zurückzukehren. 2.10 Einstellung des Lademodus. a. Tippen Sie auf das Symbol auf dem Hauptbildschirm der Funktionseinstellung , um den Bildschirm zur Auswahl des Lademodus aufzurufen; b.
c. Tippen Sie erneut auf das Symbol , um zum Hauptbildschirm der Funktionseinstellung zurückzukehren. d. Klicken Sie auf das Symbol auf der Schnittstelle zur Auswahl des Lademodus, um den Lademodus für die RFID-Karte aufzurufen.
2.11 Änderung der Gerätepasswort-Einstellungen. a. Tippen Sie auf dem Hauptbildschirm für die Funktionseinstellungen auf das Symbol , um den Bildschirm für die Passwortänderung aufzurufen. b. Tippen Sie auf und geben Sie ein neues sechsstelliges Passwort ein. c. Tippen Sie auf und geben Sie das sechsstellige Passwort ein. d. Klicken Sie auf OK. Das Passwort wird erfolgreich geändert. e. Tippen Sie erneut auf das Symbol Funktionseinstellung zurückzukehren.
2.12 Schnittstelle zur Ladestatusanzeige a. Tippen Sie auf dem Hauptbildschirm der Funktionseinstellung auf das Symbol , um den Bildschirm zur Anzeige des Ladestatus aufzurufen; Anzeige von Echtzeit-Ladespannung/Strom/Leistung/Menge. (SpannungA/SpannungB/SpannungC mit StromA/StromB/StromC, für dreiphasigen Leistungswert, bei einphasiger Stromversorgung nur SpannungA und StromA numerische Anzeige) b. Tippen Sie erneut , um zum Standby-Bildschirm zurückzukehren.
GEBRAUCHSANWEISUNG FÜR DIE APP-LADUNG DES MOBILTELEFONS 3. APP herunterladen und verbindlich nutzen a. Um die smart APP herunterzuladen, geben Sie die folgende Adresse in Ihren mobilen Browser ein: https://developer.tuya.com/cn/docs/iot/tuya-smart-app-smart-life-appadvantages? id=K989rqa49rluq Klicken Sie auf die Website und folgen Sie den Anweisungen zur Installation. b.
c. Klicken Sie auf Hinzufügen, um das Gerät hinzuzufügen, geben Sie die Wi-Fi-Kopplungsschnittstelle ein und identifizieren Sie automatisch den Wi-Fi-Namen des Telefons. Klicken Sie auf Weiter, und das Gerät wird automatisch verbunden. Nach erfolgreicher Verbindung wird eine Meldung angezeigt, die besagt, dass das Gerät erfolgreich hinzugefügt wurde. Klicken Sie abschließend auf das Symbol „Finish(Fertigstellen)“ und warten Sie etwa 5 Sekunden, bis das Gerät gebunden ist. d.
4.1 Im Ladezustand wird die LED mit drei verschiedenen Farben zur Anzeige des Ladezustands verwendet. Nach dem Einschalten kann die RFID-Karte zum Laden oder Beenden des Ladevorgangs durchgestrichen werden. Sie können auch die APP des Mobiltelefons für den Ladevorgang verwenden. Hinweis: 1. Die zufällig ausgestattete RFID-Karte kann den Stapel nur zum Aufladen öffnen. 2. Bei Verlust der RFID-Karte wenden Sie sich bitte an den Kundendienst. 4.2 Ladeanzeige LED-Anzeige Statustabelle.
ALLGEMEINE PROBLEME UND LÖSUNGEN 5. Das Display ist schwarz (LED-Anzeige ist aus). Ursache: Der AC-Eingangsschalter ist nicht geschlossen, und der AC-Eingangsschalter löst aus. Lösung: Schließen Sie den Schalter für die AC-Eingangsleitung wieder. Wenn er ständig auslöst, überprüfen Sie bitte, ob die Verdrahtung des Geräts korrekt ist und der L- oder N-Draht an den PE-Anschluss angeschlossen ist. 5.1 Defekter Bildschirm Symptom, keine Reaktion erfolgt, wenn Sie auf die Anzeige klicken.
INSTALLATIONSANWEISUNGEN 6. Liste der Teile Zubehör für allgemeine Anwendungen Produkt Spezifikationen Bedienungsanleitung für das AC-Ladegerät 1 Kopie Konformitätsbescheinigung Zertifikat der Lieferung 1 Stk. RFID-Karte 2 Stk. M1-Karte Wandmontage Expansionsschraube M8*60 Expansionsschraube 6 Stk. Haken für das Ladekabel Eisenhaken 1 Stk. Wandhalterung mit fester Platte Montage des Fahrgestells 1 Stk. 6.1 Die Installationsart ist wandhängend a.
120 cmcm EV c. Bohren Sie vier Löcher mit M8-Durchmesser entsprechend den Positionen der Schraubenlöcher in der Befestigungsscheibe, schlagen Sie die Spreizgummistopfen ein und befestigen Sie die Befestigungsscheibe mit Muttern am Befestigungsrahmen. 1. Befestigen Sie die Bodenplatte an der Wand oder an einer Halterung (achten Sie auf die Montagerichtung). 2. Hängen Sie das Ladegerät an die Bodenplatte und befestigen Sie die Bodenplatte Schraubensicherung.
Dieses Produkt unterliegt den Bestimmungen der Europäischen Richtlinie 2012/19/EG. Das Symbol mit der durchgestrichenen Mülltonne bedeutet, dass das Produkt in der Europäischen Union getrennt entsorgt werden muss. Dies gilt für das Produkt und alle mit diesem Symbol gekennzeichneten Zubehörteile. So gekennzeichnete Produkte dürfen nicht mit dem normalen Hausmüll entsorgt werden, sondern müssen bei einer Sammelstelle für das Recycling von elektrischen und elektronischen Geräten abgegeben werden.
Hochfrequenzenergie und kann diese ausstrahlen. Wenn es nicht gemäß den Anweisungen installiert und verwendet wird, kann es schädliche Störungen im Funkverkehr verursachen. Es kann jedoch nicht garantiert werden, dass bei einer bestimmten Installation keine Störungen auftreten.
Unterstützung und E-Garantie-Zertifikat https://www.vevor.
Assistance et Certificat de Garantie Électronique https://www.vevor.com/support CHARGEUR DE VÉHICULES ÉLETRIQUES MANUAL D’UTILISATION Nous nous engageons toujours à vous fournir des outils à des prix compétitifs.
CHARGEUR VE MODÈLE : EV-A01-US009A EV-A01-US009B EV-A01-US011A EV-A01-US011B BESOIN D’AIDE ? CONTACTEZ-NOUS ! Vous avez des questions sur les produits ? Vous avez besoin d'une assistance technique ? N'hésitez pas à nous contacter : CustomerService@vevor.com Ceci est l'instruction originale, veuillez lire attentivement toutes les instructions du manuel avant de l'utiliser. VEVOR se réserve une interprétation claire de notre manuel d'utilisation.
Avant l'utilisation, veuillez lire attentivement le manuel d'utilisation pour connaître l'équipement et la méthode d'utilisation correcte. Veuillez le conserver pour toute référence ultérieure. PRÉCAUTIONS DE SÉCURITÉ 1. Avant l'installation, veuillez vérifier le réseau pour le niveau II 240V ~ + / - 10 % (60 Hz), sinon impossible d'utiliser. 2.
6. Gardez sec et le nettoyage sur le point de charge, s'il ya une saleté, veuillez utiliser un chiffon propre et sec pour essuyer, il est interdit de toucher la broche de point. 7. La voiture hybride doit être rechargée après l'extinction de la flamme. Pendant le processus de charge, il est interdit de conduire le véhicule. 8. Les enfants ne doivent pas s'approcher du véhicule pendant la recharge, afin de ne pas causer de dommages. 9. Veuillez charger prudemment en cas de pluie ou de tonnerre. 10.
Le degré de protection IP66 de la série EV-A01-US, avec de bonnes fonctions d'étanchéité à la poussière et à l'eau, peut être utilisé en toute sécurité en intérieur et en extérieur. 1.1 Paramètres du Produit N° de type EV-A01-US00 EV-A01-US00 EV-A01-US01 EV-A01-US01 9A 9B 1A 1B Tension d'entrée Level II 240V~±15%(60Hz) Tension de Level II 240V~±15%(60Hz) sortie Puissance de sortie Courant de sortie maximal 9.6KW 11.
Interface de SAE J1772 charge Fiche d'entrée NEME6-50P NEME14-50P Matériau du Température de -30℃~50℃ fonctionnement Dimensions générales Normes de référence NEME14-50P PC+ABS boîtier Humidité relative NEME6-50P 5% - 95% pas de condensation 333*213*92mm(H*L*P) CCS1 (combo/Type 1) Charge de niveau 2 AC ÉCRAN TACTILE INSTRUCTIONS DE CHARGEMENT 2. Écran Tactile Instructions de Chargement (EV-A01-US011A/EV-A01-US011B seulement) 2.
2.2 Cliquez sur l'icône en bas à gauche pour entrer dans l'interface de saisie du mot de passe : 2.
2.4 Saisissez le mot de passe à six chiffres sur le clavier (le mot de passe d'usine est 123456) et appuyez sur ok pour entrer dans l'interface de confirmation : 2.
2.6 Description du réglage de fonctions : Réglage du courant : Cliquez pour régler le courant de charge (le courant maximum est de 32A, le réglage de dépassement n'est pas valide). Fonction de réservation : Cliquez pour entrer, vous pouvez définir le temps de charge de réservation ; le temps de réservation est compris entre 0 et 12 heures. Défini (nombre entier), le chargement commence automatiquement après avoir atteint le temps défini.
a. Cliquez sur l'icône dans l'interface principale du réglage de la fonction pour entrer dans le réglage actuel de la charge : b. Cliquez sur l'icône sur l'icône pour augmenter le courant de charge ; cliquez pour réduire le courant de charge : c.
d. Cliquez pour revenir à l'écran principal de la fonction Paramètres . 2.8 Établissement du calendrier des charges a. Cliquez sur l'icône dans l'interface principale du réglage de la fonction pour accéder au réglage de la fonction de charge de réservation, comme indiqué sur l'image : b. Cliquez pour augmenter l'heure de réservation et cliquez pour diminuer l'heure de réservation. Vous pouvez choisir entre 0 et 12 h.
c. Après avoir sélectionné le temps de charge approprié, cliquez sur l'icône pour entrer dans l'interface du compte à rebours : Après l'heure de rendez-vous, il entrera automatiquement en état de charge. 2.9 Paramètres de charge par mot de passe a. Cliquez sur l'icône dans l'interface de réglage des fonctions pour entrer dans l'interface de démarrage/arrêt de la charge par mot de passe : b. Cliquez sur l'icône , et l'appareil reconnaîtra si la communication avec le véhicule électrique est normale.
c. Si la communication est anormale, l'appareil revient automatiquement à l'écran de veille après 60 secondes. d. Pendant le chargement du mot de passe, si vous voulez mettre fin au chargement, cliquez sur l'icône dans l'interface de chargement pour revenir à l'interface de veille : e. Cliquez sur Revenir dans l'interface principale du réglage des fonctions : f.
g. Appuyez sur l'icône pour désactiver la charge. L'écran d'information sur la charge s'affiche, indiquant la durée de la charge et la puissance chargée. h. Cliquez à nouveau sur l'icône pour revenir à l'écran principal de réglage des fonctions.
2.10 Réglage du Mode de Charge a. Touchez l'icône sur l'écran principal de réglage des fonctions pour accéder à l'écran de sélection du mode de charge ; b. Cliquez sur l'icône pour entrer dans la fonction de branchement et de charge (brancher le pistolet pour charger, tirer le pistolet pour arrêter la charge) ; à ce stade, l'appareil entre dans l'état de branchement du pistolet et de charge tandis que tirer le pistolet arrête la charge. La fonction de charge de la carte RFID est désactivée. c.
où la carte de l'appareil est glissée ; la fonction de branchement et de charge étant désactivée, cliquez à nouveau pour revenir à l'écran principal des paramètres de la fonction. 2.11 Paramètres de Modification du Mot de Passe du Périphérique a. Sur l'écran principal de réglage des fonctions, appuyez sur l'icône pour accéder à l'écran de changement de mot de passe. b. Tapez et entrez un nouveau mot de passe à six chiffres. c. Tapez et saisissez le mot de passe à six chiffres d. Cliquez sur OK.
e. Tapez à nouveau sur l'icône pour revenir à l'écran principal de réglage des fonctions. 2.12 Interface d'Affichage de l'État de Charge a. Sur l'écran principal de réglage des fonctions, appuyez sur l'icône pour accéder à l'écran d'affichage de l'état de charge ; affichez la tension/courant/puissance/quantité de charge en temps réel.
b. Tapez sur de nouveau pour revenir à l'écran de veille. INSTRUCTIONS DE RECHARGE AVEC APP DU PORTABLE 3. Téléchargement de l'APP et utilisation de la liaison a. Pour télécharger le smart APP, saisissez l'adresse suivante dans le navigateur mobile : https://developer.tuya.com/cn/docs/iot/tuya-smart-app-smart-life-appadvantages? id=K989rqa49rluq Cliquez sur le site Web et suivez les instructions d'installation. b.
téléphone mobile, l'enregistrement de liaison du logiciel social, et vous connecter à l'APP après l'enregistrement réussi. b. Ouvrez l'emplacement, Bluetooth et Wifi du téléphone mobile. Si le dispositif de charge est en veille, l'APP recherche automatiquement le dispositif de charge et le nom du dispositif s'affiche. c. Cliquez sur Add pour ajouter le périphérique, entrez dans l'interface de jumelage WIFI, identifiez automatiquement le nom WIFI du téléphone.
INSTRUCTIONS POUR LA CHARGE DES ÉCRANS 4.Instructions pour Charger les Appareils Sans Écran Tactile (EV-A01-US009A/EV-A01-US009B Sans écran tactile, sans fiche et sans fonction de charge). 4.1 État de charge La LED à trois couleurs différentes est utilisée comme indicateur de l'état de charge. Après la mise sous tension, la carte RFID peut être glissée pour charger ou arrêter la charge. Vous pouvez également utiliser l'application du téléphone portable pour les opérations de charge.
Fuite électrique de l'équipement Les voyants vert et jaune clignotent une fois, 1S Surchauffe de l'équipement Les feux vert et jaune clignotent une fois pendant 2S Adhésion de l'équipement Les feux vert et jaune 4S clignotent une fois PROBLÈMES COURANTS ET SOLUTIONS 5. L'écran est noir (l'indicateur LED est éteint) Problème : L'interrupteur d'entrée CA n'est pas fermé et l'interrupteur d'entrée CA se déclenche. Solution : Refermez l'interrupteur du fil d'arrivée CA.
Problème : Le signal WIFI du réseau est instable, le déverrouillage a échoué. Problème de communication avec le véhicule. Solution : Éteignez la clé de contact du véhicule, coupez le moteur et verrouillez le véhicule, puis redémarrez le véhicule. Si le problème ne peut être résolu, veuillez contacter les concessionnaires automobiles ! INSTRUCTIONS D’INSTALLATION 6.
b. Choisissez la place de stationnement où le pieu de charge doit être installé. La position la plus basse de la plaque de fixation de la pile de chargement doit être à 120 cm au-dessus du sol. 120 cmcm EV c. Percez quatre trous de diamètre M8 en fonction de la position des trous de vis dans le disque de fixation, enfoncez les bouchons en caoutchouc d'expansion et fixez le disque de fixation avec des écrous sur le châssis de fixation. 1.
Ce produit est soumis aux dispositions de la directive européenne 2012/19/CE. Le symbole représentant une poubelle à roulettes barrée indique que le produit nécessite une collecte séparée des déchets dans l'Union européenne. Ceci s'applique au produit et à tous les accessoires marqués de ce symbole. Les produits marqués comme tels ne peuvent pas être jetés avec les déchets ménagers normaux, mais doivent être apportés à un point de collecte pour le recyclage des appareils électriques et électroniques.
produiront pas dans une installation particulière. Si cet équipement provoque des interférences nuisibles à la réception de la radio ou de la télévision, ce qui peut être déterminé en éteignant et en allumant l'équipement, l'utilisateur est encouragé à essayer de corriger l'interférence par l'une ou plusieurs des mesures suivantes : --- Réorientez ou repositionnez l'antenne de réception. --- Augmenter la distance entre l'équipement et le récepteur.
·
Assistance et Certificat de Garantie Électronique https://www.vevor.