XN120 XN240 XN360 NEED HELP? CONTACT US! Have product questions? Need technical support? Please feel free to contact us: 53 This is the original instruction,Please read all manual instructions carefully before operating. TREVOR reserves clear interpretation of our user manual. The appearance of the product shall be subject to the product you received. Please forgive us that we won't inform you again if there Is any technology or software updates on our product.
1. Explanation of Warning Diagram S cu. mmm] 03 2 Operation Safety Instructions 05 3. Operation Instructions 08 4. Cleaning and Maintenance 13 5. Assembly of Parts 17 6. Condenser Cleaning 19 7. Circuit Schematic 19 8, Troubleshooting Instructions 2 9.
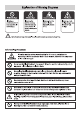
A Prohibition Signs LE Indicating & Indicating the Indicating that the Indicating a high prohibited act that. matters needing material used is voltage danger zo may cause fatal or attention that may flammable. Beware: Beware of high serious injury. cause personal of fire, voltage. injury or damage to objects.
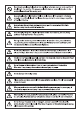
Never insert metal materials such as iron needles or wires into vents or vents used for air circulation in the machine. This may cause electric shock or personal injury due to the accidental operation of the moving parts, Be sure to place the Slush Machine firmly on solid ground. If the ground is not strong enough or is not firmly placed, it will cause damage due to the overturning or capsizing of the Slush Machine. Be sure to use the consistent special power supply on the nameplate of this Slush Machine.
There is no obstruction around the appliance or in the embedded structure to keep the ventilation open. Before cleaning, maintaining or inspecting the Slush Machine, unplug the power supply to prevent electric shock or personal injury. If some models use combustible refrigerants and flammable foaming agents, you should beware of fire (there is a * Fire Hazard A\" sign on the product). When the product is abnormal, it must be repaired by relevant qualified personnel and institutions.
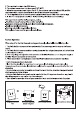
1. Dolls and flat ground. To operate the Slush Machine correctly and get the best performance, please put the Slush Machine where the following conditions are met. 2, Stay away from the place where the heat source is generated. Avoid putting the Slush Machine near heating equipment, such as gas flames or stoves. The heating of the Slush Machine will lead to a decrease In cooling efficiency. 3. Avoid direct sunlight.
2. The elevation Is no mare than 2000 meters. 3. The ambient temperature is in the range of 10 4. When the temperature Is not higher than 31 °C, the maximum relative humidity is 80%, and the maximum relative humidity decreases linearly with the increase of temperature. 5. The voltage fluctuation of the main power supply shall not exceed +10% of the rated voltage. 6. In line with the equipment installation level {over voltage level) transient over voltage.
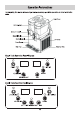
For simplicity, this manual takes a single tank as an example, and the operation of other tanks is the same. Rebound Handle Material Outlet Control pane! Front Pane! Drip Tray Single Tank Operation Panel Diagram ~ | fe All Vents ere. Machine Foot Tank Cover Mine O O LIGHTNING COLD DRINK ® SLUSH SET/SUBTRACT ADD \.
Triple Tanks Operation Panel Diagram LEFT MIXING ~~ SET MADDING ADD COLD DRINK 0 RIGHT MIXING SUBTRACT SLUSH IntroductionofFunctionandSetParameters Single Tank 1. Press*Mixing™ key, turn on the mixing function, and the mixing light is on. Press “Mixing” key again to tum off the mixing function.
4, Press the “Slush” key (the mixing function must be turned on, otherwise the Slush key will not work) to open the slush function, and the slush light is on (the compressor is powered on) or the slush light flashes (compressor is powered off}, then press the “Slush” key again to close the slush function. 5. Press the “Lighting” key to turn on the light, and then press the “Lighting” key again to tum off the light. 6.Press “Set” key, to enter the user parameter setting state.
Due to the improvement and ionization of the product, we apologize that the product you have obtained may not be completely consistent with the diagram of this manual, 1. Raw material preparation In a suitable container, dilute the concentrate with water and stir according to the manufacturer's instructions. The minimum sugar content should not be less than 13% as low concentration may damage the machine. 2. Open the lid Follow the Instructions below to remove the lid. A Raise the back of the lid. B.
4. Close the lid Warning: only when the machine is turned off or not plugged in can the raw material be poured into the tank, Close the lid after the raw material is poured. 5. Start the machine First, plug the machine into the socket, and turn on the power on the operation panel. Then, turn on the light, Stirring 1, and Stirring 2 in tum, and finally turn on the compressor and the machine begins to work automatically. After the inner material of the tank is formed, the cooling of the tank will be stopped.
pimple cleaning of material cylinder A. Release all the materials in the tank. B. Turn off the power. C. Prepare hot water no more than 50 °C, then open the lid of the tank and pour the hot water into the tank. D. Turn on the power supply, then press the corresponding stirring switch and let the stirrer stir for 0.5-1 minute. E. Let out all the hot water in the tank, and then repeat the operation for more than 2-4 times, F. Turn off the stirring switch and the power supply.
Note: The tank must be cleaned at least once a day, In any case, it must be In line with the health standards implemented in the country, and the frequency of cleaning may need to be increased according to the actual situation. For more Information, please consult the product supplier. If the machine is not in continuous use throughout the day, wipe the material outlet area with a clean soft dishcloth (box area below).
Clean the removed outlet parts in clean water. Note: if there is a large amount of raw material or liquid residue in the tank, do not disassemble the material outlet parts, or the tank parts. 3. Remove the tank parts Disassembling the tank Is the most basic operation te ensure the thorough cleaning. Please follow the following steps to remove the tank. A. Remove the tank cover. B.
4. Disconnect the drip tray First, pull the residual pipe out of the drip tray, and then Sift the water box up vertically to remove the drip tray. When disassembling the drip tray, do not drag the residual pipe at will, so as not to damage the residual pipe. The drip tray should be emptied and cleaned every day. 5. Cleaning accessories. All removed parts should be thoroughly cleaned. Note: the cleaning method must conform te the current health standards of the country where the machine is used.
8. Clean the main body 1.Wipe the body with a clean soft cloth dampened with the diluted cleaning agent. 2 Wipe the body clean with a soft wet rag stained with clean water. 3.Dry the body with a clean dry rag. All parts that have been cleaned and sterilized must be reinstalled correctly. Some parts must be guaranteed to moisturize so that they can be used for a longer time.
+ Assembly of tanks Lift the front end of the evaporator slightly, and then put the tank Into the evaporator. Put the rear end of the bucket into the rear sealing ring of the evaporator, and then continue to push the tank forward until the front end of the material barre! Is locked into the limit of the tank seat. « Assembly of material outlet parts A. Put the valve stem under the outlet of the tank. B. Put the discharge spring down from the top of the tank outlet and place it on the valve stem, C.
Working for a period of time, the condenser will stick to dust to affect the heat dissipation, and the cooling effect will become worse (such as: the output of the Slush Machine decreases or it is difficult to take shape at the same time). Please clean once a month (If the environment is poor, please clean once 2 month), be sure to ask a professional cleaner to clean, turn off the power before cleaning, and be careful not to damage the fins of the condenser.
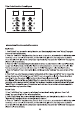
Wiring diagram of double tanks slush machine ™ M2 M1 PC2 7 bod = — 0 PCT-Main PC Board, PCT-Dispaly Panel, SW-Switch, CO-Compressor, FA-Fan, Tr Transformer Motor, Lighting, Sensor, Valve Wiring diagram of triple tanks slush machine TR ® &® PC2 8 O70 Pct PCT-Main PC Board, PCT-Dispaly Panel, SW-Switch, CO-Compressor, FA-Fan, Tr Transformer Motor, Lighting, R1/R2/R3Temperature Sensor, Valve, 20
Faults Cause Analysis Solutions : Insert the power plug into a The machine cannot | No power input suitable outlet Pe e turned on Machine power switch is nat Tum the power switch on The material outlet is Parts located at material outlet are Lubricate the outlet parts leaking not lubricated Damaged valve stem seal Replace the stem seal Tank not installed in place Check the tank installation position in tear fs back | Tank seals are not lubricated Apply lubricant of theta The power witch on the right side Re
The tank is not clean Re-clean The sherbet h A bla ain s as Dirty stirrer seal Re-clean Damaged stirrer seal Replace with new seal If the machine allure is not caused by the above reasons or the above suggestions can not solve the problem, please contact the seller.