Multifunctional Digital Heat Press Machine User Guide -1-
CATALOGUE Heat Press Machine Parts Introduction 3 Parts List 4 Assembly & Use Steps 5 Intelligent temperature controller operation method 6 Ⅰ. Preparation before Using 6 Ⅱ. Set temperature required 6 Replace Baking Tray Mat 8 Replace Baking Cap Mat 10 Replace Baking Coaster 13 Ⅲ.Printing methods 14 Ⅳ.
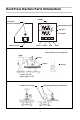
Heat Press Machine Parts Introduction display overload protector design temperature light TEMP TEMP SET TIME TIME minus mode power switch plus set light time light start best pressure for heat press 3/16” spring object spring T-shirt: 3/8-1/2” other object: 3/16” rotation lock screw swiveling pressure adjustment -3-
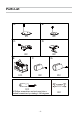
Parts List A. B. 1PC 1PC C. D. 1PC E. 1PC F. 1PC G.
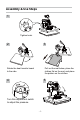
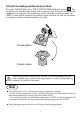
Assembly & Use Steps 1 Tighten knob. 2 3 Rotate the heat transfer board to the side. Pull out the mat below, place the clothes flat on the mat, and place the pattern on the clothes. 4 5 Turn this adjustment switch to adjust the pressure.
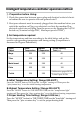
Intelligent temperature controller operation method Ⅰ. Preparation before Using: 1. Check the connection between power plug and electrical socket of electrical cabinet.Be sure to operate with safe ground wire!!! 2. Heat press element must be securely plugged into the machine before you switch the machine on.Plug your electrical cord into the machine.Plug electrical socket into wall plug.Turn the power on by flipping the On/Off Switch on.( Nominal voltage:220V, Max.input power:1250W ) Ⅱ.
D.Finish the Setting and Stands by to Work Press the “MODE”button for THE FOURTH TIME;finish the setting , The set light is on, and the temperature will continue to rise. When the set maximum temperature is reached, the countdown starts. After the countdown ends, the "BEEF" sound will be emitted, the indicator light will turn off, and the operation is complete.and the machine stands by to work. Printed pattern Printed clothes Turn off the power and pull out the mat.
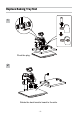
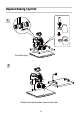
Replace Baking Tray Mat 1 Pluck the plug. 2 Rotate the heat transfer board to the side.
Replace Baking Tray Mat 3 A. B. Select the appropriate size baking pan mat ( Part A or B ). 4 Plug in. Patterned plate.
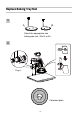
Replace Baking Cap Mat 1 Pluck the plug. 2 Rotate the heat transfer board to the side.
Replace Baking Cap Mat 3 Loosen the bottom screw and remove. Move the cushion aside. 4 5 C. D. Slide the baking mat ( Part D ) in.
Replace Baking Cap Mat 6 Use the screwdriver 4 to tighten the 2 screws just removed and put the cap on.
Replace Baking Coaster 1 F. or G. E. Select the appropriate size baking coaster ( Part F or G ). Put the cup in Part E. 2 Plug in. Adjust the tightness.
Ⅲ.Printing methods 1. Adjust pressure to your requirement (Neither too tight nor too loose), Plug in the power cord and turn the power switch ON. 2. The temperature starts to rise.Set the Initial temperature,Highest Temperature an press time. 3. Once the temperature rise to the Initial temperature,the buzzer will send out a shot “BEEF” sound. 4. Press the button once.Then Place the object (i.e. T shirt) on press bed.Pull down the handle to press the object. 5.
CAUTION CHECK the correct voltage before using the machine.Be SURE to operate with reliable grounded protection connections. TURN OFF the machine,and then DISCONNECT the power-supply before replacing the heat units.DO NOT forget to wearing insulated gloves if the unit is still under high-temperature. AVOID prolonged burning of the heating parts.If not turning the power off,please place a hot stamping replacement ( it could be a scrap and can be used repeatedly ).