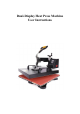
Dual-Display Heat Press Machine User Instructions
Warning 1. Please make sure that there is always someone around the machine while it is working to avoid any danger. 2. Do not touch the heating plate when the machine is working to prevent from getting burnt. Touching the machine when it is overheated may hurt you. Please use the handle on it. 3. Do not let children and the disabled use this machine. Youngsters and the elders can only use it when an adult is around. 4.
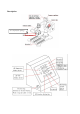
Content Features.............................................................................................................................. 错误!未定义书签。 All Parts...............................................................................................................................错误!未定义书签。 Specifications..................................................................................................................... 错误!未定义书签。 Description............................................................
Dear Customer, We appreciate you choosing our multi-functional heat press machine. Our patented heat press machine with slide rails is one of the most outstanding ones in the world. Controlled by microprocessor and designed with a touch control panel, our heat press machine features high accuracy and easy operation. Slide rails make component replacement simpler. Advanced design and technologies offer convenience for upgrade and after-sales service. Features 1. 2. 3. 4. 5. 6. 7. 8.
A : Heat Press Machine B : Mug Press Machine C : Mug Press(12*23.5cm)( 11oz ) D : Hat/Cap press:5.5"x 3" (14*8cm) E : Plate Press #1 5"(12.5cm) in diameter (max) F : Plate Press #2 6" (15.5cm) in diameter (max) G : Mug Press 12*19cm H : Mug Press 12OZ I : Mug Press 17OZ Specifications Heating Plate Size 29*38CM /1000W 38*38CM/1000W 20*30CM /600W Package Size 46.5*50*42.5CM 55*48.5*42.5CM 51*47.5*44.
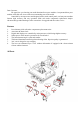
Description Six compression springs
Operation Instruction Controller OUT: Heating WORK: Countdown SET: Function setting ▲: Increase ▼: Decrease & (count down manually) Upper display screen: temperature Lower display screen: countdown Setting Temperature setting: Press the “SET” button, and you will see “SP” on the upper screen and the temperature value on the lower screen. Press ▲ or ▼ to increase or decrease the temperature. Time setting Double press the “SET” button, and you will see “S” on the upper screen and time on the lower screen.
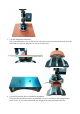
Assembly Process Thank you for purchasing our product. It is a multi-purpose heat press machine which can be applied on T-shirts, caps, china or mugs. However, it does require different attachments to be compatible with different tasks. 1. T-shirt Attachment Installation The machine is set to T-shirt mode by default. The default temperature is 356°F, and the timer is set to 30 seconds. 2.
3. Cap/ Hat Installation Attachment The whole attachment is easy to slide in/out. After taking out the previous attachment, insert the attachment for caps/hats and slide it in. Secure it with screws. 4. Cups and Cylindrical Objects Installation Attachment This particular attachment requires no installation. It can be used directly after plugged into a power source. If you want to replace the cup, untighten the clamp and replace the cup.
Tips for adjusting the clamp: Turn the knob counterclockwise to loosen the clamp. Turn the knob clockwise to tighten the clamp. Step 1: Wrap the transfer paper tightly around the cup/mug. It is advisable to use heat-resistant tape. Step 2: Put the cup/mug and the transfer paper into the heat press machine.
Step 3: Set the appropriate temperature. Please remember to wear heat resistant gloves! Reminder: To print and make DIY products, it is also necessary to prepare the following equipment and materials. 1. Inkjet printer/ six color printer (For example: Epson R-230 / R270 / R290 / T50) 2.
Different models of inkjet printer will need different CISS. 3. Sublimation ink / Heat transfer ink; 4. Heat resistant tape; 5. Sublimation paper / Heat transfer paper (for ceramic and fabric) 6. Paper cutter 7. For mug/cup and plate press: normal mug and plate cannot be used for press. Only sublimation mug and plate can be used.
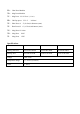
Temperature and Time Setting for Common Products No Product Name . Recommende d Temperature 180-200°C 330-380°F Recommende Notes d Time 1 Cup/Mug 30s 2 Plate 180-200°C 330-380°F 30s 3 Cap/Hat 180-190°C 330-350°F 40s 4 Cotton Clothing 160-180°C 320-360°F 30s 5 Linen Fabric 160-180°C 320-360°F 30s 1. Use heat transfer paper. Print the image in reverse format (mirror image). 2. Apply medium pressure. Make sure the cup/mug is tightly wrapped by the transfer paper. Adjust the position. 1.
6 Chemical Fiber Fabric 150-160°C 300-320°F 20s 7 Pillows and White Non-cotton Clothing 190°C 340°F 50s image). 2.Make sure parts that are not heat-resistant (such as plastic buttons) do not touch the heating board. 3.Print with high pressure. 1. Use heat transfer paper. Print the image in reverse format (mirror image). 2. Make sure parts that are not heat-resistant (such as plastic buttons) do not touch the heating board. 3. Print with medium pressure. 1. Use heat transfer paper.
Contact us Thanks for your purchase. If you have any questions, please don't hesitate to contact us. We'll try our best to resolve your issues ASAP. Should you have any concern, please contact us by emailing to help@cs-supportpro.com.