
Instructions / Assembly
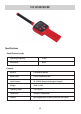


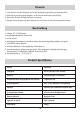

Power on/o (keep pressing to power on; keep pressing to power o)
Near/Far Switch–Controls overall sensitivity. The“Far”position is recommended when staing to locate
the sonde. As you app -roach the transmitter and the meter goes to full scale and you can’t reduce the
sensitivity any fuher, switch to“Near”to pinpoint its precise location.
Meter indicator–Indicates the strength of the peak signal (to the right) and the null signal (to the left).
Speaker–Allows you to hear the transmitter’s signal beeping or continuous sound,depending on the
transmitter use case. Batte indicator–Shows the status of the batte’s health.
Instructions: Adjust the locator Near/ Far Switch and Signal+/- according to the actual environment,
then the locator can match transmitter better.
It is recommended to set into Far mode (Signal set to 9) at the beginning, and reduce the signal
sensitivity grade when the LED screen shows ve strong signal (you can hear the louder sound at the
same time), then you can narrow the detection range.
GENERAL LAYOUT
Your 512 receiver suppos the detection of any standard 512Hz sonde or camera in the market.
This type of sonde or camera is usually attached to devices that are sent through non-metallic sewer
lines or water pipes.The emitted magnetic eld easily passes through the walls of such pipes.
Since the signal being traced by the receiver is produced by the sonde or camera,there are some
dierences in the way the receiver is used when compared with normal cable or pipe tracing.
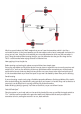
Let’s practice using the 512.
Sta by turning on the receiver and walking around and holding the receiver at waist height and walk
towards general direction of the transmitter while slowly sweeping the receiver back and for the while
pointing in the direction of the transmitter. You will notice that the signal will get louder. Turn the
sensitivity down as needed to keep it in range as you get closer. When you’re unable to keep the meter
below full scale ip the switch to“Near”.
Keep moving in the direction that makes the signal stronger. When you have reached the point that the
signal seems to be the strongest and any direction you move makes it weaker, then you know you
found the sonde which is directly below the center of the antenna rod.
Move to another place and seek this peak signal again and see if you always come back to the same
spot for conrmation.You should nd yourself right over the transmitter each time if you have followed
each step correctly. Keep practicing until you get consistent results.
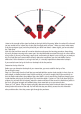
I keep nding “dead” spots!
That’s good news! If you haven’t noticed any“dead spots”, let’s go look for some. These dead spots are
known as“nulls”, and they are the key to accuracy. As we nd nulls, notice that they happen at ve
sharp and precise places, unlike“peak signals” which are much more generalized. Let’s look at a clear
demonstration of a“peak” and a“null”. Be sure to do all these tests with the receiver held at waist level.
Hold the receiver directly above the transmitter, parallel to the long axis of the transmitter.
The speaker is loud. This is a peak signal.
GETTING TO KNOW YOUR TOOLS
11