Technical Support and E-Warranty Certificate www.vevor.com/support ELECTRIC CHAIN HOIST Original instruction BDH1000B We continue to be committed to provide you tools with competitive price. "Save Half", "Half Price" or any other similar expressions used by us only represents an estimate of savings you might benefit from buying certain tools with us compared to the major top brands and doses not necessarily mean to cover all categories of tools offered by us.
ELECTRIC CHAIN HOIST BDH1000B NEED HELP? CONTACT US! Have product questions? Need technical support? Please feel free to contact us: CustomerService@vevor.com This is the original instruction, please read all manual instructions carefully before operating. VEVOR reserves a clear interpretation of our user manual. The appearance of the product shall be subject to the product you received. Please forgive us that we won't inform you again if there are any technology or software updates on our product.
The symbols used in this manual are intended to alert you of the possible risks. Please fully read the safety signs and instructions below. The warning themselves do not prevent the risks and can not be a substitute for proper methods of avoiding accidents. This symbol, placed before a safety comment, indicates a kind of precaution, waning, or danger. Ignoring this warning may lead to an accident. To reduce the risk of injury, fire, or electrocution, please always follow the recommendations shown below.
The users must read and understood the instruction manual completely and clearly before operating the hoist. Product Specifications Model BDH1000B Model BDH1000B Voltage 120V,60Hz Input Power 1400 W Chain Diameter 0.28 Inch Rating Lifting 2200 lbs Capacity Lifting Speed 10 Ft/min Lifting Height 10 Ft Speed Ratio 222:1 Insulating Grade B Protecting Grade IP40 Safety Instruction Keep work area clean. Cluttered areas can cause injuries. Consider work area environment.
protective hair covering to contain long hair. Do not abuse cord. Never carry electric tool by cording or yanking it to disconnect it from wall outlet. Keep cord from heat, oil and sharp edges. Secure work. Maintain firm footing or be otherwise secured when operating the hoist ,use tools to hold the workplace for safety, and free both handle to operate electric tool . Do not overreach. Keep proper footing and balance at all times Maintain tools with care.
The user shall always work in compliance with the operating instructions. The use of any other accessory or attachment other than recommended in the instruction manual present a risk of personal injury.Have your tool repaired by an expert.This electric appliance is built in accordance with the relevant safety rules. The repair of electric appliance must only be carried out by experts, otherwise it may cause considerable danger for the user. Additional Safety Rules 1.
21.Make sure hook travel is in the same direction as shown on the controls. 22.Inspect the hoist regularly, replace damaged or worn parts, and keep appropriate records of maintenance. 23.Do not use limit switches as routine operating stops. They are emergency devices only. 24.Do not allow your attention to be diverted from operating the hoist. 25.Do not allow your attention to subjected to sharp contact with other hoist, structures, or objects through misuse. 26.
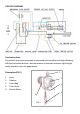
CIRCUIT DIAGRAM Use Instructions The electric chain hoist promises an improved work condition and high efficiency, with the limit switch devices, and the features of compact structure, light weight, easily operation and nice appearance. 1 Description(FIG 1) 1. Hook 2. Gearbox 3. Chain Bag 4. Chain Hook 5.
Unpacking. After opening the carton, carefully inspect the hoist frame, cords ,hooks, CHAIN and control station for damage that may have occurred during shipment. Mounting the hoist. Hang the hoist from its intended support. The structure used to support the hoist must have sufficient strength to withstand several times the load imposed. Suspending the hoist from an inadequate may allow the hoist and to fall and cause injured and/or damage. Checking for adequate voltage at hoist.
injury, and in that conditions the work duty is reduced than normal operating conditions. 4.Hoist operation is controlled by depressing the control station push buttons. Depressing the “up” push button will move the load hook toward the hoist; depressing the “down” push button will move the load hook away from the hoist. 5.The “up” and “down” buttons are momentary type and the hoist will operate in the selected direction as the long as the button is held in the depressed position.
Periodic inspections are to be performed semi-annually and it should include the following: 1.Extemal evidence of loose screws. 2.Extemal evidence of worn , corroded, cracked or distorted hook fixing block, gears, bearings, chain stop ball and hook retainer. 3.Extemal evidence of damage or excessive wear of the lift-wheel. Widening and deepening of pockets may cause chain to lift-up in the pockets and cause binding between lift-wheel and chain guide or between lower sheave and hook block.
examine the interlink area for the point of maximum wear. Measure and record the stock diameter at this point of the link. Then measure stock diameter in the same area on a link that does not pass over the lift wheel (use the link adjacent to the loose end link for this purpose). Compare these two measurements. If the stock diameter of FIG 2.2 the worn link is 0.254 mm(or more). Less than the stock diameter of the unworn link, the chain must be replaced. The chain length is 3 meters and it has 143 Knots.
2. Remove the hook lock(FIG 4). Depress “up” button and run chain out of the hoist. 3. Jog the “down” push button while pulling on the new chain until the old chain comes out of the hoist. 4. Attach the hook block to the new chain. 5. Remove the chain stop ball from the old chain(FIG 5) and attach it to the new chain by reusing the chain pin.
13
14
Technical Support and E-Warranty Certificate www.vevor.