Support and E-Warranty Certificate https://www.vevor.com/support CHICKEN COOP USER MANUAL We continue to be committed to offering tools at competitive prices. "Save Half", "Half Price", or any other similar expressions used by us only represent an estimate of savings you might benefit from buying certain tools with us compared to the major top brands and do not necessarily mean to cover all categories of tools offered by us.
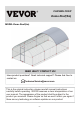
CHICKEN COOP Dome Roof(6m) MODEL:Dome Roof(6m) NEED HELP? CONTACT US! Have product questions? Need technical support? Please feel free to contact us: CustomerService@vevor.com This is the original instruction, please read all manual instructions carefully before operating. VEVOR reserves a clear interpretation of our user manual. The appearance of the product shall be subject to the product you received.
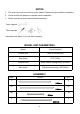
NOTES 1. The work may have burrs that injure the hands. Please wear gloves before installation. 2. Check whether the parts are complete before installation. 3. Please read this manual carefully before assembly. -Tools supplied: -Tools required: + or -Assembly time: About 1-2 hours (with 2 people) MODEL AND PARAMETERS Model Dome Roof(6m) Product Size L600*W300*H200cm Door frame 67.5*170cm Protective net Steel (Plastic impregnation), Φ0.9mm Main frame Galvanized steel pipe, Φ25*0.
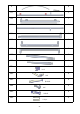
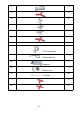
8 1730mm D1 1 D2 1 D3 1 D4 1 D5 2 D6 2 D7 2 D8 4 DP1 2 Lock DP2 2 M8 DP3 4 Ø10x80 DP4 4 M6 DP5 4 M8x40 DP6 4 U clips -3-
C 15 D 4 E 4 F 4 G 2 H 4 J Mesh(wide 1m) K 2 1 PVC lashing rope L 1bag Plastic cable tie M 1 Tarpaulin N 14 Rubber cord O Tent pegs 10 T 2 X 2 -4-
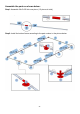
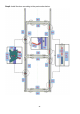
Assemble the parts as shown below: Step1: Assemble 2A+C+2B into one piece. (15 pieces in total) Step2: Install the bottom frame according to the part number in the picture below.
Step3: Install the column according to the part number below. Step4: Install the beam according to the part number in the picture below.
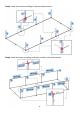
Step5: Install the top surface according to the part number in the figure below.
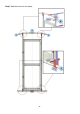
Step6: Install the door according to the part number below.
Step7: Attach the door to the frame.
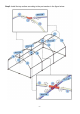
Step8: Installation of top mesh.The laying mesh can be pre-cut to 6.2x1m. (a)The two pieces of mesh are joined using PVC lashing rope piercings. L=6.2m (b)Cut off the excess length of mesh if necessary. (c)Secure the mesh to the frame Extra mesh can be buried in the soil. with cable ties. Cut off the excess length of cable ties.
Step9: Install front and rear mesh (The two mesh are interlaced with PVC lashing rope) and secure to the frame with excess length cut. Note: Cut out the mesh at the door frame and secure it to the door frame.
Step10: Lay the tarp over the top and secure it with rubber cords. Secure the chicken coop to the floor with tent pegs.
Manufacturer: HEBEI HABIT METAL PRODUCTS CO.
Support and E-Warranty Certificate https://www.vevor.