
Product Manual

4
OPERATION INSTRUCTIONS - WTJ, WTJ-E, VAN-J
Powered winches are not equipped with independent overload protection. Therefore, the operator should closely
monitor the winch while it operates. If the cable tension increases suddenly--indicating a bind--stop the winch
immediately and then return the load to the ground. Restore the winch to normal operating condition before using it
again.
WARNING! Whenever the jib is used, the vehicle must be parked on even, level ground and be unable to
move or tip. If the jib is mounted on a trailer, always chock the wheels before using it.
VAN-J MODELS (manual winches):
When standing on the handle side of the winch, rotate the handle counterclockwise to raise the hook. Rotate the
handle clockwise to lower the hook.
VAN-J models with powered winches (AC or DC):
Battery-powered and AC-powered VAN-J's utilize a constant-pressure (dead-man style) pushbutton controller.
Connect the power cord to the appropriate power supply.
NOTE: AC-powered units must be connected to a 115V supply circuit that is effectively grounded and that provides
GFCI protection.
To raise the hook, press the “UP” button which turns on the winch and retract the cable. The winch will operate only
while the button is pressed. Release the button to stop the winch. The hook
will maintain position
To lower the hook, press the “DOWN” button. Again, releasing the button will stop the winch and the hook will hold its
position.
When you are finished using the VAN-J, fully retract (raise) the hook. Rotate the outer jib arm so that it folds
alongside the inner arm. Rotate the entire, folded jib
arm around so that the outer arm is against the inside wall of the
van. Tighten the threaded knob (see p. 8A & 8C) so that the boom cannot rotate.
WTJ models with powered winches (AC or DC):
[NOTE: The auxiliary handle provided with the AC winch is provided for emergency use only. Always remove this
handle when it is not in use. Do not operate the winch or allow the winch to spin freely with the handle attached.]
• The DC-powered WTJ is furnished with a constant-pressure (dead-man style) pushbutton control.
• The AC-powered WTJ has a toggle switch located on the winch body.
Connect the power cord to the appropriate power supply. AC-powered units must be connected to a 115V supply
circuit that is effectively grounded and that provides GFCI protection.
Pressing the “UP” button turns on the winch and retracts the cable causing the hook to rise. The winch will operate
only while the button is pressed. Upon releasing the pushbutton, the winch will stop and hold its position.
To lower the hook, press the “DOWN” button. Releasing the button will stop the winch and the hook will maintain
its position.
NOTE: Unplug the winch cords and store them in the vehicle whenever the jib is not in use.
1) Press the “DOWN” button to lower the hookuntil it is a few feet below the end of the boom.
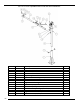
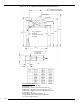
2) Raise the boom to the desired angle (refer to "Boom angle adjustment diagram" on p. 5):
a.
(WTJ-E) remove the hitch pin from the end of the angle adjustment pin; then remove the angle adjustment pin.
Raise the outer boom above
the desired position (A-D), align the hole in the end of the lock bar with the
appropriate set of pin holes in the bracket on top of the boom, and then reinsert the angle adjustment pin.
Secure the adjustment pin with the hitch pin.
b.
(WTJ-20) remove the hitch pin from the end of the angle adjustment pin; then remove the angle adjustment pin
from the boom receiver bracket. Raise the boom above the d esired position and insert the angle adjustment pin
through the holes in the receiver bracket. Lower the boom until the holes in the winch support brackets align
with the appropriate holes in the receiver bracket. Reinstall the adjustment pin and secure it in place with the
hitch pin.
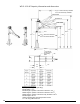
VAN-J (all models):
BOOM ANGLE:
The boom angle can be fixed at any of four positions to change the maximum lifting height. To adjust the boom angle: