
Product Manual

2
INSTALLATION INSTRUCTIONS - WTJ, VAN-J
Review this entire page before installing the jib.
Consult the factory in the event there are any questions or problems at the time of installation, or for information
regarding optional features not covered by the owner’s manual.
Securely mount the jib on a solid surface before use! Before mounting a jib in a vehicle, consult the vehicle
manufacturer for a specific mounting location and mounting hardware recommendations.If installed in a vehicle,
backing or stiffener plates might be necessary to provide sufficient support for the jib.
•
•
Confirm that the vehicle surface where you intent to mount the jib will be mounted is adequate (i.e. strong and
stable). The mounting location must be able to handle not only static loads (lifted by the jib), but also dynamic forces
that occur as the vehicle moves. Always put the jib in the stowed position before moving the vehicle.
•
DO NOT modify the jib in any way. Unauthorized modifications automatically void the limited warranty and might
make the jib unsafe to use. Adding ancillary equipment to the jib might require that its capacity be reduced. Contact
the factory to determine how optional equipment affects capacity.
Installation should be performed by suitably trained personnel. The electrical aspects of the installation should be
performed by an electrician.
To install a standard jib crane (WTJ models or the VAN-J), the following tolls and equipment are required:
1.
Equipment to move the jib, e.g. a forklift.
2.
A smooth, level, adequately strong surface on which to mount the jib.
3.
A power drill, drill bits, and mounting hardware. Consult the vehicle manufacturer to determine the best size and
type of hardware to use to anchor the jib to the vehicle.
4.
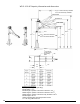
If the VAN-J is to be installed inside a covered vehicle, verify that there is enough clearance inside the vehicle to
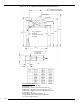
mount the unit and that the jib will be able to rotate appropriately. (See p. 8A-8D).
5.
For units with an AC-powered winch, use of a ground-fault circuit interrupter device in the supply circuit to protect
personnel from electrical shock is strongly recommended. AC winches must only be used with effectively grounded
supply circuits.
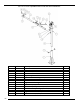
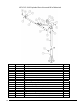
To install a standard lifting jib (WTJ, WTJ-E and VAN-J): [2 people should work together to perform this installation]
1.
The jib should remain completely assembled for installation. However, if the outer mast is removed during
installation of a WTJ model jib, be sure that the bearing disk is still present inside it before installing the inner mast.
2.
Move the jib to the desired position on/inside the vehicle. Use care to avoid causing damage to the jib, espceially
the winch and hydraulic components (when supplied). Select a location where the boom will be able to rotate
freely.
3.
Use the mounting plate as a template to mark the vehicle surface with the positions of all 4 bolt holes.
4.
Move the jib out of the way and drill appropriately-sized holes where the vehicle was marked in step 3.
5.
Align the mounting plate with the holes drilled into the vehicle. One person should stabilize the boom while the
other person fastens the mounting plate to the vehicle using the hardware and any backing or stiffener plates
recommended by the vehicle manufacturer.
6.
Raise the end of the jib and secure it at the desired angle.
7.
Confirm that the boom rotates freely and without obstruction throughout the desired range of motion.
8. Connect the power supply (if applicable) to the winch’s power supply cord. On DC-powered units, the included
power supply cord and pendant control cable must be plugged into the winch.
9.
Cycle the winch down and up to confirm that it operates properly; then verify that the winch cable smoothly spools
on and off of the reel.
10.
Tes
t the
jib
by using it to list a load that weighs 125%
of the rated capacity prior to its initial use. Afterwards, visually
inspect the jib and the vehicle for evidence of deformation, cracking, fatigue, or other damage. If any of these
conditions are present, correct the installation and test the unit again before clearing it for use.