R DXP, DXP Plus, and FX Series Digital Communications System LCD Speakerphone Station User’s Guide 1 ABC 2 DEF GHI 4 JKL 5 MNO 6 PRS 7 TUV 8 WXY 9 OPER 0 3 # SPKR T/C MUTE HOLD TAP ITCM unisyn05.
This user’s guide applies to the following system and telephone models: System Model: DXP software revision 9C and later. DXP Plus software revision 11A and later. FX Series software revision 12A and later. Telephone Model: Impression 2022S Rev. A and later DigiTech 7700S-** Rev. I and later If you need more information, consult your LCD Speakerphone Reference Manual. Contact your Comdial dealer for updates of this as well as other Comdial publications as your needs require.
GCA70–198 Contents Contents Section . . . . . . . . . . . . . . . . . . . . . . . . . . . . . . . . . . . . . . . . Page # 1 Introduction . . . . . . . . . . . . . . . . . . . . . . . . . . . . . . . . . 1–1 1.1 Understanding What The Lights Mean . . . . . . . . . . . . . 1–1 1.2 Using The LCD Abbreviations. . . . . . . . . . . . . . . . . . . . 1–2 1.3 Using The Speakerphone . . . . . . . . . . . . . . . . . . . . . . . . 1–8 2 Answering Calls . . . . . . . . . . . . . . . . . . . . . . . . . .
Contents GCA70–198 5 Sending And Receiving Non-Verbal Messages . . . . . 5–1 5.1 Using The Messaging Feature . . . . . . . . . . . . . . . . . . . . 5–1 5.2 Using LCD Messaging . . . . . . . . . . . . . . . . . . . . . . . . . . 5–2 5.3 Sending An LCD Message . . . . . . . . . . . . . . . . . . . . . . . 5–3 6 Transferring Calls . . . . . . . . . . . . . . . . . . . . . . . . . . . . 6–1 6.1 Transferring Outside Calls . . . . . . . . . . . . . . . . . . . . . . . 6–1 7 Conferencing Calls . .
GCA70–198 9.9 Contents Overriding A Call Or A Do Not Disturb Condition At Another Telephone (Executive Override). . . . . . . . . . . . . . . . . . . 9–5 9.10 Setting The Volume Control . . . . . . . . . . . . . . . . . . . . . . 9–6 9.11 Setting Your Personal Ringing Tones . . . . . . . . . . . . . . . 9–8 9.12 Using Background Music. . . . . . . . . . . . . . . . . . . . . . . . 9–8 10 Operating Your Telephone With A DSS/BLF Console . . . . . . . . . . . . . . . . . . . . . 10–1 10.
This page remains blank intentionally.
GCA70–198 1 Introducing The Telephone Introducing The Telephone Congratulations and thank you for using a Comdial telephone! This manual serves as a helpful guide for using your new telephone’s many functions. If you should need more information about a particular function or a function that is not listed in this guide, consult the Impression / DigiTech LCD Speakerphone Reference Manual (your system attendant should have several copies). 1.
Introducing The Telephone GCA70–198 — Next to an INTERCOM button: Steady green with a quick flash = you are using your intercom. Winking red = an LCD message is set on your telephone for others to receive when calling. Flashing orange = another station is calling you. — Next to a fixed feature or programmable feature button: Steady red = the feature is on. Steady off = the feature is off. — Above the HOLD button: Fluttering red = message awaits pickup. Winking green = a line is on hold at your station.
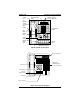
GCA70–198 Introducing The Telephone Auxiliary Jack Interactive Buttons (NOT programmable) LCD Alphanumeric Display TAP Button Transfer/ Conference Button DIGITECH COMDIAL Speaker Programmable Buttons Mute Button TRANS CONF TAP SPKR MUTE Speaker Button Volume Control Message Waiting Light HOLD Intercom Button ITCM AW400 Hold Button Microphone Opening DigiTech LCD Speakerphone unisyn12.
Introducing The Telephone 1.2 GCA70–198 Using The LCD Abbreviations The following chart identifies the abbreviations on your LCD screen and provides a brief definition of each feature. For more detailed information see the Impression / DigiTech LCD Speakerphone Reference Manual, GCA70–226. Abbreviation Feature Definition ACCT Account Stores a button that enables account code entry. ALERT Set Reminder Sets two reminder alerts that will sound at your station at specified times.
GCA70–198 Introducing The Telephone Abbreviation Feature Definition CFWD Call Forward Forwards all of your calls to a different station location. When chosen as a feature, stores a button that enables the function. CAMP Camp On Has system call you when busy station becomes idle. When chosen as a feature, stores a button that enables the function. CLEAR Clear Features Stores a button that clears a currently active or engaged feature. CLR Clear Cancels a call forward condition.
Introducing The Telephone Abbreviation Feature GCA70–198 Definition LIGHT Light (contrast) Makes the LCD screen lighter. MSG Message Turns on the message-waiting light at another station. MUSIC Background Music Turns on the background music at your station. When chosen as a feature, stores a button that enables the function. NEXT Next Display Shows the next display. NoANS No Forward calls that ring at your station Answer/Forward but receive no answer.
GCA70–198 Introducing The Telephone Abbreviation Feature Definition SAVE Save Number Permanently saves last number you dialed. When chosen as a feature, stores a button that provides the function. SDIAL Speed Dial Programs a number for one-button calling. SEND Send Transfer Re-transfers a previously transferred call that returned to your station. SET Set Feature Enables call forwarding. SOHVA Secure OffHook Voice Announce Sends a subdued off-hook voice announcement to another station.
Introducing The Telephone 1.3 GCA70–198 Using The Speakerphone When using your speakerphone, the microphone and loudspeaker are farther away from you than when you use a handset. Both the signal from the loudspeaker and the signal to the microphone must be strengthened.
GCA70–198 Introducing The Telephone • Raising the volume of the loudspeaker makes it easier for the sound-activated switches in your telephone to select the distant party’s voice. Lowering the volume of the loudspeaker makes it easier for the switches to select your voice. • Since the system takes several seconds to provide the best switching, constant sound patterns—such as elongating your words and playing externally-supplied music—may prevent the sound-activated switches from operating properly.
This page remains blank intentionally.
GCA70–198 2 2.1 Answering Calls Answering Calls Answering Calls • To answer a call that is ringing at your telephone, 1. If the light is flashing orange, lift handset, —OR— if the light is flashing red, press the line button next to it and lift handset. • To answer a call using the speakerphone, 1. Press flashing line or INTERCOM button. • To answer a call that is ringing at any telephone, 1. Lift handset. 2. Press INTERCOM and dial ✳ 4 plus extension number of ringing telephone.
Answering Calls GCA70–198 • To answer a call that is ringing the loud ringer or night transfer station, 1. Hear ringing. 2. Lift handset. 3. Press INTERCOM. 4. Dial 65 through 68 to select ringing zone (1–4) at the location of the bell, or dial 69 to answer any ringing zone. NOTE: This feature is known as Trunk Access From Any Station (TAFAS). 2.2 Answering A Subdued OffHook Voice Announcement (SOHVA) The installer may arrange your telephone to receive a subdued off-hook voice announcement (SOHVA).
GCA70–198 2.3 Answering Calls Forwarding Calls • To forward calls made to your station, 1. Press OPTIONS. 2. Press NEXT until the CFWD option appears. 3. Press CFWD. 4. Press SET. 5.
Answering Calls • To cancel call forwarding, 1. Press OPTIONS. 2. Press NEXT until the CFWD option appears. 3. Press CFWD. 4. Press CLR to disable call forwarding. 5. Press SPEAKER to end.
GCA70–198 3 3.1 Making Calls Making Calls Making A Call • To make a call, 1. Lift handset, select line (unless your telephone selects it for you) or select INTERCOM, and listen for dial tone. 2. Either dial number, use speed dial feature, use redial feature, or press Direct Station Select (DSS) if making an intercom call. 3.2 Accessing Lines • To access outside line using the line group feature, 1.
Making Calls GCA70–198 • To cancel queuing before it rings back at your telephone, 1. Lift handset. 2. Press INTERCOM and dial # 6. 3. Hang up handset. • If you must enter an account code when making outside calls, 1. Select line. 2. Press INTERCOM and dial ✳04 (this places the call on hold), —OR— press preprogrammed ACCOUNT CODE button (this does not interrupt the call in progress). 3. Dial your account number, hear outside dial tone, and dial outside number. 4. When called party answers, lift handset.
GCA70–198 3.4 Making Calls Using Speed Dial • To dial a speed dial number from a preprogrammed DSS button, 1. Press preprogrammed button. If you have programmed the number at the second level of a DSS button, press SHIFT before pressing button. 2. When called party answers, lift handset. • To dial personal or system speed dial numbers from your keypad, 1. Dial desired code: 0–9 = personal speed dial number, ✳100–✳599 = system speed dial number, if you are already on a line, press HOLD, then dial code.
Making Calls 3.5 GCA70–198 Making A Subdued Off-Hook Voice Announcement (SOHVA) • To make a SOHVA announcement using the preprogrammed SOHVA button, 1. Make intercom call and hear busy tone. 2. Decide whether to interrupt. 3. If you decide not to interrupt the called party, hang up. 4. To interrupt, press preprogrammed SOHVA button and hear several quick tone bursts. 5.
GCA70–198 3.6 Making Calls Making A Paging Announcement • To send a paging announcement, 1. Lift handset. 2. Press INTERCOM, then dial 70–77 for zones 1–8 [in the default mode code 70 (zone 1) provides an all-call function], —OR— press a preprogrammed PAGE button. 3. Make announcement. 4. Remain on line if awaiting a reply (known as a meet-me page), —OR— hang up handset. At times other telephone users may page you with instructions to meet them on line. This is known as a meet-me page.
Making Calls 3.7 GCA70–198 Camping On At a Busy Station And Waiting For An Answer (Call Waiting) If the telephone you have called is busy, you can send a call-waiting message to the telephone and wait on the line for an answer (you must be using the handset for this feature to work.) • To activate call waiting when you hear a busy signal, 1. Dial ✳ 6 (called party hears tone). 2. Wait on line for reply. 3.
GCA70–198 3.8 Making Calls Camping On At An Idle Station And Waiting For An Automatic Callback If you call another station and hear ringing but receive no answer, you can press a button that will cause the system to ring your telephone when the user at the called station initiates any telephone activity. • To camp on at a station for which you hear ringing but receive no answer, 1. Press CALLBK button. 2. Callback will occur after the user at the called station initiates any telephone activity.
Making Calls 3.9 GCA70–198 Camping On At A Busy Station And Waiting For An Automatic Callback • To camp on at any busy station, 1. Press CAMP. 2. Your telephone immediately disconnects. When the station you called becomes available, your telephone will ring with five short tone bursts. • When you hear five short tone bursts, 1. Press INTERCOM. 2. The other telephone will start ringing. If you do not press INTERCOM within the time limit set by the installer, you cancel the callback at that time.
GCA70–198 4 4.1 Placing Calls On Hold Placing Calls On Hold Holding Calls • To place a call on hold, 1. Press HOLD. 2. Hang up handset. • To return to a call that is on hold, 1. Lift handset and press line button with flashing light, —OR— press TAP. • To place a call on exclusive hold, 1. Press HOLD twice and hang up handset. • To retrieve an exclusive hold, 1. Press line button of held call (button with flashing light), —OR— press TAP (if station does not have line appearance).
Placing Calls On Hold GCA70–198 • To retrieve a held call at another station, 1. Lift handset. 2. Press INTERCOM and dial # 90. 3. Dial extension number of station that has the held call, 4. Answer call. • To answer a call at the extension receiving held call, 1. Lift handset. 2. Press INTERCOM and dial # 90. • To cancel directed call hold and retrieve the call, 1. Lift handset. 2. Press INTERCOM, dial ✳4, then dial the extension number of the telephone to which you directed the call. 3.
GCA70–198 4.2 Placing Calls On Hold Using Call Park • To park a call, 1. When on a line, press INTERCOM. 2. Dial S, then dial park orbit access code (91–99 for orbit 1–9). If chosen orbit is busy, dial a different orbit number. 3. Hang up handset. 4. Remember the code for later use or make it known to those who need to know it in order to retrieve the call. NOTE: If no one retrieves the call within a programmable time limit, it reverts to the parking station as a standard held call.
This page remains blank intentionally.
GCA70–198 5 5.1 Sending And Receiving Non-Verbal Messages Sending And Receiving Non-Verbal Messages Using the Messaging Feature • To turn on the message-waiting light and broken dial tone at an idle telephone, 1. Press INTERCOM. 2. Dial ✳ 3. 3. Dial extension number of the station you want to alert. The message-waiting light of that station will flash. • You can also turn on the message-waiting light and broken dial tone at another station when that station is busy, 1.
Sending And Receiving Non-Verbal Messages 5.2 GCA70–198 Using LCD Messaging NOTE: You can set system-supplied messages to display at any calling LCD speakerphone. • To turn on LCD messaging, 1. Press INTERCOM. 2. Dial ✳ 02. 3. Press # to clear current message if you have one stored. 4. Dial message code number (01–30). 5. Press # and then press SPEAKER to end message. 6. INTERCOM light flashes. • To turn off LCD messaging and your INTERCOM light, 1. Press INTERCOM. 2. Dial # 02.
GCA70–198 5.3 Sending And Receiving Non-Verbal Messages Sending An LCD Message • To send an LCD message when you call and receive busy signal or no answer, 1. While still on the call, press the appropriate fixed RESPONSE MESSAGE button to send a preselected message (Call [your name], for example) to the other telephone, —OR— 1. While still on the call, press the scrolling RESPONSE MESSAGE button to scroll through the system-supplied messages. 2.
This page remains blank intentionally.
GCA70–198 6 6.1 Transferring Calls Transferring Calls Transferring Outside Calls • To announce a call before transferring it, 1. Answer outside call. 2. Press TRANSFER/CONFERENCE (this places the call on hold). 3. Dial station number, or press DSS button for that station. 4. Upon answer, announce the call. 5. Hang up the handset (this transfers the call), or if in speakerphone mode, press SPEAKER to disconnect. • To transfer a call without first announcing it, 1. Answer outside call. 2.
Transferring Calls GCA70–198 • To make a hot transfer, 1. Answer call. 2. Press TRANSFER/CONFERENCE (this automatically places the call on hold). 3. Dial extension number of telephone to receive the transfer or press the DSS button for that extension. 4. Announce call. 5. Press TRANSFER/CONFERENCE. 6. Press SPEAKER to disconnect (if in speakerphone mode) or hang up. The person receiving the transfer has the call. • To do a quick screened transfer to intercom or tie line, 1. Answer call. 2.
GCA70–198 7 7.1 Conferencing Calls Conferencing Calls Conferencing Stations Together • To set up a conference call that includes any combination of outside lines and intercom parties, 1. Make first call. 2. Press TRANSFER/CONFERENCE (this places the on hold). 3. Select next line and make next call. 4. Press TRANSFER/CONFERENCE to establish conference. 5. Repeat the last three procedures to add up to two more parties for a 5-party conference (including yourself) when using the DXP system.
Conferencing Calls GCA70–198 • To continue conversation on remaining line after other outside lines have dropped out of conference, 1. Press the line button of the remaining party. • To drop out of a conference call between you and two outside lines (creating an unsupervised conference), 1.
GCA70–198 8 8.1 Programming Your Telephone Programming Your Telephone Storing DSS Numbers • To store extension numbers at DSS buttons, 1. Press OPTIONS. 2. Press NEXT until DSS option appears, 3. Press DSS. 4. Press programmable button to choose storage location. 5. Dial extension number. 6. Press next programmable button and dial another extension number. 7. Repeat previous step until finished then press EXIT. 8. Press SPEAKER to end.
Programming Your Telephone 8.2 GCA70–198 Storing Feature Buttons • To store special-purpose feature buttons, 1. Press OPTIONS. 2. Press NEXT until FEAT option appears. 3. Press FEAT. 4. Press NEXT until the feature you want is displayed. 5. Press desired feature button. 6. Press programmable button to choose storage location. 7. Press FEAT again to program another feature or EXIT to end.
GCA70–198 Programming Your Telephone Dial message number (01-30) from list of messages provided by your system attendant or installer. 5. Press # to save programming. 6. Press SPEAKER to end. 7. Label button location. 8.4 Programming Speed Dial Numbers • To store an outside number as a speed dial number, 1. Press OPTIONS. 2. Press NEXT until SDIAL option appears. 3. Press SDIAL to choose speed dial programming. 4. Press programmable button (or 1–0 on keypad) to choose storage location.
Programming Your Telephone GCA70–198 • To store an intercom number as a speed dial number, 1. Press INTERCOM. 2. Dial ✳ ✳ 1. 3. Press the button you want to program. 4. Press INTERCOM, —OR— press 8 to preselect intercom. 5. Enter the intercom number you want to store (up to 16 digits that can include # and ✳). 6. Press SPEAKER to end. 7. Repeat procedure for each speed dial number.
GCA70–198 8.5 Programming Your Telephone Setting A Reminder Alert • To set a reminder alert at your telephone, 1. Press OPTIONS. 2. Press NEXT until the ALERT option appears. 3. Press ALERT. 4. Press 1 or 2 to select available alert designation; if you have already programmed an alert for 1, press 2 to set a second alert condition. 5. Press ON (press OFF to turn off an alert that you have already set). 6.
This page remains blank intentionally.
GCA70–198 9 9.1 Using The Other Features Using The Other Telephone Features Adjusting The Display Contrast • To adjust the display contrast, 1. Press OPTIONS. 2. Press NEXT until the DISP option appears. 3. Press DISP. 4. Your display will read “Contrast Level.” 5. Press LIGHT or DARK once for each degree of change desired. 6. Press SPEAKER to end. 9.2 Blocking Voice-Announce Calls • To block voice-announce calls, 1. Press OPTIONS. 2. Press VAB. 3. Press ON. 4. Press SPEAKER to end.
Using The Other Features 9.3 GCA70–198 Displaying Status Of Busy Lines And Stations (Busy Button Inquiry) • To identify the station that occupies a busy line, 1. Press button for busy line. 2. Read your display for intercom number of station that is busy on line. • To identify the line that a busy station occupies, 1. Press DSS button for busy station. 2. Read your display for the line number of the busy station. 9.
GCA70–198 9.5 Using The Other Features Diverting Incoming Calls To Another Station Call diverting permits you to send an incoming call to another station that you have previously designated. You can divert an incoming call to the designated station whether you are busy or idle. You must program a CALL FORWARD button (using the instructions in the programming section) on your LCD speakerphone to serve as a call divert button. • To identify the station to receive diverted calls, 1. Press INTERCOM. 2.
Using The Other Features 9.7 GCA70–198 Muting YourTelephone • To mute your telephone, 1. Press MUTE (MUTE light turns on). You can still hear distant callers, but they cannot hear you. • To speak to the distant party, 1. Press MUTE again (MUTE light turns on). 9.8 Setting A Do Not Disturb Condition • To enable DND, 1. Press OPTIONS. 2. Press NEXT until the DND option appears. 3. Press DND. 4. Press ON. 5. Press EXIT. 6. Press SPEAKER to end. • To disable the DND condition, 1.
GCA70–198 9.9 Using The Other Features Overriding A Call Or A Do Not Disturb Condition At Another Telephone (Executive Override) • To override an in-progress call at another telephone, 1. Make intercom call and hear a busy signal. 2. Dial ✳ 03 (all parties will hear several tone bursts). 3. Join in-progress call. • To override a Do Not Disturb condition at another station, 1. Press OVER to disable the Do Not Disturb condition at the called station. 2.
Using The Other Features GCA70–198 9.10 Setting The Volume Control • There are four ringer loudness levels (plus an off position). Set the level as follows: 1. While your telephone is on hook and idle, press VOLUME UP or VOLUME DOWN once for each change in loudness that you desire. The ringer sounds once for each change as an example of the current setting.
GCA70–198 Using The Other Features • There are eight group listening loudness levels. Set the level for the current call as follows: 1. While on a call and in the group listening mode, press VOLUME UP or VOLUME DOWN once for each change in loudness that you desire. • There are eight headset loudness levels. Set the level for the current call as follows: 1. While on a call and in headset mode, press VOLUME UP or VOLUME DOWN once for each change in loudness that you desire.
Using The Other Features GCA70–198 9.11 Setting Your Personal Ringing Tones • To select one of the ringing tones, 1. Press OPTIONS. 2. Press NEXT until the RING option appears. 3. Press RING. 4. Press UP or DOWN to choose ring tone in display (a new tone will sound at each up or down press). 5. Press EXIT to return to main display. 6. Press SPEAKER to end. 9.12 Using Background Music • To turn the music on, 1. Press OPTIONS. 2. Press MUSIC. 3. Press SET. 4.
GCA70–198 10 DSS/BLF Console Operating Your Telephone With A DSS/BLF Console 10.1 Operating Your Telephone With A DSS/BLF Console The DU32X (Impression) or DD32X (DigiTech) DSS/BLF console has additional buttons and status lights that extend the memory button capability of an adjacent companion telephone. You can program the buttons for automatic dialing (speed dial) or direct station selection (DSS) with busy lamp field (BLF) using the instructions provided in this guide.
DSS/BLF Console GCA70–198 dd32x DD32X DSS/BLF Console 10 – 2 LCD Station User's Guide
GCA70–198 Index Publication Index A Accessing Lines........................................................................................... 3–1 Adjusting Display Contrast ......................................................................... 9–1 Answering A SOHVA................................................................................. 2–2 Answering Calls .......................................................................................... 2–1 B Background Music .......................
Index GCA70–198 D Dialing, Speed ............................................................................................. 3–3 Dialing, Last Number .................................................................................. 3–2 Display Contrast, Adjusting ........................................................................ 9–1 Displaying Button Functions....................................................................... 9–2 Displaying Status Of Busy Lines And Stations ..................
GCA70–198 Index M Making A Paging Announcement............................................................... 3–5 Making A SOHVA...................................................................................... 3–4 Making Calls ............................................................................................... 3–1 Messaging Feature....................................................................................... 5–1 Messaging, LCD.......................................................
Index GCA70–198 Speakerphone, Using The ........................................................................... 1–8 Speed Dial ................................................................................................... 3–3 Speed Dial Numbers, Programming ........................................................... 8–3 Stations, Conferencing ................................................................................ 7–1 T Transferring Calls..................................................
GCA70–198 A Quick Reference Guide Appendix A Quick Reference Guide This chart provides you with a Quick Reference Guide of the feature dialing codes. If you wish, you can detach these pages and keep them near your telephone to serve as a stand alone reference. Chapter 8, Programming Your Telephone, describes a method to program these codes on your telephone at unused programmable buttons. Also, the installer may store features at your telephone buttons and label the buttons with the feature’s mnemonics.
Quick Reference Guide Feature Enable Code GCA70–198 Disable Code Button Mnemonic Call Forward, INTERCOM ✳ 54 INTERCOM # 5 Ring-No Answer, + extension All Calls number FWDRA Call Forward, INTERCOM ✳ 53 INTERCOM # 5 Ring-No Answer, + extension Personal Calls number FWDRP Call Park, Orbit 91-99 INTERCOM ✳ (91-99) PARK 1–9 Call Park, Pickup INTERCOM # 91-99 PARK 1-9 Call Pickup, Directed INTERCOM ✳ 4 + extension number DPKUP Call Pickup, Group INTERCOM # 4 GPKUP Clear Major Alarm Ring INT
GCA70–198 Feature Quick Reference Guide Enable Code Disable Code Button Mnemonic Line Group 1 INTERCOM 9 LNG01 Line Groups 2-11 INTERCOM 80-89 LNG02-11 Line Groups 12-16 INTERCOM 60-64 LNG 12-16 Line Pick Up From Any Station, Zones 1-4 INTERCOM 65-68 TAFS 1-4 Line Pick Up From Any Station, All Zones INTERCOM 69 TAFS✳ Meet-Me Answer Page INTERCOM 78 MMEPG Message Waiting INTERCOM ✳ 3 + INTERCOM ✳ 3 + extension number extension number Message Wait Retrieval #00 Night Transfer (Atte
Quick Reference Guide Feature Enable Code GCA70–198 Disable Code Button Mnemonic Personal Ringing Tones INTERCOM ✳✳ 4 + tone code (1-8) Redial Last Dialed Number # Remote Station Disable INTERCOM ✳ 05 + extension number Response Message INTERCOM ✳✳ 6 + button + 01-30 RSPnn (nn = 1-30, S) Service Observing INTERCOM # 03 + extension number S-OBS Speed Dial, Station 1-0 Speed Dial, System ✳ 100 ✳ 599 Speed Dial, Programming INTERCOM ✳✳ 1 Station Lock INTERCOM #04 + code LOCK Volume S
GCA70–198 Quick Reference Guide The following table details several unique dialing codes that are only applicable to single line proprietary and industry-standard telephones.
NOTES
This manual has been developed by Comdial Corporation (the “Company”) and is intended for the use of its customers and service personnel. The information in this manual is subject to change without notice. While every effort has been made to eliminate errors, the Company disclaims liability for any difficulties arising from the interpretation of the information contained herein.
R Charlottesville, Virginia 22901-2829 World Wide Web: http://www.comdial.com/ Printed in U.S.A. GCA70–198.