
Security Camera User Manual

VerteX RTH Series H.8 and H.16 Series
19
Chapter 4. DVR Operation Setup
4-1. VERTEX RTH-Series Storage Installation
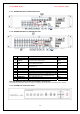
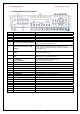
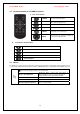
※ Recommended HDD Specification
Type Size Capacity Buffer RPM
SATA I, II 3.5 1, 2 Flat Up to 1.5TB over 8MB over 7200
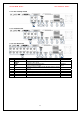
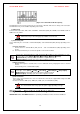
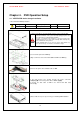
1) Using a screw driver, unscrew and take off the top case of the product.
1) Normal termination of the system and fully unplugged power code
are required before conducting HDD installation.
2) Touch a grounded metal substance or ground yourself before
installing HDD in order to reduce static electricity. Static electricity may
cause a malfunction of the product.
3) After installing HDD, Do not connect to power supply with the top
case opened. The top case must be covered before usage.
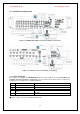
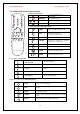
2) Unscrew and separate the HDD bay.
3) Align screw holes and screw and fix additional HDD onto HDD bay.
4) Connect the power cable and data cable to HDD.
5) The main board of the product provides two power connection;
Left(A)/Right(B). Connect the power cable of HDD to (A)/(B).
6) Connect the data cable of HDD to the main board data cable
connecter(C).
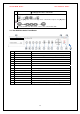
7) Reassemble the top case by reversing 1) to finalizing HDD installation.