
Security Camera User Manual


VerteX RTH Series H.8 and H.16 Series
36
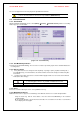
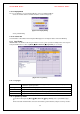
Select button.
The user can check the time and the log type using the arrow keys in the log list.
Use the Up/Down button to check the logs by time and type on each page.
The user can shift the focus to a certain time zone for playing the certain time (playback will start from the
time point when logs are saved).
Click the right-mouse button or select {Menu} button in the front panel and select {Hour} to move the
desired log time zone.
[Figure 4-24. Move to the log list of the certain time zone]
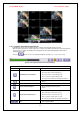
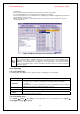
Time Changed Log Data View
The stored data folder is updated each time the user changes the time. A blue triangular icon is
displayed on the date each time a change is made in the date on the calendar window.
Otherwise, a red triangular icon is displayed on the unchanged date. To view the log details,
select the desired date with a red icon. Selecting a date with a blue icon causes the changed
date list to appear.
5-12. Recording
5-12-1. Recording Types
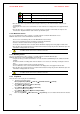
The VERTEX RTH, H.8 AND H.16 series supports various recording types as shown below.
Recording Type Description
Automatic
Set the event recording frame and general recording frame separately. Depending
on the set value, select the recording type automatically and proceed with the
recording.
When motion or sensor is detected, the event recording frame will be selected.
Otherwise, the general recording frame will be selected.
Continuous
Continuous recording will be done based on the general frame value.
Motion
When motion is detected, recording will be done based on the event frame value.
Sensor
When input signal from an external sensor is generated, recording will be done
based on the event frame value.
5-12-2. Recording Setup
Go to {Menu} Æ {Setup} Æ {Recording} for Recording Setup. For more information, move to {Menu} Æ
{Setup} Æ {Recording}} Æ {Recording}