
Installation Instructions


17. Mix the Grout
Mix up the sanded grout of your choice. Use the same sanded grout as is used
for tile. Mix the grout a bit thinner (somewhat like cake icing) when using a grout
bag, Do not mix more grout than you can easily use with a few fills of your grout
bag as it will harden. Always follow the manufacturers instructions when mixing
grout.
Note: Choose your grout color carefully because different grout colors can
change the appearance of the wall
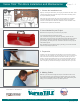
18. Using a Grout Bag
Wet the inside of a grout bag to help in starting the process. Scoop grout into
the bag using a small trowel. Begin by scooping a small amount, two to three
scoops, until you know how much works best for you.
Twist the bag closed similar to how you would a cake icing bag. Squeeze the
bag into your grout bucket to get air out and start the grout flowing.
If the gout is clogging the bag add a bit water to your bucket to get the right
consistency.
As you work on the wall, from time to time you may need to rinse hardening
grout out of the bag to keep it from clogging.
Note: Some grout bags are designed to allow you to cut more of the tip of the
bag off to increase grout flow. Cutting too much however could cause improper
filling of the joints and harder clean up.
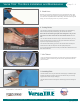
19. Fill the Joints
Place the tip of the mortar bag into the joint. Begin squeezing grout into the
joints between the bricks. Start at the top of the wall and work your way down.
Fill the vertical joints first coming back to fill in the horizontal joints. Work the
bag across the joints as you are twisting the bag to squeeze grout out. Fill the
joints as neatly as possible and completely fill (but don’t overfill) the joints. This
will make clean up much easier.
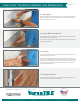
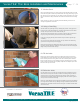
20. Strike the Joints
Use the joiner tool (you can also use a large dowel rod) to strike the joints as
shown at left. You may want to wait a minute or two after grouting to strike an
area of joints. If you are doing a large wall you will do a section and then go
back and strike it. Waiting until the grout is slightly hard will cause the grout to
clump more and cause less smearing.
Note: Pay close attention to the instructions provided by the grout manufacturer
for curing times as these will vary. Waiting too long to strike the joints will make
it difficult even impossible to remove the excess grout. It is better to strike them
sooner than later.
Steps 17 - 20
Versa TILE
®
Thin Brick Installation and Maintenance
P.O. Box 9240 Canton, Ohio 44711 1-800-325-3945 e-mail: info@ironrock.com www.versatilebymetro.com
MET_TB_CM_11_16
M
A
D
E
I
N
T
H
E
U
S
A
C
A
N
T
O
N
,
O
H
I
O
AVAILABLE AT MENARDS®
®
®
INDOOR / OUTDOOR
A product of Metropolitan Ceramics
QUARRY TILE AND THIN BRICK