
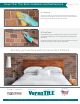
Installation Instructions
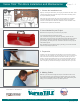
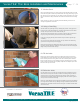

9. Laying Bricks
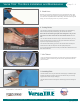
Begin pushing bricks into the adhesive. You may choose to back butter bricks
to help with adhesion. When back buttering, use a small trowel to smooth a
thin layer of mortar on the bricks.
10. Laying Bricks (Continued)
You will want to press the bricks firmly into the adhesive with some pressure
to make sure you have a good bond.
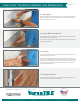
You can poke a dowel rod in the vertical gap between bricks as you go along
to give the right spacing
11. Spacing
The use of dowel rods laid on top of the row creates the right spacing for the
bricks and supports the next row.
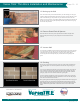
Note: When the adhesive has hardened, dowel rods may be difficult to pull
out because of the weight of the bricks and because they may stick to excess
adhesive. This is especially true on the lower part of the wall. To help remedy
this we recommend not positioning dowel rods at the back of the joint but
instead more toward the front.
12. Using Dowel Rods
This picture shows how to place dowel rods to minimize difficulty in removal.
You can see the cut kerf brick at the walls end.
Steps 9 - 12
Versa TILE
®
Thin Brick Installation and Maintenance
P.O. Box 9240 Canton, Ohio 44711 1-800-325-3945 e-mail: info@ironrock.com www.versatilebymetro.com
MET_TB_CM_11_16
M
A
D
E
I
N
T
H
E
U
S
A
C
A
N
T
O
N
,
O
H
I
O
AVAILABLE AT MENARDS®
®
®
INDOOR / OUTDOOR
A product of Metropolitan Ceramics
QUARRY TILE AND THIN BRICK