
Installation Instructions
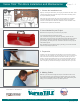
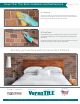

5. Chalk Lines
Measure up one foot from the ledge and snap a horizontal line with a chalk
line. Continue working up the wall every foot marking lines as you go. Make
sure these lines are parallel with the bottom ledge. These lines will be a guide
letting you know everything is level as you brick up the wall.
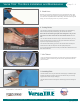
6. Cutting Bricks
You will need to cut bricks for the left and right ends of your wall beginning
with the half pieces (kerfs) that will begin your second row of bricks.
Note: take into account the grout joint when cutting kerfs. They are not
just bricks cut in half. The kerf size for Versa Tile thin brick is 2 ¾” x 3
5/8”.
You can either calculate and make all of your cuts ahead of time or you may
want to cut the bricks as you work your way up the wall. Often, walls aren’t
square so it may be best to cut as you go.
You will want to start bricking your wall on the end that will be a focal point
because that end will have full pieces and true (kerfs) half pieces.
As you come to the other end of the wall you will be able to determine the cuts
that needs made there.
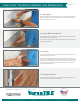
7. Mix Thinset
If you are installing with bag thinset, mix thinset mortar per the manufacturers
instructions. Using a mortar mixing tool and a heavy duty drill will make this
job much easier.
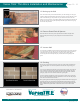
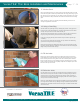
8. Installing Brick
Choose a bottom corner of your wall at the wood ledge you installed to begin
troweling on adhesive. Trowel on only as much adhesive as you can easily
apply bricks to before it begins setting up.
Hold the notched trowel at a 45°angle to create deep grooves for holding the
brick.
Steps 5 - 8
Versa TILE
®
Thin Brick Installation and Maintenance
P.O. Box 9240 Canton, Ohio 44711 1-800-325-3945 e-mail: info@ironrock.com www.versatilebymetro.com
MET_TB_CM_11_16
M
A
D
E
I
N
T
H
E
U
S
A
C
A
N
T
O
N
,
O
H
I
O
AVAILABLE AT MENARDS®
®
®
INDOOR / OUTDOOR
A product of Metropolitan Ceramics
QUARRY TILE AND THIN BRICK