
Operating instructions


Initial Startup
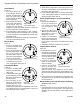
Figure 61
1. After initial power up or
when RESET button is
pressed, the transmitter is
reset. The reset button is
located behind the battery
door of transmitter.
2. During system reset, all fea-
tures of the LCD DISPLAY
will be visible. After one
second, the LCD will be
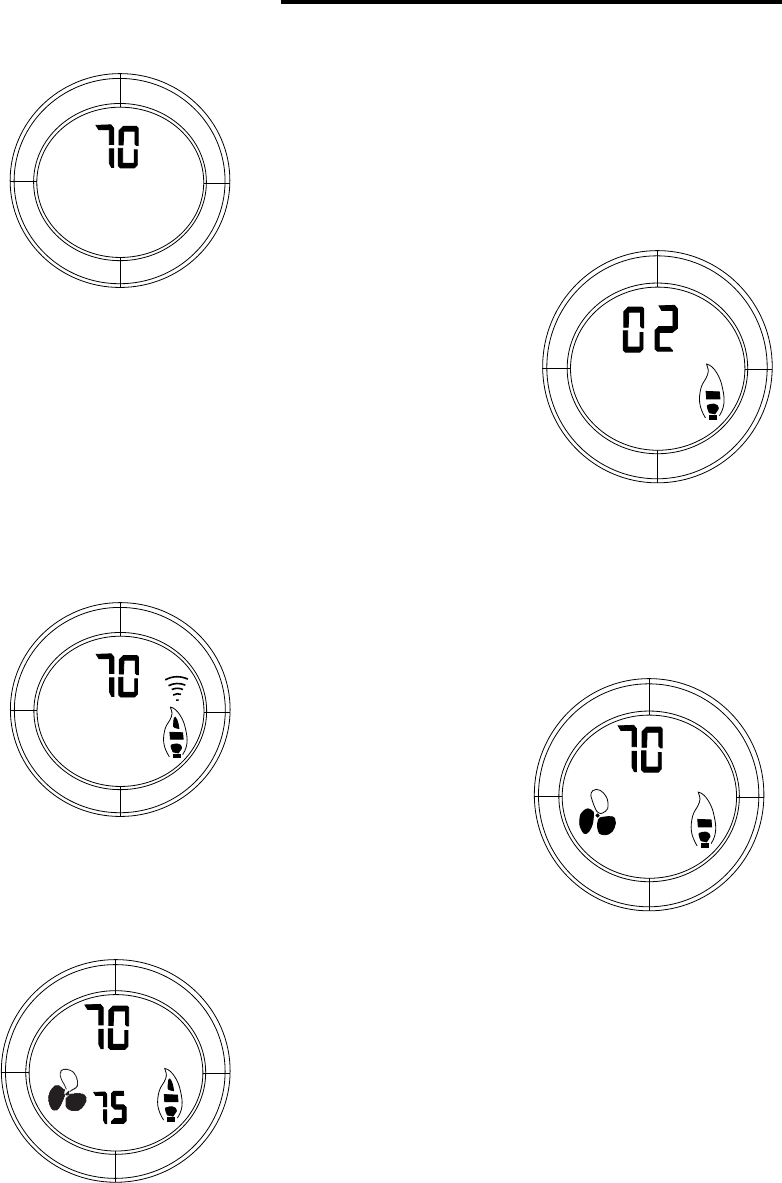
initialized. A typical reset display is shown in Figure 60.
Note the temperature scale is degree F.
3. Press ON button to select between °C and °F display.
It will exit setting mode automatically after 10 seconds
if no key is pressed. The transmitter will send an OFF
signal after reset.
4. After reset, the transmitter is operating in manual mode.
The room temperature is shown.
Manual Mode
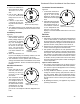
Figure 62
1. Press the ON button once
to turn on the appliance with
max ame height.
2. Press the OFF button to
decrease ame height. The
first two (2) presses will
decrease flame height to
lower level. The third press
will turn off the replace.
3. If the OFF button is held
for more than three (3) sec-
onds, the replace will be shut off.
Thermostatic Mode
Figure 63
1. Press the AUTO/FLAME
button to enter the thermo-
static mode.
2. In thermostatic mode, press
the ON / s button or OFF /
t button to set the desired
set temperature.
3. Once the setting is com-
pleted, the transmitter will
automatically turn on the
replace when the room
temperature is below the set temperature and turn off
the replace when the room temperature is above the
set temperature within 1 degree.
°F
FP2142
initial start up
Figure 61
Typical Reset Display
FP2142
FP2143
°F
FP2143
manual mode
12/08
Figure 62 Manual mode.
FP2144
thermostat mode
12/08
°F
°F
SET
Figure 63
Thermostatic mode.
FP2144
4. There will be a slight delay in the response of the unit
(on/off) to a temperature. Room temperature is moni-
tored every three (3) minutes.
5. Press AUTO/FLAME button to exit the thermostatic
mode. The transmitter will be in the manual off mode
and the replace will be shut off.
Flame Height Setting for Thermostatic Mode
Figure 64
1. Hold AUTO/FLAME button
for ve (5) seconds and
one number and flame
icon will appear in LCD
screen.
2. Use the ON / s or OFF /
t button to set the desired
ame height to 1 (min.) 2
(medium) or 3 (max.).
3. If there is no input within
three (3) seconds, the new
setting will be transmitted
to the receiver. This setting only affects auto mode
operation.
4. The default setting for transmitter is 2 (medium).
3-Speed Blower Control
Figure 65
1. Press FAN button once to
enter blower speed setup
mode at low speed initially
and one of the three blade
icons will display dark-
ened on LCD display.
2. Continue to press FAN
button to set the blower
speed you desire.
3. If there is no input within
three (3) seconds, the
new setting will be trans-
mitted to receiver. If the replace is on, the blower
speed will take effect right away; if the replace is off,
the receiver will remember this setting and blower is still
off.
4. If you continue to press FAN button to the position that
all blades are gone, the FAN icon will disappear and
turn the blower off.
Blower On Delay Time and OFF Delay Time Setting
(Default 5 ON / 8 OFF)
Figure 66
1. Hold FAN button for ve (5) seconds and two (2) num-
bers will appear in the LCD screen. The upper one is
ON Delay Time and the bottom is OFF Delay Time in
minutes.
FP2147
flame height setting
12/08
Figure 64
Flame height setting
FP2147
FP2145
°F
FP2145
3 speed fan
12/08
Figure 65
3 speed blower control
34
Stardance® Direct Vent/Natural Vent Gas Heater
20306760