
Specifications


DFS Series Vent Free Fireplace
10
71D0532
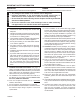
If unit is to be “built in,” replace framing can be built before
or after the appliance is set in place.
Refer to Figure 2 on Page 6
for replace and framing dimensions. The framing headers
may rest directly on top of the rebox.
This replace may be installed directly onto a combustible
oor or raised on a platform of appropriate height. Do not
install the replace directly onto any soft ooring material
such as carpeting, vinyl tile or other combustible material
other than wood ooring, unless there is a sheet metal
panel (.030” minimum thickness) or at wood, plywood or
particle board panel (1/2” minimum thickness) extending
the full width and depth of the enclosure. Be sure rebox
rests on a solid continuous oor or platform with appropri-
ate framing for support.
Anchor fireplace to the side framing members using
optional nailing ange kit. Refer to installation instructions
included with the kit.
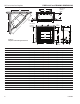
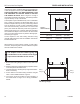
When nishing a custom cabinet, mantel, or other built-in
enclosure, the opening size to accommodate the replace
with trim installed is as follows:
K
J
FP2445
opening size
J 35M\,” 35M\,” 35M\,”
(911 mm) (911 mm) (911 mm)
K 37M\,” 41M\,” 47M\,”
(962 mm) (1064 mm) (1216 mm)
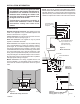
FP2445
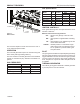
1. Bend out the nailing anges located on each side of the
rebox.
2. Slide the rebox into prepared framing or position rebox
in its nal position and frame later.
3. Level the rebox by checking the top edge of the rebox.
Shim if necessary.
4. Anchor rebox to the side framing members using 8d
nails or other suitable fasteners. Figure 8
5. The canopy must be installed for safe operation of
the heater. Refer to Page 16 for canopy installation
details.
FP2446
nailing flanges
Nailing
Flanges
Nailing
Flanges
FP2446