
User`s guide


System Administrator
113
A
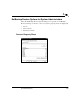
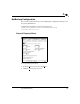
Destination Clients Property Sheet
To access this dialog box, open the
R
estore menu, select
Specify NetBackup
Machines...
, then select the C
l
ients property sheet. Use this dialog box to select the
client which will receive the restored backups.
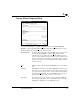
New Client Name:
To add another client name to the
Client List:
, type the name of the
client in the
New Client Name:
and click
Add
. The client name
entered must also be defined in a class on the NetBackup server.
If a new client is added to the list it will be in the client list for all
windows currently opened and any new window that is opened.
The new client will be saved in the
Client List:
box after the current
window is closed.
Add
Adds the client, entered in the
New Client Name:
box, to the
Client
List:
.
Client List:
The
Client List:
shows the names of the NetBackup clients to which
you can restore files or folders. To specify a destination client,
select a name from the Client List and click
Make Current
. The word
CURRENT will appear in parentheses beside the name of the new
destination client.
Class Type:
View and select class type for the client selected in the
Client List:
.
The class type must be the same as specified for the client in the
NetBackup configuration on the NetBackup server.