6:46 VA04
Dear Customer, Thank you for purchasing the Verilux Rise & Shine® Natural Sleep System. You have received an innovative and quality manufactured product, backed by a one year limited warranty. I hope you’ll take the time to read and follow the instructions in this owner’s guide. It will help you to set up, operate and enjoy the Rise & Shine’s many features. Please save this owner’s guide for future reference. Many other healthy lighting products are available through our catalog and online.
Table of Contents Important Safety Instructions . . . . . . . . . . . . . . . . . . . . . . . . . . . . . . . . . . . . . . . . 4 FCC Compliance . . . . . . . . . . . . . . . . . . . . . . . . . . . . . . . . . . . . . . . . . . . . . . . . . . 6 Guide to Features . . . . . . . . . . . . . . . . . . . . . . . . . . . . . . . . . . . . . . . . . . . . . . . . . 7 Introduction . . . . . . . . . . . . . . . . . . . . . . . . . . . . . . . . . . . . . . . . . . . . . . . . . . . . . .
Important Safety Instructions CAUTION: THIS DEVICE MUST BE CONNECTED TO A MAINS SOCKET OUTLET WITH A PROTECTIVE EARTHING CONNECTION. TO REDUCE THE RISK OF ELECTRIC SHOCK, DO NOT REMOVE ANY COMPONENTS. THERE ARE NO SERVICEABLE PARTS INSIDE. TO REDUCE THE RISK OF FIRE OR ELECTRIC SHOCK, DO NOT EXPOSE THIS UNIT TO RAIN OR MOISTURE.
Important Safety Instructions — continued plug has two blades with one wider than the other. A grounding-type plug has two blades and a third grounding prong. The wide blade or the third prong is provided for your safety. If the provided plug does not fit in your outlet, consult an electrician for replacement of the obsolete outlet. • Protect the power cord from being walked on or pinched particularly at plugs, convenience receptacles and the point where they exit from the device.
FCC Compliance This device complies with part 15 of the FCC Rules. Operation is subject to the following two conditions: (1) this device may not cause harmful interference, and (2) this device must accept any interference received, including interference that may cause undesired operation. This equipment has been tested and found to comply with the limits for a Class B digital device, pursuant to part 15 of the FCC Rules.
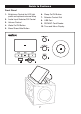
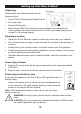
Guide to Features Front Panel 1. Brightness Control for LED light panel and optional external lamp 6. Sleep On/Off Button 2. Audio Input Selector/Off Control 8. USB Port 3. Volume Control 9. SD/MMC Card Reader 4. Wake On/Off Button 10. Time and Menu Display 7. Selector Control Dial 5.
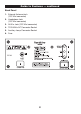
Guide to Features — continued Back Panel 1. External Antenna Jack (1/8" Mini connector) 2. Headphone Jack (1/8" Mini connector) 3. AUX In Jack (1/8" Mini connector) 4. 120V-60Hz AC Connector Socket 5. Auxiliary Lamp Connector Socket 6.
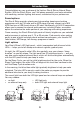
Introduction Congratulations on your purchase of the Verilux® Rise & Shine® Natural Sleep System. With the Rise & Shine, you’ll fall asleep peacefully and wake refreshed with soothing, ambient lighting and sound, customized to your preferences. Sound options The Rise & Shine provides relaxing and rejuvenating sleeping and waking experiences with an FM radio and an MP3 player that can support up to 800 MP3 files from a USB thumb drive or SD card.
Setting up Your Rise & Shine® Unpacking Front Panel Please check your shipping carton for the following items: • m Verilux® Rise & Shine Natural Sleep System • AC power cord • External FM antenna • Secure Digital (SD) Card containing natural ambient soundscapes and wake-up tones. This card can be found in the SD card reader opening (see number 9 in the image above). 9 Selecting a location • Place your Rise & Shine on a table or other flat surface near your bedside.
Operating Your Rise & Shine® Your Rise & Shine Natural Sleep System has a wealth of features. Explanations for the controls for the device are listed below. Selector Control Dial The Selector Control Dial is used to make selections from the various menus which can be displayed. The Selector Control Dial has two functions. By pressing the Selector Control Dial, you choose an option which is highlighted on the screen. The dial can also be turned right or left.
Operating Your Rise & Shine® — continued • SD card, either the one provided or your own SD card, is selected to play MP3 files (Page 24 provides details for this application). Controlling the Volume The Volume dial is used to adjust the volume for the different sound sources. There are four different sound sources for this feature: • AUX volume can be controlled by either the connected audio device, such as an iPod®, or by the Rise & Shine volume dial (Page 27 provides details for this application).
Trouble Shooting Using TIME Sanitizing SET Wand Setting the Clock 1. Press the MENU button. 2. The first item in the Main Menu, TIME SET, is highlighted (TIME SET sets the time, year, month and day). 3. Press the Selector Control Dial to choose Time Set. The time and SET HOUR are shown. The hour digits are highlighted. 4. Turn the Selector Control Dial to the desired hour. 5. Press the Selector Control Dial to set the hour. Minutes are then highlighted and SET MINUTE is displayed. 6.
Trouble Setting Shooting and Using Sanitizing WAKE SET Wand Setting WAKE Cycle You can set separate weekend and weekday wake-up programs and customize them to start either 5, 10 or 15 minutes before your desired wake-up time. You may need to experiment with the 5, 15 or 30 minute intervals to determine which cycle works best for you. Example: Wake Time: 6:30 am Wake Options: Audio (FM) and Light Duration = 15 minutes WAKE: On WAKE is shown in the bottom left of the display.
Setting Trouble and Using Shooting WAKE Sanitizing SET — continued Wand Use the same method to set a WEEKEND alarm. Note: You have now set the alarm time(s), but you have not turned the alarm on. To turn on the alarm, push the WAKE button. WAKE will show in the bottom left of the display. To turn the alarm off, press the WAKE button a second time. WAKE will no longer appear in the bottom left of the display.
Setting Trouble and Using Shooting WAKE Sanitizing SET — continued Wand Volume Settings From the WAKE SETTINGS menu: 1. Use the Selector Control Dial to highlight VOLUME: 25 (25 is the default setting). WAKE SETTINGS TIME: 06:00AM/08:00AM DURATION: 5 MINUTES LIGHT: TOP AND LAMP VOLUME: 25 SOUND: SD PLAY MODE: CONTINUOUS PREVIOUS TIME: 06:00AM/08:00AM WAKE VOLUME DURATION: 5 MINUTES 25 LIGHT: NONE VOLUME: 25 2. Press the Selector Control Dial. 3.
Trouble Shooting Sanitizing Wand Setting and Using WAKE SET — continued 2. Press the Selector Control Dial. TIME: 06:00AM/08:00AM WAKE PLAY MODE DURATION: 5 MINUTES 3. From the WAKE PLAY MODE sub-menu, turn the Selector V CONTINUOUS LIGHT: NONE REPEAT 25 Control Dial to choose CONTINUOUS or REPEAT.
Setting Trouble and Using Shooting SLEEP Sanitizing SET — Wand continued 3. Use the Selector Control Dial to highlight SLEEP SET. 4. Press the Selector Control Dial to choose SLEEP SETTINGS. The SLEEP SETTINGS menu is displayed. DURATION: 5 MINUTES is highlighted (5 MINUTES is the default setting). MAIN MENU TIME SET WAKE SET SLEEP SET AUDIO SET LIGHT SET: LAMP ONLY DISPLAY SET: MEDIUM EXIT Duration Settings 1. Press the Selector Control Dial. 2.
Setting Trouble and Using Shooting SLEEP Sanitizing SET — Wand continued 4. Press the Selector Control Dial to choose the highlighted selection. The display returns to the SLEEP SETTINGS menu. Backlight Settings The BACKLIGHT Setting determines whether the display backlight is on or off after the Sleep Cycle completes. If you’d like no display light whatsoever after the Sleep Cycle ends, select OFF. DURATION: 5 MINUTES ON TOP AND LAMP LIGHT: OFF BACKLIGHT: ON SOUND: NONE 1.
Setting Trouble and Using Shooting SLEEP Sanitizing SET — Wand continued Play Mode Settings 1. Use the Selector Control Dial to highlight PLAY MODE: CONTINUOUS (CONTINUOUS is the default setting). DURATION: 5 MINUTES SLEEP PLAY MODE LIGHT: TOP AND LAMP CONTINUOUS BACKLIGHT: ON REPEAT SOUND: NONE PLAY MODE: CONTINUOUS 2. Press the Selector Control Dial. 3. From the SLEEP PLAY MODE sub-menu, turn the Selector Control Dial to choose CONTINUOUS or REPEAT.
Setting Trouble and Using Shooting LIGHT Sanitizing and DISPLAY Wand SET LIGHT SET determines whether the LED light panel, an auxiliary lamp or both are controlled by the Brightness Control. This allows you to use either or both light sources during everyday use, at the brightness you wish, when not in Wake or Sleep mode. Wake and Sleep modes have individual controls for both light sources. Light Settings 1. Press the Menu Button. From the Main Menu: 2.
Setting and Using LIGHT and DISPLAY SET — continued Display Brightness Settings in Sleep Mode In order to have no light and no backlight to during Sleep Mode: 1. Press the Menu Button. From the Main Menu: 2. Use the Selector Control Dial to highlight and select SLEEP SET. 3. Use the Selector Control Dial to highlight and select LIGHT: TOP AND LAMP. 4. Press the Selector Control Dial and choose NONE. For more instruction, reference page 18, number 3 under Light Settings.
Trouble Listening Shooting to USB Sanitizing MP3 Songs Wand The USB Port on the front panel of the Rise & Shine® is used to listen to MP3 audio files on USB Flash Drives, also known as “Thumb Drives.” Your Rise & Shine can play MP3 audio on all standard USB Drives, regardless of memory capacity. There are limits of not more than 800 MP3 files and not more than 100 directories (or “folders”) per USB Drive. Files on USB Drives can be placed in folders and subfolders before being copied to a USB Drive.
Listening Trouble to Shooting USB MP3Sanitizing Songs — continued Wand 2. Press the Selector Control Dial to open the folder and display the MP3 files. 3. Use the Selector Control Dial to highlight an MP3 file. 4. Press the Selector Control Dial to choose the file. The display returns to the Time/Date display. The MP3 file begins to play and the file’s title is shown at the bottom of the display. To pause while listening to USB audio, press the Selector Control Dial. PAUSED will be shown on the display.
Listening to SD MP3 Songs — continued Using the Supplied Verilux® SD Card Included with your Rise & Shine® is an SD Card that contains sounds, sounds with songs and wake tones, in three folders: SOUNDS SOUNDS WITH SONGS WAKE TONES SD MEMORY SOUNDS SOUNDS WITH SONGS WAKE TONES Each folder contains three or more selections, which you can play, as described next, or use as a “wake sound” as described under “Setting WAKE Options” on page 15. If the SD Card is removed, the wake sounds will not be available.
Listening to SD MP3 Songs — continued The display returns to the Time/Date display. The MP3 file begins to play and the file’s title is shown at the bottom of the display. If the MP3 files were contained in folders before being copied to the SD Card, the folder names will be displayed. 1. Use the Selector Control Dial to highlight a folder name. 2. Press the Selector Control Dial to open the folder and display the MP3 files. 3. Use the Selector Control Dial to highlight a file. 4.
Listening to AUX Devices When using an iPod®, cassette tape player or other audio device, you can enhance your listening experience by playing the device through your Rise & Shine® using the AUX IN jack on the rear panel. Connecting an audio device requires one of the following cables: • Male-to-male 3.5 mm (1/8") stereo cable (this would be used, for example, to connect an iPod® to the Rise & Shine AUX IN). • Dual RCA male to 3.
Using Headphones For private listening, connect headphones to the headphone jack on the rear panel using a 1/8 inch “mini” headphone jack. The speaker is automatically muted when you plug in your headphones. Note: The speaker will automatically unmute when headphones are disconnected. Because headphone volume may vary from speaker volume, be sure to lower the volume before connecting or disconnecting headphones. CAUTION: Long-term exposure to loud music may cause hearing damage.
Changing the Fuse You may need to replace the Rise & Shine® fuse if it no longer brightens and dims your auxiliary lamp with your Wake and Sleep settings. In order to replace the fuse, do the following: • You will need to go to the back of the unit. There is a black circular plastic head that holds the fuse. The part is labeled 1A, 250V. • Use a flat head screwdriver and carefully turn the black head to the left (counter-clockwise). • Remove the black head.
Troubleshooting Problem What to do ® My Rise & Shine does not turn on or play music. • Make sure the power cord is fully plugged into an operating electrical outlet. • Make sure the Audio Input Selector is not OFF. See page 11 for further instructions. The Brightness Control does not change the brightness of the LED light panel or auxiliary lamp. • Make sure that the light you wish to control is ON: Go to LIGHT SET on the display menu and check settings. See page 21 for further instructions.
Troubleshooting — continued The alarm did not go off. • Verify that the correct Wake time was set (Reference page 14). • Verify that the correct setting for weekday or weekend was set (Reference page 14-15). • Verify that the date which was set is correct (Reference page 13). • Verify that the AM or PM settings are correct (Reference page 13-14). • Verify that in wake settings that a SOUND and/or LIGHT source has been chosen (Reference page 15-16). There is a statement on the screen: Files not found.
Troubleshooting — continued The audio is not working. • Turn the volume up. • Make sure the Audio Input Selector is not set to OFF. • Does the display show MUTE? If so, press the Selector Control Dial to unmute. Volume of connected AUX device is too low. • Turn up volume of Rise & Shine® and AUX device. Do so carefully. I set an MP3 for my wake/sleep and the FM radio played instead. • Verify that sound source was correctly set in the menu. Reference page 16 or 19.
Troubleshooting — continued I turned the dial brightness/volume/ mode select dial and the Rise & Shine® light and/or audio turned on suddenly. • During the Wake/Sleep cycle, the center dial settings (Brightness/Mode/ Volume) are overridden by the Wake/ Sleep cycle. • If you adjust one of the center dials during the Wake/Sleep cycle, the unit will break the cycle and return to the current Brightness and Volume settings. The volume is too loud during the alarm. • Adjust the volume in the Wake settings.
Technical Specifications AC power rating 120V~ 60Hz 140W Auxiliary Lamp Max. load 100W 0.8A Dimensions 9.75" W x 5.25" D x 5.5" H (24.8 cm x 13.3 cm x 14 cm) Weight 5.5 lbs Relative Humidity 75% max All specifications subject to change without notice.
One Year Limited Warranty ATTENTION! ONCE OPENED, PLEASE DO NOT RETURN THIS PRODUCT TO THE STORE WHERE IT WAS PURCHASED FOR REPAIR OR REPLACEMENT! Many questions may be answered by visiting www.verilux.com, or you may call our Customer Service Department at 802-496-3101 during normal business hours. This limited warranty is provided by: Verilux, Inc.
Please visit our web site at: www.verilux.com 340 Mad River Park, Waitsfield, VT 05673 VA04-MAN-Rev25 Printed in China for Verilux, Inc. © Copyright 2010 Verilux, Inc. All rights reserved.