Model: VF02 VF02_MAN_Rev14.
Dear Customer, Thank you for purchasing the Verilux EasyFlex® Deluxe Natural Spectrum® Floor Lamp. You have received a quality product, backed by a one year limited warranty. As a Verilux customer, your satisfaction means everything to us. We look forward to serving you now and in the future. Many other healthy lighting products are available through our catalog and online. Visit us on the web at www.verilux.
READ ALL INSTRUCTIONS BEFORE USING Important Safeguards DANGER: • Do not operate this lamp near a water source to avoid electrocution. WARNING: • Do NOT dismantle. • Do not use with power supply voltage other than 120 VAC. • Do not operate lamp in close proximity to flammable or combustible vapors, such as aerosol spray products, or where oxygen is being administered. • Do not cut or shorten the power cord.
VEUILLEZ LIRE L’INTÉGRALITÉ DES INSTRUCTIONS AVANT TOUTE UTILISATION Mesures de sécurité importantes DANGER : • N’utilisez pas cet appareil à proximité d’une arrivée d’eau pour éviter tout risque d’électrocution. AVERTISSEMENT : • Ne pas démonter. • Avant de brancher la lampe, vérifier que la tension de la prise murale ne dépasse pas 120 volts. • Ne pas faire fonctionner la lampe à proximité de vapeurs inflammables ou combustibles, tels que les produits aérosol, ou lorsque l’oxygène est administré.
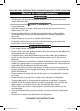
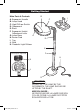
Getting Started Main Parts & Controls B A. Ergonomic Handle B. Lamp Head C. High/Off/Low Switch D. Gooseneck E. Shaft F. Ergonomic Height Adjustment Lever A G. Lamp Base H. Power Cord I. Tray J. Bulb K. Parabolic Light Diffuser I C D E F Close-up of Lamp Head H K J G CAUTION: CAUTION: DO NOT LIFT THE LAMP BY THE GOOSENECK. THE LAMP SHOULD BE LIFTED BY THE SHAFT. MISE EN GARDE : NE PAS SOULEVER LA LAMPE PAR SON COL-DE-CYGNE. LA LAMPE DOIT ÊTRE SOULEVÉE PAR LA TIGE. 5 VF02_MAN_Rev14.
Getting Started — continued Please Read Instructions Carefully Before Using the EasyFlex®. 1. Unpack lamp carefully, removing all packaging material, and confirm you have all parts shown in the diagram. For your convenience, the bulb has been inserted into the socket. 2. Remove all pieces from box being careful with the wiring that runs through the base and shafts. 3. Locate the two screws and tightening tool in the plastic bag and set aside. 6 VF02_MAN_Rev14.
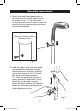
Assembly Instructions 1. Attach the lamp head gooseneck to the shaft until the screw holes line up as shown in Fig. 1. Use care when tucking the wire into the shaft. Insert the screw using the tightening tool and turn clockwise to tighten. Close-up of screw hole in the lamp head Fig. 1 2. Hold the upper shaft with one hand and release the ergonomic height adjustment lever by gently pulling it upward as shown in Fig. 2. Extend the upper shaft approximately 12".
Assembly Instructions — continued 3. Set the lamp base on the floor and insert the lamp shaft over the base support unit until the screw holes line up as shown in Fig. 3. Insert the screw using the tightening tool and turn clockwise to tighten. Close-up of screw hole in the lamp base Fig. 3 4. Remove the light diffuser from the protective plastic bag. Insert the plastic pegs at the bottom of the light diffuser into the openings near the bulb socket. Snap the tab into place as shown in Fig. 4.
Bulb Replacement Removal 1. Unplug the lamp from the power source and allow bulb to cool. 2. To access the bulb, remove light diffuser by depressing the tab and lifting it out (Fig. 7). 3. Firmly hold the bulb base (B) and pull bulb (C) from the socket (A) in an outward motion (Fig. 8). Fig. 7 Installation B 1. Unplug the lamp from the power source. 2. Firmly hold the base (B) and push bulb (C) into the socket (A). 3. Be sure the bulb is firmly seated in the socket (Fig.
Troubleshooting Before requesting service on your Verilux® lamp, please read the following: • Make sure all power connectors, cords and plugs are inserted fully and securely. • Be sure the bulb is securely seated into the socket (see page 9). • Make sure there is power to the wall outlet or try another outlet. Be sure the bulb is securely seated into the socket, repeat the bulb installation process. CAUTION: ALWAYS UNPLUG LAMP BEFORE PERFORMING BULB REPLACEMENT OR INSTALLATION. 10 VF02_MAN_Rev14.
Care & Cleaning Your lamp is made from high quality materials that will last for many years with minimum care. You may want to periodically clean the lamp, using a mild non-abrasive cleaner and soft cloth. When cleaning, make sure you have turned off and unplugged the unit, and allowed sufficient time for the unit to cool. All liquid should be properly wiped away and dried prior to restoring power. CAUTION: DO NOT USE SOLVENTS OR CLEANERS CONTAINING ABRASIVES, OR AMMONIA BASED CLEANERS.
One Year Limited Warranty ATTENTION! ONCE OPENED, PLEASE DO NOT RETURN THIS PRODUCT TO THE STORE WHERE IT WAS PURCHASED FOR REPAIR OR REPLACEMENT! Many questions may be answered by visiting www.verilux.com, or you may call our Customer Service Department at 800-786-6850 during normal business hours. This limited warranty is provided by: Verilux, Inc.