
Installation Guide


6
February 19, 2019 Please contact 1-866-843-8453 for further assistance.
ADHESIVES
GENERAL INFORMATION:
Areas of usage and suboor conditions determine the appropriate
adhesive. For areas with high point loads, rolling loads, topical spillages,
radiant heat or direct sunlight only use Two Part Epoxy. Always use new
trowels to ensure proper adhesive coverage.
GENERAL INFORMATION
Before starting the installation, verify that the material is of the correct
style, color, quantity, and run numbers, and ensure that the correct
adhesive has been selected for area of usage. Also, conrm that all pre-
installation requirements, as detailed in the remainder of this section,
have been satisfactorily completed. Start of ooring installation indicates
acceptance of current suboor conditions and full responsibility for
completed work.
CHECK RUN NUMBERS AND MANUFACTURE DATE
Locate the run number on the short end of each carton and verify that all
of the material for your job is from the same run. Minor shade variations
within the same run number contribute to the natural look of LVT. To
avoid noticeable shade variations, do not install material from different
runs across large expanses.
To determine manufacture date, locate the run number on the short end
of the carton. It is the eight-digit number separated by decimal points
beginning with the two-digit day, then the two-digit month, and nally
the four-digit year. EX: 15.07.2018 (Day.Month.Year)
• Acclimate tiles (keep cartons at), adhesive, jobsite, and suboor to a
stable condition between 65°-85°F (18°-29°C) and 35%- 85% RH for
a minimum of 48 hours before and after installation.
• Conrm quantity of LVT ooring and adhesive are sufcient for area
to be installed. Check material for visual defects before installation.
Installation of ooring acknowledges acceptance of materials.
• Make sure all surfaces to be covered are completely clean, dry,
and smooth, and that all necessary suboor preparation has been
properly completed and documented.
• Perform nal acceptance inspection of substrate.
• Protect adjacent work areas and nished surfaces from damage that
could occur during product installation.
• LVT should be the last material installed, so as
to prevent other
trades from disrupting the installation and adhesive set-up, and to
prevent damage to the oor.
LVT can come in plank, rectangular, and square tile formats. Install
tiles running in the same direction (block or staggered), quarter-turned
or as specied by architect. LVT plank ooring should have end-joints
offset by at least 6" and should be installed in a staggered manner,
so as to create a random appearance that avoids alignment of end-
joints. LVT can be laid out to run either parallel or diagonal to the room
or primary wall. The following conditions must be given consideration
when determining how LVT will be installed:
Layout: Layout shall be specied by the architect, designer or end user
(refer to architectural drawings).
• Establish center lines and determine starting point to balance the
installation by having equal tile widths on opposite sides of room.
This can be facilitated by measuring or dry-laying tiles and marking
baselines.
• Wet-Set Applications: The room layout must be arranged so that
all ooring can be installed while working off of freshly installed tiles.
This will keep tiles from shifting, minimize adhesive displacement,
and prevent wet adhesive from oozing up and getting onto the
surface of the tiles. This can be accomplished by snapping chalk
lines to create work zones that are no wider than a comfortable arm’s
reach, and in multiples of the tile or plank width. Periodically pull back
a tile or plank during installation and check for adhesive transfer to
backing.
• When all preparatory work is satisfactorily completed, including dry
tting cut tiles (if applicable), proceed with installation. Inspect each
tile for visual defects before installing. Installation of ooring implies
acceptance of materials.
• Protecting Newly Installed Floors: Newly installed ooring must be
protected while the adhesive sets, and also protected from damage
of other trades. Early foot trafc, as well as point or rolling loads,
can cause shifting of tiles, adhesive displacement, or breaking of the
bond between the adhesive and the tile or substrate.
Always start with a clean jobsite. All trades must nish before
installing LVT. Carefully inspect each plank or tile for defects prior
to installation, and do not install damaged material. Be sure to
check run numbers/manufacture dates prior to installing.
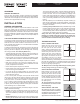
TILE INSTALLATION
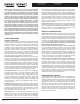
STEP 1: SQUARE THE ROOM
Square the layout of the room, nd the
center of one end of the room. Locate
the same point at the other end-wall.
Snap a chalk line between these points
to mark the center line on the oor. Then,
measure along this center line to nd the
middle of the room. At the center point,
mark off a line across the room at precise
right angles to the rst line This can be
accomplished using the 3-4-5 triangle
method. Starting from the center point,
make a mark measuring 4 feet vertically and 3 feet horizontally. Connect
the marks with a diagonal line to complete the triangle. If the diagonal
line does not measure exactly 5 feet, then the center crossing lines are
not at a true right angle. (See Figure 1)
TIP: Multiples of the 3-4-5 triangle method may be used for greater
accuracy in large rooms (e.g. 6-8-10, 9-12-15, etc.).
STEP 2: BALANCE THE ROOM
Either measure or dry-lay a row of tiles
from the center line to the side wall to
determine the size of the rst and last
tiles. If the resulting border is too small
in either direction, move the row of tiles
over one-half tiles’ width and snap a new
line. This becomes your new starting
line. (See Figure 2)
TIP: Use the dimensions of the room
to calculate the size of the rst tile
without dry-laying.
STEP 3: INSTALL THE TILES
After determining the layout and snapping
center line, spread adhesive and install ooring
as outlined below using the dry to touch or wet-
set application method. (See Figure 3)
Apply adhesive as recommended on the label.
Figure 1
3’
5’
4’
Figure 2
Figure 3
167231213 20
581941114
9181015
1716
Product Description
Dryback LVT/LVP
Installation Method
Glue Down
INSTALLATION