
Installation Guide


9 HOMEDEPOT.COM/VERANDA
Please contact 1-800-230-7547 for further assistance.
Line Rail Installation (continued)
8
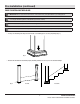
Installing the balusters and top rail
□ Insert all balusters into the bottom rail. Reposition the top
rail over the balusters, and lower into place between the
posts. After the top rail is fully seated, secure using 2 in.
screws (CC). DO NOT OVERTIGHTEN.
NOTE: Using extended drill bits is recommended to prevent
damage to the rail, and allow a more perpendicular driving
angle.
CC
9
Installing the post caps
□ Complete the installation by installing the post cap in place.
You can use a quality exterior adhesive in order to do this
but note that you will not be able to remove the cap at a
later time once it is glued.
Pre-Assembled Rail Installation
1
Preparing the railing for installation
NOTE: Do not remove the strapping until instructed to do
so at the end of this installation procedure.
□ Allow 1/32 in. – 1/16 in. from the end of the top and
bottom rails, then mark locations of the holes for the railing
brackets (AA).
□ Pre-drill holes for the screws using a 5/32 in. bit.
AA
AA
2
Installing the railing brackets
□ Attach the railing brackets (AA) using the 1 in. screws (BB).
DO NOT OVERTIGHTEN.
AA
AA
BB
BB