
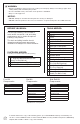
Installation Guide


3
Planning:
a. Posts are designed and manufactured to accept
3
⁄8
" fasteners (sold separately). Be sure to use
appropriate fasteners for your installation.
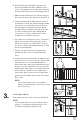
b. Determine the desired rail placement and snap
a chalk line onto the mounting surface to ensure
that all posts are aligned properly (Fig 1).
c. Plumb and level the posts using leveling shims
(included) (Fig. 2), secure the posts in place with
appropriate fasteners (sold separately) and install
base trim on each post (Fig. 3).
d. Determine the appropriate method for installing
your posts below.
Concrete Surface Installations:
a. Purchase four
3
⁄8
" masonry anchors according to
local building codes.
b. Mark holes through mounting plate onto
concrete
surface and follow masonry anchor
manufacturer installation instructions.
c. Install base trim sections around post. Take one
side of base trim and push plastic plugs through
the hole underneath. Take second half of base
trim and push together (Fig. 3).
Deck/Wood Surface Installations:
a. For decking applications, use the provided
secondary mounting plate when securing posts
in place.
b. Beneath all post locations install at least two
2"x8" blocks using at least three #10x3
1
⁄2
" deck
screws penetrating through the joists at least
1
1
⁄2
" into the blocks (sold separately) (Fig. 4 & 5).
c. Mark holes through the bottom plate of steel
post onto deck surface. Remove steel post and
drill
7
⁄16
" holes in all four marks through deck
board and blocking.
d. Purchase
3
⁄8
" diameter galvanized bolts and
nuts approximately 1" longer than the distance
between steel mounting plates (minimum 5").
e. Push bolts through post plate and attach
separate bottom plate from beneath deck
surface (Fig. 6).
Posts can be leveled as needed by using shims.
f. Tighten bolts, install base trim sections around
post. Take one side of base trim and push
plastic plugs through the hole underneath. Take
second half of base trim and push together (Fig. 3).
POST INSTALLATION
Fig. 1
Fig. 2
Chalk LineChalk Line
DeckDeck
Mounting PlateMounting Plate
Leveling ShimLeveling Shim
PostPost
LevelLevel
Fig. 3
Base trimBase trim
Fig. 4
Fig. 5
Fig. 6
1.