
Installation Guide


6
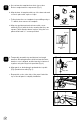
Attaching Bottom Rail Bracket Cover:
Test t the rail panel. Once proper t is ensured, press
bottom bracket covers onto the ends of the bottom rail
(Fig. 11) and set panel in place on brackets.
Connect Rails to Brackets:
a. Press top rail cap and bracket covers onto the top rail
that was cut in step 1 onto the top of the panel. Press
down on the top rail cap to ensure that it ts snug
onto the panel and that the top rail bracket end covers
are being held in place by the line bracket (Fig. 12).
b. Using the holes in the bracket as a guide, pre-drill
two (2)
1
⁄8
" holes from under the bottom of the rail
up through the top rail. Drive two (2) 1
5
⁄8
" screws up
through the hole locking the bracket, panel and top
rail together, being careful not to drill through the top
of the top rail (Fig. 13).
c. Install pyramid post top onto each post (Fig. 14).
NOTE:
A rubber mallet may be needed for a proper t.
Fig. 11
Fig. 12
Bottom Bracket CoverBottom Bracket Cover
Fig. 14
Pyramid TopPyramid Top
PostPost
Fig. 13
Assemble rail panels as described in "Rail Installation."
NOTE:
• Taller posts (sold separately) may be needed for
either bottom or top of the stairs, depending on
the angle of the stairway or the location of where
the posts will be installed relative to the nose of
the stair tread. Bottom stair posts may also be
moved out from bottom step (Fig. 1).
See "Post Installation" section for "Deck/Wood Surface
Installations."
STAIR RAIL INSTALLATION
Fig. 1
1
4
5