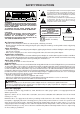
SAFETY PRECAUTIONS The lightning flash with an arrowhead symbol, within the equilateral triangle, is intended to alert the user to the presence of uninsulated "dangerous voltage" within the product's enclosure that may be of sufficient magnitude to cause an electric shock. The exclamation point within the equilateral triangle is intended to alert the user to the presence of important operating and maintenance (servicing) instructions in this owner manual.
IMPORTANT SAFETY INSTRUCTIONS 1) 2) 3) 4) 5) 6) 7) 8) Read these instructions. Keep these instructions. Heed all warnings. Follow all instructions. Do not use this apparatus near water. Clean only with dry cloth. Do not block any ventilation openings. Install in accordance with the manufacturer’s instructions. Do not install near any heat sources such as radiators, heat registers, stoves, or other apparatus (including amplifiers) that produce heat.
TABLE OF CONTENTS Safety Precautions ......................................1 Important Safety Instructions ................. 2 Table of Contents .................................... 3 Disc Formats ............................................. 4 Accessories ............................................... 5 Remote Control ........................................ 5 Control Reference Guide ...................... 6-8 Installing the Stand ................................. 9 Screen Viewing Angle Adjustment .......
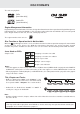
DISC FORMATS The unit can playback. DVDs [8cm/12cm disc] Audio CDs [8cm/12cm disc] Region Management Information Region Management Information: This unit is designed and manufactured to respond to the Region Management Information that is encoded on DVD discs. If the Region number printed on the DVD disc does not correspond to the Region number of this unit, this unit cannot play that disc. The region number of this unit is 1.
ACCESSORIES Please check and identify the supplied accessories. Remote control (with battery) ........................................................................................... x 1 AC adaptor ......................................................................................................................... x 1 AC power cord .................................................................................................................. x 1 12V car plug adaptor ...............................
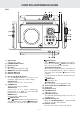
CONTROL REFERENCE GUIDE Remote Control 1) ZOOM button Zoom into an image of a DVD. TV MODE button In stop mode, select whether to output the video signal. TV shows "AUTO" means output signal depends on DVD (either NTSC or PAL). TV shows "PAL" or "NTSC" which means output signal fixed to PAL or NTSC. 2) STOP button Stop playing a disc. 8) STANDBY button Press to switch between standby and on. NEXT button 9) Move forward through titles, chapters or tracks on a disc.
CONTROL REFERENCE GUIDE Unit 1) Open button Open the disc door. 2) POWER ON/OFF switch 3) DC IN 12V jack 4) Disc Door Close by pushing the disc door. 5) MONITOR 1 & 2 ports (output) 6) DIGITAL OUT jack 7) DVD AV OUT jack 8) Cursor ( , , , ) button Use to highlight selections on a menu screen and make adjustments to certain settings. ENTER button Confirm selections on a menu screen. 9) ZOOM button Zoom into an image of a DVD.
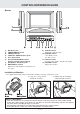
CONTROL REFERENCE GUIDE Monitor 1) 2) 3) 4) 5) 6) 7) 8) DC IN 12V jack POWER ON/OFF switch POWER indicator VIDEO IN / AUDIO IN (AV1) jacks AV1 / AV2 switch AV2 (EZ VIEW CABLE) socket Connect to main unit port (Input) Headphone / Earphone jacks BRIGHTNESS control Adjust the relative lightness or darkness of the color. 9) COLOR control Adjust for color intensity.
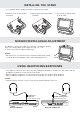
INSTALLING THE STAND • Use supplied stand installing the monitors stand up on the table. 1) Hold the screws on the monitor's backward. 2) Put the metal stand in the plastic stand hole. 3) The monitor is stablely stand up on the table. SCREEN VIEWING ANGLE ADJUSTMENT The Monitor is designed to allow users to have a comfortable viewing angle. The viewing angle can be adjusted as top -12°~ +12°. 1. Push screen frame to adjust viewing angle.
POWER SUPPLY A. Using the car power adaptor The included 12V car power adaptor is designed for use with vehicles that have a 12V, negative ground electrical system. DC IN 12V 3 To jack Back of main unit Bottom of Monitor 2 To monitor socket 1 To AV2 socket 12V car power adaptor EZ VIEW CABLES Bottom of Monitor 4 1To AV2 socket To the 12V car socket EZ VIEW CABLES Cautions: • Use this unit only with the included 12V car power adaptor. Use with other car adaptors could damage the system.
CONNECTIONS Using this Unit with Other Equipment A. Connecting Game Systems/Video Equipment • You can connect Game Systems or other Video Equipment for playback through the monitors. Right side of unit (Yellow) (Red) (Yellow) To AV IN Jack (White) (Red) (White) AUDIO/VIDEO CABLE Game Systems/ Video Equipment AUDIO/VIDEO CABLE (included) Watching Video Equipment 1. Turn on the unit, slide the AV IN / DVD switch to select "AV IN". 2.
CONNECTIONS C. Connecting a Stereo Receiver or Amplifier Analog connection Rear of unit Stereo Receiver or Amplifier (No need to connect the Yellow video plug) (Yellow) (Red) (Yellow) (White) (Red) AUDIO/VIDEO CABLE (White) AUDIO/VIDEO CABLE (included) Connecting to a Surround Sound System Rear of unit Audio equipment with digital audio input jack COAXIAL DIGITAL AUDIO CABLE Listening to another audio equipment 1. Turn on the Unit. 2.
MONITOR You can use monitor without the main unit (DVD Player) POWER SUPPLY A. Using the AC adaptor This AC adaptor operates on AC between 100V and 240V. AC ADAPTOR 2 3 1 To AC ADAPTOR To DC IN 12V jack To wall outlet Left side of monitor Cautions: • The included AC adaptor is for use with this monitor only. Do not use them with other equipment. • When the monitor is not going to be used for long time, disconnect the AC adapter from the wall outlet. B.
MONITOR CONNECTIONS A. Connecting the DVD Player or VCR Bottom of Monitor (Yellow) (Red) (White) AUDIO/VIDEO CABLE (not included) (Red) (White) (Yellow) DVD PLAYER / VCR Watching a DVD player and VCR 1. Turn on the monitor, slide the AV 1/ AV 2 switch to select "AV 1". 2. Turn on the DVD player or VCR and follow the instructions provided with it to playback. Note: If you have a mono VCR, the volume level from the speakers will be low. B.
MONITOR Note: When the monitor is connected to the main unit(DVD Player) with the EZ VIEW cable, DC 12V power, Audio/ Video and IR signals will all be supplied through the EZ VIEW cable to the connected monitor. So there is no need for another power source to be connected to the DC 12V jack on the right side of the monitor.
INSTALLATION GUIDE UNIT OPERATION Turning the Unit On The system is in the standby condition (STANDBY indicator lights) when the AC power supply cord or Car adapter is connected. 1. Slide the POWER ON/OFF switch (on unit) to the ON position to turn ON the unit. • If you select DVD the DVD logo (start-up picture) will appear on screen. 2. Press STANDBY button (on remote) to standby mode. 3. Press STANDBY button (on remote) again to turn ON the unit.
DVD CD Basic playback PLAYING A DISC This owner’s manual explains the basic instructions of this unit. Some DVD discs are produced in a manner that allows specific or limited operation during playback. As such, the unit may not respond to all operating commands. This is not a defect in the unit. Refer to the instructions accompanying the DVD disc. “ ” may appear on the screen during operation. A “ ” means that the desired operation is not permitted by the unit or disc. Playing a Disc 1.
PLAYING A DISC Fast Forward/Fast Reverse DVD CD 1. Press the SEARCH or SEARCH button of the remote unit when a disc is playing. • The disc begins fast scan at x2 speed. or • Four speeds are available. Each time SEARCH SEARCH button is pressed, the speed of fast scan changes in the following sequence: Note : You also can press and hold 2. Press the / (PREV/NEXT) buttons on unit repeatedly to select different fast scan speeds. PLAY button to resume playback at normal speed.
DVD PLAYING A DISC Angle selection Some DVDs contain scenes which have been shot from a number of different angles. For these discs, the same scene can be viewed from each of these different angles. 1. While you are playing a DVD with different angles recorded, press the ANGLE button to view the number of the current angle. 2. Press the ANGLE button repeatedly to change the scene to the next angle from those recorded. • About two seconds later, playback continues from the new angle you selected.
DVD SPECIAL FUNCTIONS Basic playback DISPLAY function Using DISPLAY, you can check and change the current settings of the following : ANGLE, AUDIO and SUBTITLE. • While the disc is playing, press the DISPLAY button of the remote unit to display the screen shown below. Elapsed time: Elapsed time from the beginning of the chapter which is currently playing. Remaining time: Remaining time of the title which is currently playing.
SPECIAL FUNCTIONS Basic playback Locating a specific title DVD If a DVD disc contains title numbers, you can locate a specific title by directly selecting a title number. 1.Press the GOTO button. 2. Press , or button to highlight a specific field and press the corresponding number button(s) for the title you want. 3. Press the ENTER button to confirm. The unit will start playback about 3 seconds later.
SPECIAL FUNCTIONS Basic playback Locating a specific time DVD CD You can move to a specific location by entering its corresponding time (hours, minutes, seconds) 1. Press the GOTO button. 2. Press or button to highlight time. DVD CD 3. Press the corresponding number buttons for the setting point you want. • The first two numbers you entered represent hours. • The second two numbers you entered represent minutes. • The third two numbers you entered represent seconds. 4.
Advanced playback CD / DVD PROGRAMMABLE MEMORY DVD Programmable memory The two types of programmed playback provided by this unit are title programmed playback and chapter programmed playback. Title / Chapter programmed playback 1. Press the MEM (Memory) button while the disc is stopped. 2. Enter the title numbers in in -- -- . Use or . button to move the highlight to chapter and enter the chapter numbers Title Chapter 3. Use , , or button to move to the other field. 4. Repeat steps 2 to 3. 5.
Advanced playback REPEAT PLAYBACK You can play a specific title or chapter repeatedly. (Title repeat, chapter repeat, A-B repeat) Repeating a title DVD You can play the same title repeatedly. 1. While the disc is playing, press the REPEAT DISC button until the “ Repeat Title ” indicator displays on the screen. The current title is played repeatedly. Repeating a chapter You can play the same chapter repeatedly. 2.
Advanced playback REPEAT PLAYBACK Repeating a specific section DVD CD You can play a specific section repeatedly. 1. While the disc is playing, press the REPEAT A-B button at the beginning of the section (( Rep A- ) is displayed) you want to play repeatedly. 2. Press the REPEAT A-B button again at the end of the section (( Rep A-B ) is displayed). 3. The Unit will immediately begin replaying your selection. To resume normal playback 4.
PLAYING A PICTURE FILE DISCS This unit can play a Picture files recorded on CD-R and CD-RW discs. Playing Digital Picture files 1. Press the OPEN switch to open the disc door. 2. Hold the Picture disc by its sides and carefully fit it onto the central spindle in the disc compartment with the label side facing up. Press down until you hear a “click”. 3. Push the door to close. 4. The unit will take a short while to load the disc. PLAY button. The first picture will automatically display after 6 seconds. 5.
CUSTOMIZING THE FUNCTION SETTINGS LANGUAGE setting STEP 1 2 STEP 1. Press the SETUP button in stop mode. 2. Use or button to highlight your desired language, then press the ENTER button. The screen will change to your selected language. 3. To exit the SETUP MENU and return to the normal screen, press the RETURN button. Language Video Audio Rating English Deutsch Français Español Italiano Svenska Português VIDEO setting TV Shape 1. Press the SETUP button in stop mode. 2.
CUSTOMIZING THE FUNCTION SETTINGS Brightness 1. Press the SETUP button in stop mode. 2. Use or button to select Video, then press the ENTER button. 3. Use or button to select Brightness, and then press the ENTER button. 4. Use or button to shift and select the Off/On, then press the ENTER button. 5. If you want to exit the SETUP MENU and return to the normal screen, press the RETURN button. On : Picture will be brighter to clarify details. Off : Picture will have deepened colors. Edges 1.
CUSTOMIZING THE FUNCTION SETTINGS Virtual Effect This function provides virtual surround sound effects from just two speakers. 1. Press the SETUP button in stop mode. 2. Press or button to select Audio, press the ENTER button. 3. Press or button to select Virtual Effect, then press the ENTER button. 4. Press or button to select ON or OFF, then press the ENTER button. 5.
LANGUAGE CODE LIST Code Language Name Code Language Name Code Language Name Code Language Name AA AB AF AM AR AS AY AZ BA BE BG BH BI BN BO BR CA CO CS CY DA DE DZ EL EN EO ES ET EU FA FI FJ FO FR Afar Abkhazian Afrikaans Ameharic Arabic Assamese Aymara Azerbaijani Bashkir Byerlorussian Bulgarian Bihari Bislama Bengali Bangla Tibetan Breton Catalan Corsican Czech Welsh Danish German Bhutani Greek English Esperanto Spanish Estonian Basque Persian Finnish Fiji Faroese French FY GA GB GL GN GU HA HI HR HU H
MAINTENANCE Cleaning Disc A defective or soiled disc inserted into the unit can cause sound to drop out during playback. Handle the disc by holding its inner and outer edges. • Do NOT touch the surface of the unlabeled side of the disc. • Do NOT stick paper or tape on the surface. • Do NOT expose the disc to direct sunlight or excessive heat. • Clean the disc before playback. Wipe the disc from the center outward with a cleaning cloth. • NEVER use solvents such as benzine or alcohol to clean the disc.
TROUBLE SHOOTING GUIDE SYMPTOM CAUSE (AND REMEDY) No power. • Check that the Car plug adapter or AC adapter and AC power cord are connected. • Turn on the unit. The remote does not function. • Remove any obstacles between the remote and the unit. • Use the remote near the unit. • Point the remote at the remote sensor on the unit. • Replace the battery in the remote. DVD No sound or only a very low-level sound is heard. • Make sure that you've select DVD mode.