
Operating instructions


7
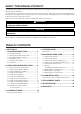
DISPLAY
Displays the time when the microwave is not being used, as well as your selected
cook times and cooking functions.
A
UTO COOK
The Auto Cook buttons consist of frequently used items allowing you to select
them quickly and conveniently without having to select manual settings.
A
UTO DEFROST Press this button to defrost food according to its weight.
C
OOK Press this button to cook beverage, bacon, frozen dinner, frozen breakfast.
AUTO REHEAT Press this button to reheat dinner plates, casseroles, or pastas.
S
OFTEN MELT Press this button to soften or melt specifi c foods (listed beside the button).
NUMBERS
Press the number buttons to enter the cook time, power level, quantity or
weight.
M
ORE/LESS
The More/Less buttons allow you to adjust the pre-set cook times once you
have started cooking. They only work in the “Reheat”, “Auto Cooking”, “One
Minute+” and “Time Cook” modes.
P
OWER LEVEL Press this button to select a cooking power level.
P
AUSE/CANCEL Press this button to stop the oven or to clear all entries.
C
LOCK Press this button to set the time.
S
OUND ON/OFF
Press the Sound On/Off button to activate or deactivate all sounds (beeps) of
the microwave oven. The display will show either On or Off, according to the
selected setting. Press the START button to return to the clock display.
L
IGHT HI/LOW/OFF
Press the Light Hi/Low/Off button once for bright light, twice for night light, or
three times to turn the light completely off.
VENT HI/LOW/OFF
Press the Vent Hi/Low/Off button once for high fan, twice for low fan, or three
times to turn the fan off.
K
ITCHEN TIMER
This microwave allows you to use your microwave oven as a timer. Use the
Kitchen Timer button for timing up to 99 minutes, 99 seconds.
S
TART
Press this button to start a selected function or cycle. If you open the door after
the oven begins to cook, close the door and press the START button again.
ONE MINUTE+
This simplifi ed control saves you time, letting you quickly start cooking at 100%
power without the need to press the START button.
Refer to “Using your microwave oven” on pa
ges 8 to 15 for detailed information on the buttons described in the
table above.
1
2
3
4
5
6
7
8
9
10
11
12
13
16
17
15
14