
Spec Sheet

Step 4: Congure your barcode scanner
Congratulations! Your iPad POS system is ready to use. For more information visit http://bit.ly/VendiPadPOS.
Step 3: Set up your iPad
Plug the power cable from the printer package into the
power connector on the back of the receipt printer. Plug the
other end into an AC outlet, and switch it on.
Plug the other end of the LAN cable into a free LAN port on
your broadband router.
1
2
3
4
1
2
3
4
3 4
Before you begin, make sure your iPad is charged and is connected to your Wi-Fi network.
If you purchased the Premium package, a Socket barcode scanner is included.
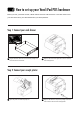
Bolt your iPad into the point-of-sale stand.
Open the App Store on your iPad, and search for "Vend". Install the Vend point-of-sale app.
Sign into Vend with your store details.
Tap the Settings cog button in the top left corner, and turn on your receipt printer in the list.
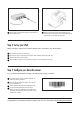
Unpack the barcode scanner, install the batteries, and
charge it as per the instructions.
Press and hold the small power button on the barcode
scanner until it turns on.
Scan this barcode. The scanner will beep three times.
Pair your iPad with the barcode scanner. Tap the
Settings icon and choose Bluetooth. Turn Bluetooth on,
if necessary. Tap the barcode scanner in the list, named
“Socket CHS”, to pair it.