PS47 Official User Guide
TABLE OF CONTENTS WELCOME I. GET ACQUAINTED II. HAND GESTURES III. GETTING STARTED 3 4-6 7-8 9-10 IV. YOUR HOME SCREEN 11-12 V. CONNECTING TO WI-FI 13-15 VI. EMAIL SET UP 16-17 VII. SAVING BATTERY 18 VIII. MICRO SD CARDS 19 IX. DEVICE STORAGE X. TRANSFER FILES XI. FILE FORMATS XII. KINDLE FOR ANDROID 20 21-22 23 24-25 XIII. READING EPUBS 26 XIV. CAMERA 27 XV. BLUETOOTH 28 XVI. INSTALLING APPS 29-30 XVII. PREINSTALLED APPS 31-32 XVIII. MULTIMEDIA 33-34 XIX.
Thanks for Choosing Cruz Thank you for purchasing a Velocity Micro CRUZ PS47! We appreciate your business and know you’ll love your brand new multimedia device. This guide is intended to help you with initial setup of your device and to familiarize you with the Android operating system. Stay Up to Date For the latest updates, news, giveaways, downloads, and support tips, be sure to follow CRUZ on facebook and twitter! Check out our homepage at www.cruzreader.
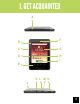
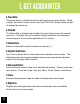
Acquainted I.
I. GET ACQUAINTED A. Power Button The power button is located on the top left-hand corner of the device. While running, this button is also used to send the CRUZ into “Sleep” mode, as well as waking the device up. B. Status Bar The Status Bar is a black strip located at the top of the screen with several icons on it. Primarily this bar is used to display notifications and statuses concerning your Cruz and the applications it is running. C.
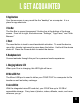
Acquainted I. GETGetting ACQUAINTED H. Applications Your Home-screen is very much like the “desktop” on a computer. It is a place for app shortcuts. I. Nav Bar The Nav Bar is a semi-transparent 3-button bar at the bottom of the home screen. From left to right, the buttons are: “Settings,” “App Panel,” and “Web Browser.” J. Reset The reset button is inset to avoid accidental activation. To reset the device, use a thin, slender instrument to press down the button. Hold until the device shuts off.
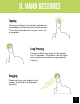
II. HAND GESTURES Tapping Touch your finger to the screen and remove immediately to select an item on the screen. This is the equivalent of a mouse “click” on a computer. Long-Pressing Press and hold your finger on the screen for 2-3 seconds. Oftentimes, this will open menu options or perform an app-specific function. Dragging Press and hold your finger on the screen, then slide in the desired direction.
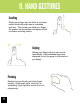
II. HAND GESTURES Scrolling Sliding your finger up and down in a vertical motion scrolls through menus, websites, and lists. The quicker you slide your finger, the greater the momentum and speed of the on-screen scrolling motion. Swiping Sliding your finger left and right scrolls horizontally. Some eReader apps are designed to turn the page in the direction you swipe.
Getting Started III. GETTING STARTED To start your Cruz, press the on/off button located bottom-right corner of the device. When you first turn on the Cruz, you will be greeted with a CRUZ logo, then an ANDROID logo, and then your Home screen. The display has a screen timeout by default set to 10 min. If the unit is left inactive for that period of time, the screen will go dark as if turned off. However, it is simply in standby mode.
Getting Started III. GETTING STARTED Quick Launch Buttons There are four buttons along the bottom edge of the touch screen. These are the Quick Launch buttons. They control the most frequently used functions in the Android platform. From left to right: MENU Generally this button is utilized for accessing settings, options, or preferences. It’s function varies from app to app. HOME Returns to the home screen. Keep in mind hitting the Home button does not necessarily stop an application from running.
Started IV. YOURGetting HOMESCREEN Think of your home screen as your desktop. What goes on the home screen is up to you. You can fill the space with any combination of shortcuts, widgets, and folders you like. Some preinstalled shortcut icons will appear at the bottom, and a Google Search Widget appears at the top. You have five customizable home screens in total. When you power up your Cruz for the first time, you’ll see the main homescreen panel.
Started SCREEN IV. YOURGetting HOME Adding Widgets to the Home Screen Widgets allow you to place a function of an app onto your Home Screen. For instance, you may add an Analog clock, calendar, picture frame, and other useful widgets. To add a widget, long-press, or tap/hold your finger on any open space on your home screen, and select Widgets from the context menu that opens. From there, select any of the available widgets.
Getting Started TO WI-FI V. CONNECTING Now that you’re familiar with the layout of the device and some of the functions of the Home Screen, it’s time to set up your Wi-Fi. You will need Wi-Fi access to download eBooks through the Kindle for Android app, as well as web surfing and email. For the sake of this guide, the assumption is that you are connecting your Cruz to your home Wi-Fi Access Point (AP) or a free unsecured Wi-Fi hotspot.
Getting Started TO WI-FI V. CONNECTING Choose which network you want to connect to and tap the name of that network. When dealing with an unprotected Wi-Fi network, a confirmation box will flash on the screen. Tap “Connect” to continue. When dealing with a secure Wi-Fi network, first check the box that says “Show Password.” This makes it easier to see that you have entered the password correctly. Then tap the password text field for the popup keyboard, and enter the security key.
Getting Started TO WI-FI V. CONNECTING If the Wi-Fi router is not found automatically, you may need to scan again by tapping Menu > Scan. If scanning appears ineffective, turn off Wi-Fi and turn it back on again, then scan again. If your Wi-Fi seems to turn off when your device sleeps, you may disable this under Menu > Wi-Fi Sleep Policy.
Getting Started VI. EMAIL SET UP The pre-installed Email app is a simple but effective email client for both POP3 and IMAP email services. Configuration is automatic for some email services. For those that are auto-configured, you only need to enter the email address and password then tap “next.” You may want to check the box that reads “Send email from this account by default.” If this does not work, you’ll need to manually configure your account. Details are below.
Getting Started VI. EMAIL SET UP Email Step-by-Step 1. Open the email app and enter your email address and password. 2. Complete the fields for the Incoming server portion of the manual setup. Be sure your username is entered correctly, whether email address or alias. If a security setting is not specified by your email provider, choose “None.” 3. Tap “Next,” and the app will test your settings. Wi-Fi is required to be active for this step. 4. Complete the fields for the Outgoing server settings 5.
GettingBATTERY Started VII. SAVING LIFE Helpful Tips 1. Streaming audio or video apps will use a lot of battery life. 2. Disable Wireless Network Positioning. You can turn it off from Settings > Location & Security > Use wireless networks. 3. Switch off Wi-Fi if you are not close to a strong source for an extended period of time. 4. Use a quick screen timeout. You can alter this option from Settings > Display > Screen timeout. 5.
Getting Started VIII. MICRO SD CARDS There are two areas for storage on your CRUZ PS47. The first is a micro SD card slot located on the bottom of your device. You may purchase micro SD cards in a wide range of capacities, varying from 1 GB – 32 GB. FRONT BACK To properly load the micro SD card, place your CRUZ flat on a surface with the screen facing up. Then, with the FRONT of the micro SD card showing, slowly and carefully push the card into the micro SD card slot located on the side of the device.
Getting Started IX. DEVICE STORAGE There are two areas for storage on your CRUZ PS47 Name microSD Storage Built-in Storage Capacity Supports 32 GB 2 GB total Appears in ASTRO as Storage Uses /sdcard The Android apps you install will write file folders and app content to this removable storage. You may copy content to this location, but be careful of what you delete as it may impact the function of your apps. 960 MB The Android operating system is loaded onto this internal embedded storage.
Getting Started FILES X. TRANSFER Transfer Via USB Cable Step 1 Turn on your Cruz and connect a mini USB cable to the Cruz device and to your PC. Step 2 Slide the notification panel down and tap the alert that reads, “USB Connected Select to copy files to/from your computer,” then tap “Turn on USB Storage.” Step 3 This should only be required once. After doing this, the alert should change to “Turn off USB storage ...” This is normal when tethered.
Getting Started FILES X. TRANSFER Transfer Via SD Card Step 1 Unmount the micro SD card: Settings>SD and Device Storage>Unmount SD Card Step 2 Eject your micro SD card and insert it into SD card adapter. Then insert SD card adapter into your PC Step 3 Transfer files as needed Step 4 Eject micro SD card from PC, remove micro SD card from the SD card adapter, and reinsert into Cruz Common Actions Using ASTRO File Manager App 22 Copy File(s) Long click on the file name, select “Edit/Copy.
GettingFORMATS Started XI. FILE The file formats that this device can support are numerous, but not infinite. The pre-installed apps should allow you to view many Microsoft Office file formats, including Word, Excel, and PowerPoint, as well as many eReader file types, and music and video file types. Most files should work, but not all files are encoded the same. For example, some MPEG4 files will work but others may not, depending on how they were encoded and compressed.
GettingFOR Started ANDROID XII. KINDLE Your CRUZ PS47 offers the remarkable opportunity of carrying all your favorite books in the palm of your hand. Each Cruz comes pre-loaded with the Kindle for Android application. This application is a library portal allowing users to sign into their personal Kindle account, browse an immense selection of literature, and purchase/download books in an instant! There are even 100’s of free eBooks available for download.
GettingFOR Started ANDROID XII. KINDLE Step 4 When you find a book you want to download/purchase, tap the book cover to select it and advance to the next step. Step 5 The app will bring you to a product page with the book cover, the price, a “Buy Now” button, as well as a synopsis of the book lower on the page. Step 6 Tapping “Buy Now” will confirm that you want to add the book to your library. To begin the download, tap the “Menu” button on the status bar, then select “Sync” from main Kindle screen.
Getting Started EPUBS XIII. READING Many eReader files are in the ePUB file format. The Cruz does not natively support this file format, so an additional application available on the Cruz Market must first be downloaded. Keep in mind that many ePUB files are also DRM-protected, preventing illegal distribution of publications. In order to read DRM-protected ePUBs, you will need to download a specialized application that manages the DRM requirements.
Started XIV.GettingCAMERA There is one forward-facing camera on your CRUZ PS47. It is capable of capturing both still images and video. There is a pre-installed application used to shoot photos/video and save them to your device. To access this application, tap the round, grey icon on your homescreen labeled “Camera.” A grey panel will appear on the right with several buttons. Among these is a vertical sliding-panel with 2 main options on it.
Getting Started XV. BLUETOOTH The CRUZ PS47 has built-in Bluetooth functionality, which enables other devices to interact with your CRUZ PS47 wirelessly.
Getting Started XVI. INSTALLING APPS Android Applications are available via the Cruz Market or other third-party sources like the developer’s website. Many Android apps are designed for use with phone devices rather than just tablet devices, but many, many more are great for use on tablets! You can also install any number of eReader Android apps, allowing you to have multiple eReader file formats, all on one Cruz. Visit the CruzMarket at www.cruzmarket.com for access to 100’s of apps.
Getting Started XVI. INSTALLING APPS When you download an app to the CRUZ PS47, it is saved as a zip folder in the “download” directory on the SD card. Inside the zip folder is an .apk file and other source files. It is vital that you keep these files together in their original folders. To install applications from the web, follow these steps: 30 Step 1 Download your app to your PC. Files are often distributed in archive format (ie: .ZIP, .RAR). If so, their contents first must be extracted so that the .
Getting Started XVII. PREINSTALLED APPS Icon Name Requires Wi-Fi Clock No Allows you to set alarms for easy reminders. ASTRO No This is your file management application. Use it to browse your storage locations, transfer files and even install/uninstall apps. Amazon ® Kindle Yes Your primary eBook library portal. Wi-Fi is only required for downloading new content. Browser Yes Default Internet browser.
Getting Started XVII. PREINSTALLED APPS Icon 32 Name Requires Wi-Fi Facebook Mobile Yes Log into your Facebook account and stay connected on the go! Gallery No Access photo or video files for play or display right on the Cruz’s full color screen. Use your Cruz as a digital picture frame or fully mobile media hub! Music No Jam to your favorite tunes! Insert headphones or listen through the built-in speakers. This app can play music while other apps are running.
Started XVIII. Getting MULTIMEDIA Not only does your Cruz hold tons of eBooks, browse the web, and keep you connected with social networks, it also functions as a great portable media player too. Just load up your micro SD card with your music collection, favorite pictures, or digital videos and take all of your favorites on the road with you. Before beginning, you should understand that certain file formats are not supported. These file formats may require additional applications to open.
Started XVIII. Getting MULTIMEDIA Video After loading your music onto your Cruz, tap the music icon (found by default on your home screen or by opening the App Panel). You’ll be given the option of selecting by Artist, Song, Album, or custom Playlist. Tap to select. Your selection will begin to play through the Cruz’s built in speakers or through external headphones if attached via the headphone port.
Started XIX. SYSTEMGettingREQUIREMENTS Platform Windows Mac Operating System Microsoft® Windows® 2000. Me, XP, Vista, 7 or higher (32-bit or64-bit) MAC OS X v10.4, 10.5 or higher preferred Processor Intel Pentium II or AMD K6-2 300MHz or higher PowerPC G3 300MHz or higher Including Intel-based Macs RAM 128 MB 256 MB Video Super VGA (800 X 600) or higher resolution video adapter and monitor Super VGA (800 X 600) or higher resolution video adapter and monitor USB USB 2.0 USB 2.
Getting Started LICENSE XX. OPEN SOURCE Where such specific license terms entitle you to the source code of such component, that source code is available upon request via vmsupport@velocitymicro at cost from Velocity Micro or visiting our website in http://cruzsupport.velocitymicro.com/ at least three years from the purchase date of this product.
XXI. SUPPORTGetting&Started REGISTRATION Cruz Support is available at http://cruzsupport.velocitymicro.com. There are a large number of informative knowledgebase articles to answer your questions. You can also download the latest manual for your product. Once registered at the site, you can register your product, submit tickets for support, and administer your tickets and personal profile. How Do I Get Support? 1.
Getting Started INFO XXII. CONTACT Address 7510 Whitepine Road Richmond, VA 23237 Phone 800-296-4312 Fax 804-897-4777 Websites www.cruzreader.com www.velocitymicro.
Started XXIII. FCCGettingINFORMATION This device complies with Part 15 of the FCC Rules. Operation is subject to the following two conditions: (1) this device may not cause harmful interference, and (2) this device must accept any interference received, including interference that may cause undesired operation. Changes or modifications not expressly approved by the party responsible for compliance could void the user’s authority to operate the equipment.