VMA107 NODEMCU V2 LUA BASED ESP8266 DEVELOPMENT BOARD USER MANUAL
VMA107 USER MANUAL 1. Introduction To all residents of the European Union Important environmental information about this product This symbol on the device or the package indicates that disposal of the device after its lifecycle could harm the environment. Do not dispose of the unit (or batteries) as unsorted municipal waste; it should be taken to a specialized company for recycling. This device should be returned to your distributor or to a local recycling service. Respect the local environmental rules.
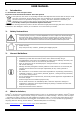
VMA107 5. Overview VMA107 The NodeMcu is an open-source firmware and development kit that helps you to prototype your IOT product within a few Lua script lines. operating voltage ................................................................................................... 5 VDC (USB) dimensions .................................................................................................... 5.8 x 3.2 x 1.2 cm weight ................................................................................
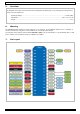
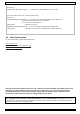
VMA107 8. Installing the VMA107 Download and install the latest Arduino® IDE on https://www.arduino.cc/en/Main/Software. Start the Arduino® IDE and open the preference window (File Preferences). Enter http://arduino.esp8266.com/versions/2.4.0/package_esp8266com_index.json in the Additional Boards Manager URL’s field. Close and re-start the Arduino® IDE. Open the Boards Manager and select the “NodeMCU 1.0(ESP-12E Module)”. Open the Boards Manager again and install the ESP8266 software. V.
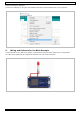
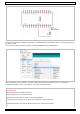
VMA107 Restart the Arduino® IDE again. Connect your VMA107 by using the micro USB and select the communications port of your computer. 9. Wiring and Software for the Blink Example Connect an LED to your VMA107. A resistor is not needed as the I/O’s of the VMA107 are current-limited. The LED can be replaced by for example the VMA331 so a relay can be controlled. V.
VMA107 The sketch for this Blink example is integrated in the ESP8266 board information, which you already installed in the Arduino® IDE. In your Arduino® IDE, open the examples and select ESP8266 and the example Blink. Now, the following code is loaded in your IDE. Please take note that the VMA107 has no on-board LED.
VMA107 void setup() { pinMode(LED_BUILTIN, OUTPUT); // Initialize the LED_BUILTIN pin as an output } // the loop function runs over and over again forever void loop() { digitalWrite(LED_BUILTIN, LOW); // Turn the LED on (Note that LOW is the voltage level // but actually the LED is on; this is because // it is active low on the ESP-01) delay(1000); // Wait for a second digitalWrite(LED_BUILTIN, HIGH); // Turn the LED off by making the voltage HIGH delay(2000); // Wait for two seconds (to demonstrate
Velleman® Service and Quality Warranty Since its foundation in 1972, Velleman® acquired extensive experience in the electronics world and currently distributes its products in over 85 countries. All our products fulfil strict quality requirements and legal stipulations in the EU. In order to ensure the quality, our products regularly go through an extra quality check, both by an internal quality department and by specialized external organisations.