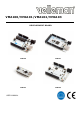
VMA100/VMA101/VMA102/VMA103 DEVELOPMENT BOARD USER MANUAL VMA100 VMA101 VMA102 VMA103
VMA100/VMA101/VMA102/VMA103 USER MANUAL 1. Introduction To all residents of the European Union Important environmental information about this product This symbol on the device or the package indicates that disposal of the device after its lifecycle could harm the environment. Do not dispose of the unit (or batteries) as unsorted municipal waste; it should be taken to a specialized company for recycling. This device should be returned to your distributor or to a local recycling service.
VMA100/VMA101/VMA102/VMA103 4. What is Arduino® Arduino® is an open-source prototyping platform based in easy-to-use hardware and software. Arduino® boards are able to read inputs – light-on sensor, a finger on a button or a Twitter message – and turn it into an output – activating of a motor, turning on an LED, publishing something online. You can tell your board what to do by sending a set of instructions to the microcontroller on the board.
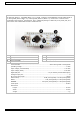
VMA100/VMA101/VMA102/VMA103 VMA101 The VMA101 (Arduino® compatible) Mega 2560 is a microcontroller board based on the ATmega2560. It has 54 digital input/output pins (of which 15 can be used as PWM outputs), 16 analogue inputs, 4 UARTs (hardware serial ports), a 16 MHz crystal oscillator, a USB connection, a power jack, an ICSP header, and a reset button. It contains everything needed to support the microcontroller.
VMA100/VMA101/VMA102/VMA103 VMA102 The VMA102 (Arduino® compatible Nano 3.0) is a small, complete, and breadboard-friendly board based on the ATmega328 (Arduino Nano 3.x) orATmega168 (Arduino ® Nano 2.x). It has more or less the same functionality of the Arduino® Duemilanove, but in a different package. It lacks only a DC power jack, and works with a mini-B USB cable instead of a standard one.
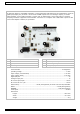
VMA100/VMA101/VMA102/VMA103 VMA103 The VMA103 (Arduino® compatible Leonardo) is a microcontroller board based on the ATmega32u4. It has 20 digital input/output pins (of which 7 can be used as PWM outputs and 12 as analogue inputs), a 16 MHz crystal oscillator, a micro USB connection, a power jack, an ICSP header, and a reset button. It contains everything needed to support the microcontroller. Connect it to a computer with a USB cable or power it with an AC-to-DC adapter or battery to get started.
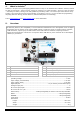
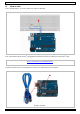
VMA100/VMA101/VMA102/VMA103 6. How to Use In the example below, we use the VMA100 to make an LED blink. Connection. First, download the latest Arduino® Integrated Development Environment (IDE) from the Arduino® page. https://www.arduino.cc/en/Main/Software Install the software and use a USB cable to connect your VMA board to your computer. a. LED13 will blink. V.
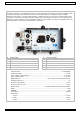
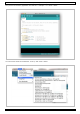
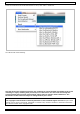
VMA100/VMA101/VMA102/VMA103 Next, launch the Arduino® application and click File > Examples > 01. Basics > Blink. You will need to select the used board. To do so, click Tools > Board. V.
VMA100/VMA101/VMA102/VMA103 Select the serial device of the Arduino board. To do so, click Tools > Serial Port. The LED should now be blinking. Use this device with original accessories only. Velleman nv cannot be held responsible in the event of damage or injury resulting from (incorrect) use of this device. For more info concerning this product and the latest version of this manual, please visit our website www.velleman.eu. The information in this manual is subject to change without prior notice.
Velleman® Service and Quality Warranty Since its foundation in 1972, Velleman® acquired extensive experience in the electronics world and currently distributes its products in over 85 countries. All our products fulfil strict quality requirements and legal stipulations in the EU. In order to ensure the quality, our products regularly go through an extra quality check, both by an internal quality department and by specialized external organisations.