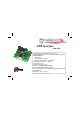
USB interface VMB1USB Allows interfacing of the VELBUS system to a PC Galvanic separation between the computer and the VELBUS system LED indication for: power supply USB communication status VELBUS data transmission and reception Required power supply: 12 … 18VDC Consumption: 13mA USB port consumption : 35mA USB V2.0 compatible (full speed 12Mb/s) Uses Microsoft Windows ‘usbser.sys’ driver Driver (.
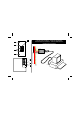
5 CONNECTION EXAMPLE - AANSLUITVOORBEELD EXAMPLES DE CONNEXION - ANSCHLUSSBEISPIELE EJEMPLO DE CONEXIÓN 1 2 L 3 H VMB1USB H L BUS + 12V - 4 + L 6 7 H -12V+ 8 BUS TWISTED PAIR (0.
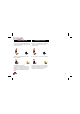
1. 2. 3. 4. 5. 6. 7. 8. Velbus TX (transmit) LED Velbus RX (receive) LED USB status LEDs Velbus power LED Connection to the USB port of the computer 12V power supply Velbus Termination 1. 2. 3. 4. 5. 6. 7. 8. Velbus TX (zend) LED Velbus RX (ontvang) LED USB status-LED Velbus voedings-LED Verbinding naar de USB-poort van de computer 12V voeding Velbus Afsluiting 1. 2. 3. 4. 5. 6. 7. 8.
TERMINATION AFSLUITING TERMINAISON If the module is connected at the start or end Indien de module op het begin of het einde van of a cable on the VELBUS, place the de VELBUS-kabel aangesloten is, moet de ‘TERM’ jumper. ‘TERM’ jumper geplaatst worden. Placez le cavalier TERM uniquement dans un module connecté au début ou en fin de connexion Velbus. Remove the jumper in all other cases. In alle andere gevallen moet deze verwijderd worden. Effacez le cavalier dans tous les autres modules.
VERSCHLUSS TERMINACIÓN Montieren Sie die TERM-Steckbrücke bei einem Modul am Anfang oder am Ende des Velbus-Anschlusses. Ponga el jumper TERM sólo en un módulo conectada al principio o al extremo de conexión Velbus. Entfernen Sie die Steckbrücke bei allen anderen Modulen. Borre el jumper en todos los otros módulos.
CONNECTION AANSLUITING For connection between the modules, use twisted pair cable (ex. EIB 2x2x0.8mm2, UTP 8x0.51mm - CAT5 or other). Use minimum 0.5mm² cable. For long wiring (>50m) or if a lot of modules ( > 10) are connected to one wire, use 1mm² cable. Connect the 1218Vdc (mind the polarity) and connect the bus wires (mind the polarity). Om de modules met elkaar te verbinden gebruikt men best een twisted-pair kabel (EIB 2x2x0.8mm2, UTP 8x0.51mm - CAT5 of gelijkwaardig).
CONNEXION ANSCHLUSS Utilisez un câble torsadé (UTP ou autre) pour interconnecter les modules. Utilisez un câble avec un diamètre minimal de 0.5mm². Utilisez un câble avec un diamètre de 1mm² pour les longues connexions (> 50m) ou lorsque la connexion comporte une multitude élevée de modules (> 10). Connectez le 12-18VCC (respectez la polarité) et le câblage du bus (respectez la polarité). Verbinden Sie die 12V bis 18V Gleichspannung (achten Sie auf die Polarität) mit dem Modul.
CONEXIÓN Utilice un cable trenzado (EIB 2x2x0.8mm2, UTP 8x0.51mm CAT5 u otro) para interconectar los módulos. Utilice un cable con un diámetro mín. de 0.5mm². Utilice un cable con un diámetro de 1mm² para conexiones largas (> 50m) o si están conectados muchos módulos (> 10) a un cable. Conecte 12-18VDC (respete la polaridad) y el cableado del bus (respete la polaridad). Conecte el módulo al puerto USB del ordenador. Utilice un cable USB de la marca Velleman: CW076, CW077, CW078, CW090A, CW090B o CW090C.
USE - GEBRUIK - EMPLOI - ANWENDUNG - USO
USE Connect the module to the VELBUS system and the computer (see connection diagram). At the first connection of the module with a computer without the driver, the upper USB status LED will blink. The computer operating system detects new hardware and will ask to localize and to install the driver (.inf file). This file can be downloaded from www.velleman.be/ download/files/ After the installation of the driver, both LEDs will alternately blink as an indication that communication is established.
GEBRUIK Verbind de module met het VELBUS-systeem en de computer (zie aansluiting). Wanneer de module voor de eerste maal met een computer verbonden wordt waarop de driver nog niet geïnstalleerd is, zal de bovenste USB status-LED knipperen. Het besturingssysteem van de computer detecteert nieuwe hardware en vraagt om de driver (.inf bestand) te lokalizeren en te installeren. Dit bestand kan men downloaden van de website www.velleman.
EMPLOI Connectez le module au système VELBUS et l’ordinateur (voir le câblage). Lors de la première connexion avec un ordinateur sur lequel le pilote n‘est pas encore installé, la LED d’état de l’USB du haut clignotera. Le système d’exploitation de l’ordinateur détecte un nouveau périphérique et demande à localiser et à installer le pilote (le fichier .inf). Ce fichier peut être téléchargé à partir du site www.velleman.
ANWENDUNG Verbinden Sie das Modul mit dem VELBUS-System und dem Computer (siehe Anschlüsse). Wenn das Modul zum ersten Mal mit einem Computer verbunden wird, auf dem der Treiber noch nicht installiert ist, wird die obere USB-Status-LED blinken. Das Betriebssystem des Computers detektiert die neue Hardware und bittet darum, den Treiber (inf. Datei) zu lokalisieren und installieren. Sie können diese Datei von unserer Website www.velleman.be/download/files/ herunterladen.
USO Conecte el módulo al sistema VELBUS y al ordenador (véase el cableado). Al conectar el módulo por primera vez a un ordenador que todavía no está equipado con el driver, el LED de estado superior USB parpadeará. El sistema operativo del ordenador detecta nuevo hardware y pide que localice e instale el driver (el fichero .inf). Es posible descargar este fichero de la página web www.velleman.
VELLEMAN Components NV Legen Heirweg 33 9890 Gavere Belgium Europe www.velleman.be www.velleman-kit.com www.velbus.be Modifications and typographical errors reserved - © Velleman Components nv.