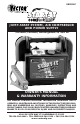
VEC020C pro TM JUMP-START SYSTEM, AIR COMPRESSOR AND POWER SUPPLY Portable, Cordless, Rechargeable 12 Volt DC OWNER’S MANUAL & WARRANTY INFORMATION THIS MANUAL CONTAINS IMPORTANT INFORMATION REGARDING SAFETY, OPERATION, MAINTENANCE AND STORAGE OF THIS PRODUCT. BEFORE USING, READ AND UNDERSTAND ALL CAUTIONS, WARNINGS, INSTRUCTIONS AND PRODUCT LABELS, PLUS YOUR VEHICLE’S BATTERY MANUFACTURER GUIDELINES. FAILURE TO DO SO COULD RESULT IN INJURY AND/OR PROPERTY DAMAGE. 4140 SW 28TH WAY, FT.
SAFETY INFORMATION WARNINGS: Warning statements identify conditions or practices that may result in personal injury or loss of life. 1) When working with lead acid batteries, always make sure immediate assistance is available in case of accident or emergency. 2) Always use protective eyewear when using this product: contact with battery acid may cause blindness and/or severe burns, be aware of first aid procedures in case of accidental contact with battery acid.
CONTENTS 1. INTRODUCTION ................................................................................. 4,5 2. USING START-IT COMPACT PRO™ AS A JUMPSTART SYSTEM .............. 5,6 2.1 Easy, Step-by-Step Jumpstarting Instructions ...................................................... 6,7 3. CHARGING/RECHARGING ................................................................. 7 3.1 110/120-Volt AC Charging ............................................................................. 8 3.
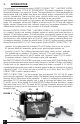
1. INTRODUCTION Congratulations on selecting the Vector® START-IT COMPACT PRO™ JUMPSTART SYSTEM, AIR COMPRESSOR and 12 VOLT DC POWER SUPPLY. This compact jumpstarter is unique in the amount of energy it can supply for it’s size. The internal battery is a Vector-developed high density sealed lead acid battery that stores and delivers energy comparable to full sized ordinary jumpstarters.
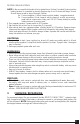
1. 12 Volt DC Accessory Socket, with 20 amp overload protection 2. Safety ON/OFF Power Switch (No Key Required) 3. Charge Status Push Button 4. LED Charging/Battery Status Indicators 5. Heavy-Duty #6AWG Welding Quality Jumper Cables 6. Heavy-Duty, 350 Amp Copper Clamps 7. Exclusive, Quick-Release, Clamp Holsters 8. 110/120-Volt UL approved AC/DC Charging Adapter Cord 9. 12 Volt DC/DC Charging Adapter Cord 10. Built-in Emergency Work light 11. Light ON/OFF Switch 12.
7. Do not attempt to jumpstart a frozen battery. 8. NEVER submerge this unit in water. 9. Do not wear vinyl clothing when jumpstarting a vehicle-friction can cause dangerous static electricity sparks. Remove all jewelry or metal objects-they can cause short circuits or react with battery acid to cause severe burns. Remove or secure any loose clothing items, and restrain long hair, before attempting jumpstart procedure. WARNINGS: Lead-acid batteries generate hydrogen gas during normal operation.
POSITIVE GROUND SYSTEMS: NOTE: In the rare event that the vehicle to be started has a Positive Grounded System (positive battery terminal is connected to chassis): Replace step 4 and 5 above with steps, 4a and 4b and then proceed to steps 6 through 8 below. 4a. Connect negative (-) black clamp to vehicle battery ‘s negative terminal. 5a. Connect positive (+) red clamp to vehicle chassis or a solid, non-moving, metal vehicle component or body part.
3.1 110/120-VOLT AC CHARGING IMPORTANT: • MAKE SURE ALL SWITCHES ARE TURNED OFF DURING RECHARGING • Charge unit for full 24 hours, prior to first use • Recharge unit fully after each use • Recharge unit every two months, when it has not been used CAUTION: Make sure compressor switch is off otherwise the battery will not accept the charge. 1. Simply plug the 110/120 volt AC plug of the AC/DC adapter/charger cord into any standard 110/120 volt AC wall outlet. 2.
4. OPERATION AS A 12 VOLT PORTABLE POWER SUPPLY NOTE: Make sure that the unit ‘s Safety ON/OFF switch is ALWAYS in the OFF position when using the 12 Volt DC accessory outlet. 1. Lift up the cover of the unit‘s 12 Volt DC cigarette lighter-type accessory receptacle (See Figure 1). 2. Insert the 12 volt DC plug from the appliance into the receptacle on the unit. 3. Switch on the appliance, and operate as usual. CAUTION: Do not use this unit to operate appliances that draw more than 20 amps.
6.1 COMPRESSOR USE IMPORTANT: Read Instructions Carefully To Avoid Possible Injury Or Property Damage. The compressor may be used by removing the air hose from it’s storage channel and if required, fitting an appropriate nozzle to the air hose. An On/Off switch located on the side of the unit controls the power to the compressor and the gauge light. Refer to Figures 2 and 3 for locations of compressor hose, nozzle storage hatch and hose. Return hose to it’s storage compartment after use. 6.
7. REPLACEMENT PARTS For replacement parts (bulbs, batteries, fuses, etc.), contact Vector Customer Service: (954) 584-4446 or toll-free (866) 584-5504. 7.1 BULB REPLACEMENT Tools needed - small Phillips screwdriver. 1. Unscrew (counterclockwise) and remove two Phillips screws. 2. Remove the lens cover. 3. Remove the burned-out bulb. 4. Replace with a new bulb (12-volt 0.2 amp Krypton bulb). 5. Snap the lens cover back into place. 6. Replace (clockwise) the screws and carefully tighten.
VECTOR 120 DAY/TWO YEAR LIMITED WARRANTY PROGRAM This limited warranty program is the only one that applies to this product, and it sets forth all the responsibilities of Vector Manufacturing, Ltd., regarding this product. There is no other warranty, other than those described herein. This Vector Manufacturing, Ltd. product is warranted, to the original purchaser only, to be free of defects in materials and workmanship for 120 days from the date of purchase without additional charge.