
Instructions / Assembly

2
NOTE: All references to LEFT, RIGHT, FRONT, and
REAR indicate the cab enclosure position on the
equipment when facing forward while seated in
the operator position.
NOTE: The clear vinyl may be wrinkled from
shipping. The wrinkles will come out within a few
days. A blow dryer may be used to blow warm
air onto the clear vinyl to progress the wrinkle
removal. Be careful not to overheat the vinyl.
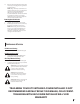
CAUTION: Do not trailer your UV with
the cab enclosure installed, doing so
may result in damage of the
enclosure, and will void any warranty.
CAUTION: Your enclosure may cover
some warning labels on your UV. Be
sure to adhere to all manufacture
warnings.
CAUTION: The enclosure is not
completely air tight. Do not attempt
to completely seal enclosure as fresh
air is needed to prevent asphyxiation.
Always ensure proper ventilation as
needed.
Installing the Cab Enclosure
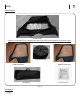
1. Locate the front flap on the roof enclosure.
Unroll, trim and attach a complete length
of velcro tape to the front flap of the
roof enclosure. Do not remove adhesive
backing of the velcro tape at this time.
See Figure 3-2.
Figure 3-2
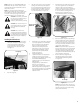
2. Raise the cargo bed.
3. Slide the roof enclosure over the top of the
existing UV roof into the desired position.
It is recommended to have another person
help you with this step. Make sure to tuck
the back of the roof enclosure inside the
rear cab and bulkhead. See Figure 3-3.
Figure 3-3
5. Evaluate where you would like to apply the
velcro tape supplied. It is recommended
that velcro strips not span interrupted
surfaces in order to prevent loss of
adhesion. Clean and dry the desired
application areas; do not use oil based
cleaning products. Rubbing alcohol is
preferred as it will evaporate without
residue. See Figure 3-5.
6. Tips for installing Velcro
7. 1.) Warm machine to room temperature
2.) Make sure vehicle is clean and dry
(recommend using rubbing alcohol or any
other NON OIL BASED product)
3.) Warm are where you will install Velcro
with blow dryer
4.) Apply Thin layer of 3m Adhesive
Promoter, as per instructions
5.) Once Velcro is installed, go over Velcro
with blow dryer while pressing firmly on
Velcro making sure there are no air bubbles.
6.) Recommended time for maximum
adhesion is 72hrs
7. Evaluate where you would like to apply the
velcro tape supplied. It is recommended
that velcro strips not span interrupted
surfaces in order to prevent loss of adhesion.
Clean and dry the desired application areas;
do not use oil based cleaning products.
Rubbing alcohol is preferred as it will
evaporate without residue. See Figure 3-5.
Figure 3-5
8. Cut velcro strips to length corresponding to
the desired application surfaces. Attach the
hook and loop velcro to the roof enclosure
and the doors in its desired position. Excess
velcro tape should be retained for possible
replacement of applied strips.
NOTE: Due to the wind forces experienced
during normal operation, it is recommended
that a full seam of velcro be applied to the
sides of the windshield, with appropriate
interruptions for windshield clamps and any
other removable components.
9. Remove adhesive backing from the
front flap, and apply pressure against
the windshield top mounting surface.
See Figure 3-6.
Figure 3-6
NOTE: Due to the wind forces experienced
during normal operation, it is recommended
that a full seam of velcro be applied along
the top of the windshield.
Front Flap
Front Flap
Rear Cab and
Bulkhead
Velcro Strips