
User's Manual


User Manual VC-EVCC
© 2021 Vector Informatik GmbH Version 1.3.0 105
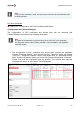
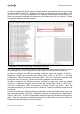
In order to configure the PnC contract certificate and the associated private key in one step,
select the window “VCVCCU – Diagnostic Console” and select the tab “Stored Data”. Click
on “2E FD 2C – VCVCCU Configuration PnC Contract Certificate and Private Key Write”.
Write the requested certificate and private key (832 bytes) and click on “Execute”. Please
note that the response must be positive.
Configuration of OEM Provisioning Certificate/Private Key:
The configuration of the OEM provisioning certificate and the associated private key follows
the same approach as the configuration of the contract certificate and its private key.
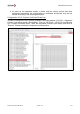
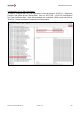
In order to configure the OEM provisioning certificate, select the window “VCVCCU –
Diagnostic Console” and select the tab “Stored Data”. Click on “2E FD 27 – VCVCCU
Configuration OEM Provisioning Certificate Write”. Write the requested certificate (800
bytes) and click on “Execute”. Please note that the response must be positive.
In order to configure the OEM provisioning certificate’s private key, select the window
“VCVCCU – Diagnostic Console” and select the tab “Stored Data”. Click on “2E FD 28 –
VCVCCU Configuration OEM Provisioning Certificate Private Key Write”. Write the
requested private key (32 bytes) and click on “Execute”. Please note that the response must
be positive.
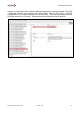
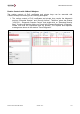
In order to configure the OEM provisioning certificate and the associated private key in one
step, select the window “VCVCCU – Diagnostic Console” and select the tab “Stored Data”.
Click on “2E FD 29 – VCVCCU Configuration OEM Provisioning Certificate and Private Key
Write”. Write the requested certificate and private key (832 bytes) and click on “Execute”.
Please note that the response must be positive.