
User`s guide


Vector
ZCB
Single
&:lard
canputer
The
Jl
34-pin
connector
is
I1UIl'bered
beginning
with
the
front
left-hand
pin
as
nuI'li:>er
1.
The back:
left-hand
pin
is
number
2.
3 and 4
are
the
next
two
pins
to
the
right,
and
so
on,
with
odd
pin
I1UIl'bers
in
the
front
and
even
pin
numbers
in
the
back.
The
connector
cable
is
set
up
so
that
the
lines
are
nurrbered
1
to
34
fran
left
to
right.
The
functional
definition
of
each
line
is
as
follows:
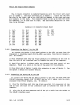
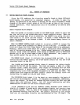
2.4.8
Parallel
I/O
Connector
Pinout
Olart
l.
N.C.
11.
N.C.
21.
N.C.
31.
PB7
2.
GND
12.
N.C.
22.
PA7
32.
PB6
3.
PC2
13.
PAO
23.
N.C.
33.
N.C.
4.
PC3
14.
N.C.
24.
N.C.
34.
+5V
5.
PCO
15.
PA2
25.
PBl
6.
PCl
16.
PAl
26.
PBO
7.
PC5
17.
PA4
27.
PB3
8.
PC4
18.
PA3
28.
PB2
9.
PC?
19.
PA6
29.
PBS
10.
PC6
20.
PAS
30.
PB4
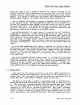
Connecting
the
Sprint
3
to
the
ZCB
To
connect
the
Sprint
3
high
speed
printer
to
the
ZCB,
you
must
have
the
ZCB-Sprint
3
interface
board
(PIN 42-3200)
available
from
Vector
Graphic,
Inc.
To
install:
1)
Plug
interface
card
into
top
34
pin
parallel
I/O
connector
on
the
ZCB
so
that
the
bulk
of
the
interface
card
is
towards
the
rear
of
the
cat!puter.
2)
Feed
flat
Sprint
3
Ribbon
Cable
out
through
the
rear
panel
of
the
canputer.
There
is
a
notch
at
the
tcp
of
the
panel
for
this
purpose.
3)
Plug
other
end
of
Sprint
3
cable
into
connector
at
rear
of
Sprint
3.
see
the
Sprint
3 manual
for
further
details.
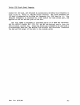
2.4.9
Connecting
the
Vector
MP
to
the
ZCB
To
connect
the
Vector
MP
dot
matrix
printer
to
the
ZCB,
you
must
have
the
ZCB-MP
interface
board
(P/N
12-3400)
and
an
I/O
I
cable
(P/N
16-1202)
available
fran
Vector
Graphic,
Inc.
To
install:
1)
Plug
the
interface
card
into
top
34
pin
parallel
I/O
connector
of
the
ZCB
so
that
the
bulk
of
the
interface
card
is
towards
the
rear
of
the
canputer.
2)
Plug
the
24
pin
DIP
connector
end
of
the
I/O
I
cable
into
the
socket
on
the
ZCB-MP
interface
card.
Rev. I-B
6/11/80
2-19