2-514-606-11(1) Digital HD Video Camera Recorder Digital HD Video Camera Recorder Operating Instructions Before operating the unit, please read this manual thoroughly, and retain it for future reference.
Read this first For customers in the U.S.A. and CANADA WARNING HVR-Z1U only RECYCLING LITHIUM-ION BATTERIES To prevent fire or shock hazard, do not expose the unit to rain or moisture. Lithium-Ion batteries are recyclable. You can help preserve our environment by returning your used rechargeable batteries to the collection and recycling location nearest you. For more information regarding recycling of rechargeable batteries, call toll free 1-800-8228837, or visit http://www.rbrc.
Owner’s Record The model and serial numbers are located on the bottom. Record the serial number in the space provided below. Refer to these numbers whenever you call upon your Sony dealer regarding this product. Model No.HVRSerial No. Model No.ACSerial No. CAUTION You are cautioned that any changes or modifications not expressly approved in this manual could void your authority to operate this equipment.
malfunctions. Be careful when placing the camera near a window or outdoors. • Do not aim at the sun. Doing so might cause your camcorder to malfunction. Take pictures of the sun only in low light conditions, such as at dusk. • Do not hold the camcorder by the following parts. Playing back HDV tapes on other devices A tape recorded in the HDV format cannot be played back on a device that is not compatible with the HDV format.
Table of Contents Read this first ............................................................................................. 2 Quick Start Guide Recording movies ...................................................................................... 8 Getting started Step 1: Checking supplied items.............................................................. 10 Step 2: Charging the battery pack............................................................ 11 Using an outside power source ................
Customizing the picture quality – PICTURE PROFILE ............................ 34 Customizing the sound............................................................................. 37 Adjusting the audio recording level – Microphone volume level ................................ 37 Connecting external audio sources ........................................................................... 38 Selecting the recording channel ................................................................................
Advanced operations Using the Menu Troubleshooting Troubleshooting ...............................106 Warning indicators and messages ...111 Selecting menu items .........................57 Using the (CAMERA SET) menu – STDYSHOT TYP/FRAME REC, etc. ...............................................58 Additional Information Using the (AUDIO SET) menu – INT MIC SET/XLR SET, etc. .....64 HDV format and recording/playback 114 Using the (LCD/VF SET) menu – LCD COLOR, etc. .....................
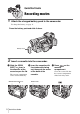
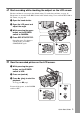
Quick Start Guide Recording movies 1 Attach the charged battery pack to the camcorder. To charge the battery, see page 11. Press the battery pack and slide it down. Battery Pack 2 Insert a cassette into the camcorder. a Slide the OPEN/ EJECT lever in the direction of the arrow to open the lid. The cassette compartment comes out automatically. OPEN/EJECT 8 lever Quick Start Guide b Insert the cassette with its window-side facing out, then push the center of the back of the cassette.
3 Start recording while checking the subject on the LCD screen. The date and time is not set up in the default setting. To set the date and time, see page 16. The pictures are recorded in the HDV format in the default setting. To record in the DVCAM or DV format, see page 20. Quick Start Guide a Open the hood shutter. b Open the LCD panel and adjust the angle. c While pressing the green button, set the POWER switch to CAMERA. d Press REC START/STOP. Recording starts.
Getting started Large eyecup (1) To attach it to your camcorder, see page 16. Step 1: Checking supplied items Make sure you have following items supplied with your camcorder. The number in parentheses indicates the number of that item supplied. Wireless Remote Commander (1) AC Adaptor/charger (1) A/V connecting cable (1) Power cord (1) Component video cable (1) Connecting cord (DK-415) (1) Shoe adaptor (1) To attach it to your camcorder, see page 130.
Step 2: Charging the battery pack You can charge the battery by attaching the “InfoLITHIUM” battery pack (L series) to the AC Adaptor/charger. While pressing the battery back down, slide it in the direction of the arrow. The charge lamp lights up and charging starts. When the battery was successfully charged The battery mark on the display window will light up in the shape of a full battery ( ) that indicates that the battery has been sufficiently charged for use.
2 Press BATT RELEASE and slide the battery pack up. To check the remaining battery – Battery Info C Possible recording time using the viewfinder. Charging time Approximate number of minutes required when you fully charge a fully discharged battery pack using the supplied AC Adaptor/charger at 25°C (77°F). (10 – 30°C (50 – 86°F) recommended.
Battery pack Continuous recording time Typical recording time NP-F970 195 200 200 355 385 380 z Tip • You can also use NP-F550/F730/F750/F960 battery packs. After charging these battery packs, make a trial recording with them before an actual recording to see the recording time. The recording time varies depending on the environment where the camcorder is used. Press DISPLAY/BATT INFO to display the recording time on the screen. b Note • Figures are those of 60 Hz.
1 Set the mode switch to VCR/ CAMERA. No power will be supplied if the mode switch is set to CHARGE. Step 3: Turning the power on Press the attaching part of the connecting cord (DK-415), and slide it down. You need to set the POWER switch to the respective power mode to record or play back pictures. When using this camcorder for the first time, the [CLOCK SET] screen appears (p. 16). 3 Connect the connecting cord (DK-415) to the AC Adaptor/charger.
Step 4: Adjusting the LCD panel and viewfinder Adjusting the LCD panel Getting started You can adjust the angle and brightness of the LCD panel to meet various recording situations. Even when there are obstructions between you and the subject, you can check the subject on the LCD screen during recording by adjusting the angle of the LCD panel. z Tip • If you rotate the LCD panel until it faces down, you can close and restore the LCD panel to the original position with the LCD screen facing out.
When the picture in the viewfinder is hard to see If you cannot see the picture in the viewfinder clearly under bright circumstances, use the supplied large eyecup. To attach the large eyecup, stretch it a little and align it with the groove of the viewfinder, then slide it up to the end. You can attach the large eyecup facing either the right or left side. Large eyecup (supplied) Step 5: Setting the date and time Set the date and time when using this camcorder for the first time.
3 When [50i/60i SEL] on the (OTHERS) menu is set to 50i, the clock is displayed in 24-hour display. Press MENU. CAMERA SET WB PRESET WB OUTDR LV L GA I N SETUP SHOT TRANS COLOR CORRCT STEADYSHOT STDYSHOT TYP [ MENU ] : END 4 Getting started Select the (OTHERS) menu by turning the SEL/PUSH EXEC dial, then press the dial. OTHERS RETURN ASS I GN BTN CLOCK SET WORLD T I ME LANGUAGE QU I CK REC BEEP REC LAMP [ MENU ] : END 5 Select [CLOCK SET] by turning the SEL/PUSH EXEC dial, then press the dial.
Step 6: Inserting a cassette tape For the information about the type of cassette you can use with your camcorder, and details on these cassettes (such as write-protection, etc.), see page 114. 2 Insert a cassette with its window-side facing out. Window-side Push the center of the back of the cassette lightly. b Note • Do not force the cassette into the compartment. This may cause a malfunction of your camcorder. 1 Slide the OPEN/EJECT lever in the direction of the arrow and open the lid.
Step 7: Setting the screen language 5 Select [LANGUAGE] by turning the SEL/PUSH EXEC dial, then press the dial. You can select the language to be used on the LCD screen. 6 Select the desired language by turning the SEL/PUSH EXEC dial, then press the dial. 7 Press MENU to hide the menu screen. Getting started z Tip • Your camcorder offers [ENG [SIMP]] (simplified English) for when you cannot find your native tongue among the options. POWER switch 1 Turn on your camcorder.
Recording 3 Recording movies appears on the LCD screen. The HDV format lamp lights up and your camcorder is set to recording standby after a while. Your camcorder is set to record using the 1080/60i specification of the HDV format in the default setting. To record using the 1080/50i specification (PAL system), see “To record using the 1080/50i specification (PAL system)” below. To record in the DVCAM/DV format, see “To record in the DVCAM/DV format” below.
To record in the DV format On the (IN/OUT REC) menu, set [REC FORMAT] to [DV], and [ REC MODE] to [DV SP] (p. 71). When the menu screen is turned off, appears on the LCD screen, the DVCAM format lamp lights up, and your camcorder is set to recording standby. Indicators displayed during recording The indicators will not be recorded on the tape. The camera settings data (p. 51) will not be displayed during recording.
However, the transition from the last recorded scene may not be smooth. • The following functions may not work correctly with a tape recorded in the HDV, DVCAM, and DV formats mixed: – Date search – Index search z Tip • You can record the color bars on a tape. If you record movies including the color bars, you can adjust the color while observing the color bars when you are viewing the pictures on a TV or monitor. To display the color bars, press BARS. Press BARS again to hide the color bars.
To record a wider range of view Press the W side of the power zoom lever. The subject appears farther away (Wide angle). To record a closer view Press the T side of the power zoom lever. The subject appears closer (Telephoto). z Tip • You can display the zoomed position with a number or a bar display. Select [BAR] or [NUMBER] in [ZOOM DISPLAY] on the (OTHERS) menu (p. 80). The zoom position is displayed with a bar display in the default setting.
Recording in mirror mode You can turn the LCD panel towards the subject so that you and your subject can share the image being recorded. You can also utilize this function when recording yourself, or to keep the attention of small children attracted to the camcorder while you record them. Up to about 100 degrees Displaying the recording setup information – Status check You can check the setup value of the following items in the standby mode or during recording.
To turn off the display of the recording setup information Press STATUS CHECK. b Note • Information of the picture profile setup does not appear when it is set to [OFF]. Adjusting the exposure The exposure is adjusted automatically in the default setting. If you want to record brighter or darker pictures than those of the auto exposure adjustment, use the manual adjustment function (p. 28), or customize the picture quality by using the PICTURE PROFILE function (p. 34).
b Note • The back light function is canceled when you press the ASSIGN button assigned to SPOTLIGHT. • You cannot use the back light function if 2 or more items out of iris, gain, and shutter speed are adjusted manually. Recording the subject lit by strong light – SPOTLIGHT When the subject is lit by strong light, such as in a theater, use the spotlight function to prevent people’s faces from appearing excessively white. Assign the SPOTLIGHT function to one of the ASSIGN buttons in advance.
the same lighting condition as that of the subject. 5 Press (one-push) WHT BAL. A or B flashes quickly. When the white balance is adjusted, A or B lights up and the adjustment data is memorized. To recall adjustment data from the memory 1 During recording or in the standby 2 Set the WHT BAL switch to A or B. 3 Press WHT BAL. The white balance is set to the recalled adjustment. b Note • Avoid subjecting your camcorder to mechanical shock while A or B is flashing.
Recording using manual adjustments You can manually adjust the iris, gain, etc. according to the brightness of the recording scene or in order to obtain desired effects. Adjust the iris, gain, shutter speed, and white balance after setting the AUTO LOCK switch to the center position to release the auto lock mode. Depending on the position of the AUTO LOCK switch, you can hold or release the settings of these functions. Position Purpose AUTO LOCK To adjust automatically.
To restore automatic adjustment Press IRIS, or set the AUTO LOCK switch to AUTO LOCK. b Note • If you set the AUTO LOCK switch to AUTO LOCK, other manually adjusted items (gain, shutter speed, white balance) also become temporarily automatic. • As you shift the zoom from W (wide) to T (telephoto), the aperture value varies from F1.6 to F2.8. Adjusting the gain Adjust the gain manually when shooting blackish or dark objects if you do not want the AGC (auto gain control) to be activated.
Adjusting the shutter speed number that appears on the screen, the slower the shutter speed. To restore automatic adjustment You can manually adjust and fix the shutter speed for your convenience. Depending on the shutter speed, you can make the subject look still, or on the contrary, emphasize the fluidity of movement. Press SHUTTER SPEED, or set the AUTO LOCK switch to AUTO LOCK.
If [ND1] flashes Set the ND FILTER switch to 1 to turn on [ND1]. If [ND2] flashes Set the ND FILTER switch to 2 to turn on [ND2]. If [ND OFF] flashes Set the ND FILTER switch to OFF to turn off the indicator. If there is a part of the screen where brightness is over a certain level, the part may appear excessively white when played back. By displaying the zebra pattern on such a part, you can be reminded to adjust the brightness before recording.
4 Select the desired level by turning the SEL/PUSH EXEC dial, then press the dial. Select a value from [70] to [100] or [100+]. If you select [70], the zebra pattern appears at the part of 70±5 % of the brilliance signal. If you select [100+], the zebra pattern appears at all areas of the brilliance signal over 100 %. The default setting is [100+]. 5 Press MENU to hide the menu screen. 6 Set the ZEBRA/PEAKING switch to ZEBRA. The zebra pattern will appear.
1 During recording or in the standby mode, set the FOCUS switch to MAN (manual). 9 appears. 2 Rotate the focus ring and adjust the focus. 9 changes to when the focus cannot be adjusted any farther. 9 changes to when the focus cannot be adjusted any closer. Record the subject with PUSH AUTO pressed. If you release the button, the setting returns to manual focusing. Use this function to shift the focus from one subject to another. The scenes will transition smoothly.
Enhancing the outline to focus – PEAKING You can enhance the outline of the image on the screen for easier focusing. Customizing the picture quality – PICTURE PROFILE You can customize the picture quality by adjusting the color intensity, brightness, white balance, etc. You can set 6 different picture quality settings depending on the recording time of day, the weather, or the camera person, and store them in the memory.
Item Adjustment [SKINTONE To make wrinkles less DTL] noticeable by suppressing the outlines on the part in skin color to be enhanced. [OFF]: No adjustment [TYPE1] (the color range recognized as a skin color is narrow) to [TYPE3] (the color range recognized as a skin color is wide) 1 2 In the standby mode, press PICTURE PROFILE. Select a picture profile number by turning the SEL/PUSH EXEC dial, then press the dial. [PP1] through [PP6] are available.
Item Adjustment [CINEMATONE γ ] [OFF]: Normal recording [TYPE1]: A better tone scale than the standard video gamma reproduces natural intermediate colors between a skin color and neutral colors. A skin color will look lively when recorded with this setting. Further, the reproduction of extremely precise description of highlighted parts provides depth in pictures.
If you decide not to reset the picture profile, select [NO]. 6 Press PICTURE PROFILE. Adjusting the audio recording level – Microphone volume level You can adjust the microphone volume while recording. Checking the volume with headphones is recommended. If you input external audio sources, you can adjust the recording level of channel 1 and channel 2 separately. (To adjust the volume of the internal microphone, operate the AUDIO SELECT CH1 switch and the CH1 dial.
The audio level meter appears. 2 During recording or in the standby mode, adjust the volume of the microphone by turning the AUDIO LEVEL dial. Adjust the microphone level of channel 1 by turning the CH1 dial, and that of channel 2 by turning the CH2 dial. Adjust the internal microphone volume by turning the CH1 dial. Connecting external audio sources Connect an external microphone and/or audio device to the INPUT1/INPUT2 connectors.
1 In the standby mode, press MENU. Align the pins of the plug to the INPUT1 or INPUT2 connectors, and connect them securely. 2 Select the (AUDIO SET) menu by turning the SEL/PUSH EXEC dial, then press the dial. 3 Select [MIC SELECT] by turning the SEL/PUSH EXEC dial, then press the dial. 4 Select [XLR] by turning the SEL/ PUSH EXEC dial, then press the dial. 5 Select [XLR SET] by turning the SEL/ PUSH EXEC dial, then press the dial.
9 Source Connector Menu PHANTOM switch Audio device INPUT1 [INPUT1 LEVEL] – [LINE] OFF INPUT2 [INPUT2 LEVEL] – [LINE] OFF Recording a picture using various features Developing scenes smoothly – Shot transition Press MENU to hide the menu screen. b Note • When you use an external microphone, make sure that the wind screen will not be included in the picture using [ALLSCAN MODE] (p. 87). • If you connect a device other than PHANTOM compatible devices, set the PHANTOM switch to OFF.
REC START/STOP Recording using the Shot transition function 1 Press STORE/CHECK/EXEC repeatedly to turn on the EXEC lamp. 2 Press REC START/STOP. 3 Press the button (A or B) in which the desired setting was stored. Pictures will be recorded with the settings that were changed automatically from the current ones to the stored ones. 1 2 0 min REC SHOT TRANS S Step 1: Store the settings 1 Press STORE/CHECK/EXEC repeatedly to turn on the STORE lamp. 2 Adjust the desired items manually.
To cancel the operation Press STORE/CHECK/EXEC repeatedly until the STORE/CHECK/EXEC lamps are all turned off. 5 Select a revision type by turning the SEL/PUSH EXEC dial, then press the dial. [OFF] Normal recording. Revising a specific color – Color Correction [COLOR REVISN] Revises the color that has been set in the memory. You cannot revise the color that is not included in the memory (the part is displayed in black and white as set in [COLOR EXTRCT]).
10Adjust the color tone. Increasing [R] makes the selected color reddish, and decreasing [R] makes it less reddish (as cyan increases). Increasing [B] makes the selected color blueish, and decreasing [B] makes it less blueish (as yellow increases). No adjustment will be made at 0. To specify a color Select PHASE Color phase from 0 through 31. 0 (violet) - 8 (red) - 16 (yellow) - 24 (green) - 31 (blue) In the default setting, memory 1 is set to 19, memory 2 to 8.
Fading in and out of a scene – FADER You can add the following effects to currently recording pictures. Assign the FADER function to one of the ASSIGN buttons in advance. See page 86 for details on how to assign a function. 2 Press REC START/STOP. The FADER indicator stops flashing and disappears when the fade is complete. To cancel the operation Press the ASSIGN button assigned to the FADER function repeatedly until the FADER indicators disappear.
Press the ASSIGN button assigned to the index function. When pressed during recording appears for about 7 seconds and an index signal is recorded. When pressed in the standby mode flashes. After you press REC START/STOP to start recording, appears for about 7 seconds and an index signal is recorded. Before starting to record, press the ASSIGN button assigned to the index function again. b Note • You cannot record an index signal on a recorded tape afterward.
4 5 Select the (IN/OUT REC) menu by turning the SEL/PUSH EXEC dial, then press the dial. 10Press REC START/STOP to start recording. 11Press MENU to hide the menu screen. Select [EXT REC CTRL] by turning the SEL/PUSH EXEC dial, then press the dial. To stop recording Press REC START/STOP again. 6 Select [REC CTL MODE] by turning the SEL/PUSH EXEC dial, then press the dial. 7 Select a recording control mode by turning the SEL/PUSH EXEC dial, then press the dial.
Reviewing the most recently recorded scenes – Rec Review You can view a few seconds of the scene recorded just before you stopped the tape. Assign the Rec Review function to one of the ASSIGN buttons in advance. See page 86 to assign a function. Recording ASSIGN 1 – 6 In the standby mode, press the ASSIGN button assigned to the Rec Review function. The last few seconds of the most recently recorded scene are played back. Then, your camcorder is set to the standby mode.
Playback 3 Press m (rewind) to go to the point you want to view. 4 Press N (play) to start playback. Viewing movies Make sure you have a recorded cassette inserted into your camcorder. Some of the operations are possible using the Remote Commander. When you want to play back recordings on your TV, see page 52. When playing back the tape, select the (IN/OUT REC) menu, [VCR HDV/DV], then [AUTO] (the default setting). To adjust the volume Adjust the volume by pressing VOLUME – (decrease) / + (increase).
b Note • Due to the difference in the synchronization, the picture and sound will disappear momentarily where the system switches between 60i and 50i. • Tapes recorded in the HDV format cannot be played back on video cameras using the DVCAM/DV format or mini-DVCAM (DV) players. • DV format tapes are played back on your camcorder only if they are recorded in the SP mode ( appears on the screen). Tapes recorded in the LP mode are not played back.
Various playback functions You can locate the end of the last recording, or display the date of recording and camera settings data. b Note • The END SEARCH function will not work correctly when there is a blank section between recorded sections on the tape. Displaying the screen indicators You can display the time code and other information together with the pictures on the screen. Press DISPLAY/BATT INFO.
Displaying the date/time and camera settings data – Data code During playback, you can view the date/time data and the camera settings data that are automatically recorded while recording pictures on a tape. To hide the camera settings data Select the (OTHERS) menu, [DATA CODE], then [DATE] (p. 80). Each time you press DATA CODE, the date/ time indicator turns on and off. Displaying the video information – Status check Set the POWER switch to VCR. You can check the setup value of the following items.
Playing the picture on a TV TV connections differ depending on the type of TV. Connect your camcorder to the wall outlet using the supplied connecting cable (DK415) and AC Adaptor/charger for the power supply (p. 13). Refer also to the instruction manuals supplied with the devices to be connected. To copy to another tape, see page 89.
DVCAM (DV) format is played back, an equivalent picture with DVCAM (DV) format is output regardless of [COMPONENT] setting. • Only video signals are output from the COMPONENT OUTPUT jack. To output audio signals, connect the white and red plugs of the A/V connecting cable to the audio input jack of your TV.
Viewing the picture on a 16:9 TV or a 4:3 TV When you have an S video jack on your TV or VCR TV or VCR S video cable (optional) A/V connecting cable (supplied) Yellow White Red Green Component video cable (supplied) Blue Signal flow Connect your camcorder and your TV or VCR using either cables described below. To connect the TV using the component video cable This connection is recommended when your TV has COMPONENT VIDEO jacks.
menu, [DV WIDE REC], then [OFF] before recording (p. 72). When your TV is connected to a VCR Connect your camcorder to the LINE IN input on the VCR using the A/V connecting cable. Set the input selector on the VCR to LINE. When your TV is monaural (When your TV has only one audio input jack) Connect the yellow plug of the A/V connecting cable to the video input jack and connect the white or the red plug to the audio input jack of your TV or VCR.
Searching for a recording start point – Index search You can locate the point where an index signal is recorded (p. 44). SEARCH MODE ./> STOP 1 Set the POWER switch to VCR. 2 Press SEARCH MODE on the Remote Commander repeatedly to select [INDEX SEARCH]. 3 Press . (previous)/> (next) on the Remote Commander to select an index point. You can select the previous or the next index signal of the present point on the tape. Playback starts automatically from the point where the index signal is recorded.
BAdvanced operations LCD/VF SET (p. 68) IN/OUT REC (p. 70) TC/UB SET (p. 76) OTHERS (p. 78) Using the Menu Selecting menu items OTHERS RETURN ASS I GN BTN CLOCK SET WORLD T I ME LANGUAGE QU I CK REC BEEP REC LAMP [ MENU ] : END You can change various settings or make detailed adjustments using the menu items displayed on the screen. 4 STBY Select the desired item by turning the SEL/PUSH EXEC dial, then press the dial. The available menu items vary depending on the power mode of your camcorder.
Using the (CAMERA SET) menu – STDYSHOT TYP/FRAME REC, etc. You can select the items listed below on the CAMERA SET menu. For details on how to select items, see “Selecting menu items” (p. 57). The default settings are marked with G. The indicators in parentheses appear when the setting is selected. The settings you can adjust vary depending on the power mode of your camcorder. The screen shows the items you can operate at the moment. Unavailable items will be grayed out.
SHOT TRANS Select this setting to set the transition duration, time, and start timer. See page 40 for details on using the shot transition function. b Note • Before setting [SHOT TRANS], turn off all of the STORE/CHECK/EXEC lamps by pressing the button repeatedly (p. 40). TRANS TIME Select the time that takes to make a transition from the current setting to the selected setting. Duration from [2.0 sec] through [15.0 sec] are available. It is set to [4.0 sec] in the default setting.
COLOR CORRCT Select this setting to revise a specific color to be recorded as you desire. See page 42 for details on using the Color Correction function. STEADYSHOT GON OFF ( Select to activate the SteadyShot function. You can select the type of the SteadyShot function in [STDYSHOT TYP]. ) Select to deactivate the SteadyShot function. Select when recording using a tripod. More natural pictures are produced.
AF ASSIST GOFF Select to record in the standard recording mode. ON Select to focus manually by rotating the focus ring during auto focusing. AE RESPONSE Select the speed used to adjust the exposure automatically in accordance with the brightness of the subject. [FAST], [MIDDLE], and [SLOW] are available. It is set to [FAST] in the default setting. MARKER Select when you do not want to display the marker on the screen. Select to display the marker you select in [MARKER SEL] on the screen.
FLCKR REDUCE GON Select to record under normal conditions. Flickering of the screen under a light source such as fluorescent lamps will be reduced. OFF Select when you do not want to reduce flickering of the screen. b Note • You cannot select this item when [50i/60i SEL] on the It is always set to [OFF]. (OTHERS) menu is set to 50i. HANDLE ZOOM Select this item to set the zoom speed of position H and L of the handle zoom switch (p. 23).
SETUP G0% Select to record in the system at the 0% setup level. 7.5% Select to record in the system at the 7.5% setup level. b Note • When [50i/60i SEL] in the automatically. (OTHERS) menu is set to 50i, this item is set to [0%] FRAME REC You can record pictures with a stop-motion animated effect by alternately recording a few frames and then moving the subject a little. Operate your camcorder using the Remote Commander to prevent camera shake.
Using the (AUDIO SET) menu – INT MIC SET/XLR setting is selected. The settings you can adjust vary depending on the power mode of your camcorder. The screen shows the items you can operate at the moment. Unavailable items will be grayed out. SET, etc. You can select the items listed below on the AUDIO SET menu. For details on how to select items, see “Selecting menu items” (p. 57). The default settings are marked with G.
AUDIO MODE GFS32K ( FS48K ( ) ) Select to record in 12-bit mode (2 stereo sounds) in DVCAM/DV SP format. Select to record in 16-bit mode (1 stereo sound with high quality) in DVCAM/DV SP format. b Note • You can add sound only on a tape recorded in Fs32K mode in DVCAM format. You cannot add sound on a tape recorded in Fs48K mode. • [FS48K] is selected automatically in the HDV format. AUDIO LOCK GUNLOCK MODE Select to record the sampling clock for audio and video separately.
INT MIC SET You can set the wind noise reduction and the sensitivity for the external microphone. INT MIC SENS GNORMAL The standard setting. HIGH Use this setting to record a quiet sound. When a loud sound is recorded with this setting, the sound may be distorted. Make a trial recording in advance. GOFF Select when you want to record the sound as it is without reducing the noise caused by wind. AUTO Select to reduce the noise caused by wind.
INPUT1 LEVEL Select the input signal from the INPUT1 connector, either from a microphone or an audio device. GMIC Select to input an audio signal from a microphone connected to the INPUT1 connector. appears on the status check display. LINE Select to input an audio signal from an audio device connected to the INPUT1 connector. appears on the status check display. INPUT1 TRIM You can select the level of input signal from the INPUT1 connector.
Using the (LCD/VF SET) menu – LCD COLOR, etc. power mode of your camcorder. The screen shows the items you can operate at the moment. Unavailable items will be grayed out. You can select the items listed below on the LCD/VF SET menu. For details on how to select items, see “Selecting menu items” (p. 57). The default settings are marked with G. The settings you can adjust vary depending on the LCD / VF SET RETURN LCD COLOR LCD BL LEVEL VF B .
VF COLOR GON Select to display pictures in the viewfinder in color. OFF Select to display pictures in the viewfinder in black and white. GAUTO Select when you do not want to display pictures on the viewfinder when the LCD panel is open. ON Select to display pictures on the viewfinder even when the LCD panel is open. VF POWER b Note • If you select [ON], the battery life will become a little shorter.
Using the (IN/OUT REC) menu – REC FORMAT/ DOWN CONVERT, etc. You can select the items listed below on the IN/ OUT REC menu. For details on how to select these items, see “Selecting menu items” (p. 57). The default settings are marked with G. The indicators in parentheses appear when the setting is selected. The settings you can adjust vary depending on the power mode of your camcorder. The screen shows the items you can operate at the moment. Unavailable items will be grayed out.
– at [HDV], an HDV signal is converted to an audio-unlocked DV signal; a DV signal is not output. – at [DV], a DV signal is output as it is; an HDV signal is not output. • An HDV signal cannot be converted to a DVCAM signal. REC FORMAT Selects a recording format when the POWER switch is set at CAMERA. The format lamp of the selected format will light up during recording. GHDV1080i ( ) Select to record using the HDV1080i specification. DV ( ) Select to record in the DVCAM/DV format.
DV WIDE REC You can display pictures recorded in the DVCAM (DV) format on the entire TV screen by setting this item at the time of recording. Refer to the operating instructions supplied with your TV as well. GON Select to view the recorded pictures on a 16:9 wide TV screen. On the LCD screen or viewfinder screen On a 4:3 TV screen* On a 16:9 wide TV screen OFF ( ) Select to view the recorded pictures on a 4:3 TV screen.
COMPONENT When [50i/60i SEL] is set to 60i 480i Select when connecting your camcorder to a TV that is compatible with 480i. 480p/480i Select when connecting your camcorder to a TV that is compatible with 480p. G1080i/480i Select when connecting your camcorder to a TV that is compatible with 1080i. When [50i/60i SEL] is set to 50i 576i Select when connecting your camcorder to a TV that is compatible with 576i. 576p/576i Select when connecting your camcorder to a TV that is compatible with 576p.
• Disconnect the i.LINK cable before setting [i.LINK CONV]. Otherwise, the connected video device may not be able to recognize the video signal from this camcorder. DOWN CONVERT Select the picture format to be output when you play back the tape recorded in the HDV specification. This setting is effective for the following output: - COMPONENT OUTPUT (at 480p/480i and 576p/576i) - S VIDEO - AUDIO/VIDEO - i.LINK (when [HDVtDV CONV] is set to [ON] in [i.
A/V c DV OUT You can connect a digital device and an analog device to your camcorder and convert the signal transmitted from the connected devices to the appropriate signal on your camcorder. GOFF ON ( Select when you are not using the Signal conversion function. ) To output analog images and sound in digital format using your camcorder. The analog signal input to the AUDIO/VIDEO jack of your camcorder will be converted and output from the i.LINK Interface of your camcorder. For details, see page 104.
setting is selected. The settings you can adjust vary depending on the power mode of your camcorder. The screen shows the items you can operate at the moment. Unavailable items will be grayed out. Using the (TC/UB SET) menu – TC MAKE, etc. T C / UB SET RETURN TC PRESET UB PRESET TC FORMAT TC RUN TC MAKE UB T I ME REC You can select the items listed below on the TC/ UB SET menu. For details on how to select these items, see “Selecting menu items” (p. 57). The default settings are marked with G.
TC MAKE GREGENERATE Select to make the time code continuous at backspace editing. Regardless of the [TC RUN] setting, the running mode is automatically set to [REC RUN]. PRESET Select when you do not want to make the time code continuous at backspace editing. GOFF Select when you do not want to set the user bits to the real time clock. ON Select to set the user bits to the real time clock.
Using the (OTHERS) menu – CLOCK SET/WORLD TIME, etc. setting is selected. The settings you can adjust vary depending on the power mode of your camcorder. The screen shows the items you can operate at the moment. Unavailable items will be grayed out. You can select the items listed below on the OTHERS menu. For details on how to select these items, see “Selecting menu items” (p. 57). The default settings are marked with G.
ON The time shortens slightly until recording restarts from the state that the drum has stopped rotating, but the transition from the last recorded scene may not be smooth. Select this when you do not want to miss a recording chance. MELODY Select to play a melody when you start/stop recording, or when an unusual condition occurs on your camcorder. GNORMAL Select to sound a beep instead of the melody. OFF Select to cancel the melody and the beep sound.
DATA CODE Select the item to be displayed when you press DATA CODE (p. 51). GDATE/CAM Select to display the date and time, or the camera settings data during playback. DATE Select to display the date and time during playback. GNORMAL Select to display the menu screen at normal size. 2x Select to display the selected menu item at double the normal height.
EXP. FOCUS GAUTO OFF Select to release the expanded focus automatically after a certain time (p. 33). MANUAL OFF Select to keep the expended focus even after a certain time. To release the expanded focus, press EXPANDED FOCUS again. HOURS METER The cumulative operation time of your camcorder will be displayed with the total hours of operation, drum rotation, tape running, or the total number of tape unthreading operations. Displays the total hours of operation in 10-hour increments.
50i/60i SEL You can switch the system, 1080/60i (NTSC system) or 1080/50i (PAL system), used by your camcorder to record. It is set to 60i in the default setting. 1 Select [YES] by turning the SEL/PUSH EXEC dial, then press the dial. 1 2 0 min 00:00:00:00 5 0 i / 6 0 i SEL Change to 50i? Reboots after change. YES NO 2 Select [YES] again by turning the SEL/PUSH EXEC dial, then press the dial. The screen goes off, the system is switched.
Customizing Personal Menu The available items vary depending on the power mode of your camcorder. Unavailable items will be grayed out. You can add frequently used menu items to Personal Menu, or sort them in the order you like (customizing). You can customize the Personal Menu for each power mode of your camcorder. Adding a menu – Add You can add frequently used menu items to Personal Menu for easier and faster access. b Note • You can add up to 28 menu items each for the CAMERA and VCR modes.
4 Select a menu category by turning the SEL/PUSH EXEC dial, then press the dial. 2 1 2 0 min STBY P–MENU SETUP RETURN ADD DELETE SORT RESET 1 2 0 min STBY 00:00:00:00 Se l ec t t he i t em. RETURN WB PRESET WB OUTDR LVL GA I N SETUP SHOT TRANS COLOR CORRCT STEADYSHOT [ P–MENU ] : END 5 Select a menu item by turning the SEL/ PUSH EXEC dial, then press the dial. STBY 3 STDYSHOT TYP A d d t o CAMERA m o d e ' s P–MENU? YES NO 6 4 Select [YES] by turning the SEL/ PUSH EXEC dial, then press the dial.
Arranging the order of menus displayed on Personal Menu – Sort 5 1 2 0 min STBY 00:00:00:00 Se l ec t new l oca t i on. 1 SHOT TRANS 2 ASS I GN BTN 3 REC FORMAT 4 COLOR CORRCT 5 MARKER 6 DV W I DE REC 7 MARKER SEL [ P–MENU ] : END You can sort the menus added to Personal Menu in the desired order. 1 Press P-MENU. 1 2 0 min STBY P–MENU END SHOT TRANS ASS I GN BTN REC FORMAT DV W I DE REC COLOR CORRCT MARKER [ P–MENU ] : END 2 00:00:00:00 6 Press the SEL/PUSH EXEC dial.
3 Select [RESET] by turning the SEL/ PUSH EXEC dial, then press the dial. 1 2 0 min RESET STBY 00:00:00:00 I n i t i a l i ze CAMERA m o d e ' s P–MENU s e t t i n g ? YES NO [ P–MENU ] : END 4 Select [YES] by turning the SEL/ PUSH EXEC dial, then press the dial. 1 2 0 min RESET STBY 00:00:00:00 A r e yo u s u r e ? YES NO [ P–MENU ] : END 5 Select [YES] by turning the SEL/ PUSH EXEC dial, then press the dial. The Personal Menu settings return to the default settings.
2 Select the (OTHERS) menu by turning SEL/PUSH EXEC dial, then press the dial. 3 Select [ASSIGN BTN] by turning SEL/ PUSH EXEC dial, then press the dial. 4 z Tip • It is recommended that you focus manually. Select the number of the ASSIGN button you want to assign the function by turning SEL/PUSH EXEC dial, then press the dial. [ASSIGN1] through [ASSIGN6] are available. [------] is displayed at the number that no function is assigned.
[ALLSCAN MODE]. During the simple allscan display, a black frame appears around the screen. Press the button again to restore the previous screen mode. b Note • When this function is activated, pictures are output in the interlace letter box format from the COMPONENT OUTPUT and i.LINK jacks except for the HDV signals. z Tip • When you press the ASSIGN button assigned to [STEADYSHOT], the SteadyShot function is released and appears on the LCD screen.
Dubbing/Editing Dubbing to another tape You can copy a picture played back on your camcorder to other recording devices (such as VCRs). Connect your camcorder to a VCR as shown in the following illustration. Connecting a VCR To dub to an HDV compatible device Connect your camcorder to an HDV compatible device using an i.LINK cable (optional). Player i.
To dub to a DVCAM (DV) device Connect your camcorder to a VCR using an i.LINK cable (optional). i.LINK compatible devices i.LINK jack HDV/DV jack i.LINK cable (optional) Signal flow To select the video format to be dubbed The video format to be dubbed depends on the settings of [VCR HDV/DV] (p. 70) and [i.LINK CONV] (p. 73) on the (IN/OUT REC) menu. Before setting these menu items, disconnect the i.LINK cable.
To dub to an AV device Connect your camcorder to a VCR using the A/ V connecting cable (supplied). When you have an S video jack on your VCR * S video cable (optional) VCRs Yellow AUDIO/VIDEO jack Signal flow White A/V connecting cable (supplied) Red Dubbing/Editing * When there is an S video jack on the device to be connected, connect an S video cable (optional) to that jack instead of using the yellow video plug of the A/V connecting cable (supplied).
Dubbing to another tape 1 Connect the recording device to your camcorder (p. 89). 2 Prepare the recording device. • Insert a cassette for recording. • If the recording device has an input selector, set it to the input mode. 3 Prepare your camcorder for playback. • Insert the recorded cassette. • Set the POWER switch to VCR. 4 Start the playback on your camcorder, and record it on the VCR. Refer to the operating instructions supplied with your VCR for details.
Recording pictures from a VCR or TV You can record pictures or TV programs from a VCR or TV on a tape inserted in your camcorder. Connecting a VCR or TV To record from an HDV compatible device You can record and edit pictures from an HDV compatible VCR. Use your camcorder as a recorder and connect it to an HDV compatible device using an i.LINK cable (optional). On this camcorder (recorder), select the (IN/OUT REC) menu, [VCR HDV/DV], then [AUTO] (p. 70) before connecting.
To record from a DVCAM (DV)/AV device You can record and edit pictures or TV programs from a VCR or TV. Use your camcorder as a recorder and connect it to a VCR using the A/V connecting cable (supplied). You can connect a DVCAM (DV) compatible device also using an i.LINK cable (optional). When you use an i.LINK cable to connect a DVCAM (DV) compatible device, select the (IN/OUT REC) menu, [VCR HDV/DV], then [DV] or [AUTO] (p. 70) before connecting.
Recording movies Insert a cassette for recording in your camcorder before the following operations. 1 Connect your TV or VCR to your camcorder as a playback device (p. 93, 94). 2 If you are recording from a VCR, insert a cassette. 3 Set the POWER switch to VCR. 4 Set your camcorder to recording pause. 5 Press x (stop) to stop recording. b Note • When you use an i.LINK cable, the recorded picture becomes rough when a picture is paused on your VCR. • When you use an i.
Connecting to a computer To use your camcorder by connecting it to a computer using an i.LINK cable, the computer must have an i.LINK interface, and application software to read video signals must be installed on the computer. Refer to the manual supplied with the application software for the system requirements of the computer. HDV/DV jack i.LINK cable (optional) Connecting the computer • Before connecting your camcorder to the computer with an i.
[AUDIO LOCK] to [UNLOCK MODE] in [i.LINK CONV] (p. 73). b Note • Pictures may not be imported correctly depending on the application software of the computer. • You cannot import pictures recorded in the DVCAM (DV) format in the HDV format. To import pictures from the computer to your camcorder In the HDV format Set [VCR HDV/DV] to [HDV] (p. 70) and [HDVtDV CONV] to [OFF] in [i.LINK CONV] (p. 73). In the DVCAM (DV) format Set [VCR HDV/DV] to [DV] (p. 70).
You can record additional audio to the original sound on a tape recorded in the DVCAM format and the FS32K audio mode. Dubbing sound to a recorded tape Preparing for audio dubbing BAUDIO/VIDEO jack Audio device (such as a CD/MD player) Audio output jacks Do not connect the Video plug (yellow).
• When the microphone is connected to the INPUT2 connector, set [INPUT2 LEVEL] to [MIC]. • If the microphone is powered through its cable, set the INPUT1/INPUT2 PHANTOM switch to ON. To use an audio device • When the audio device is connected to the INPUT1 connector, set [INPUT1 LEVEL] to [LINE], and set the INPUT1 PHANTOM switch to OFF. • When the audio device is connected to the INPUT2 connector, set [INPUT2 LEVEL] to [LINE], and set the INPUT2 PHANTOM switch to OFF.
7 Press x (stop) when you want to stop recording. b Note • You can only record additional audio on a tape recorded on your camcorder. The sound may deteriorate when you dub audio on a tape recorded on other camcorders (including other HVR-Z1U/ Z1N camcorders). z Tip • You can adjust the recording volume of additional audio manually. Checking and adjusting the recorded sound 100 1 Play back the tape on which you have recorded audio following the procedures in “Recording sound” (p. 99). 2 Press MENU.
Setting time values Your camcorder uses 2 types of time values: time code values and user bits. 5 Select [PRESET] by turning the SEL/ PUSH EXEC dial, then press the dial. 6 Set the time code value. 1 Select [TC PRESET] by turning the SEL/ PUSH EXEC dial, then press the dial. Setting the time code value 2 Select [PRESET] by turning the SEL/ PUSH EXEC dial, then press the dial. 3 Select the first 2 digits by turning the SEL/PUSH EXEC dial, then press the dial.
9 Setting To FREE RUN advance the time code freely regardless of the camcorder’s current operation mode. The time code starts running once this setting is selected. Press MENU to hide the menu screen. • If you set [TC MAKE] to [REGENERATE], TC PRESET on the Remote Commander does not work. Setting the user bits value Shooting information (date, time, scene number, etc.) can be superimposed on a tape using up to 8 hexadecimal digit.
5 Select [PRESET] by turning the SEL/ PUSH EXEC dial, then press the dial. 6 Select the first 2 digits by turning the SEL/PUSH EXEC dial, then press the dial. 7 Repeat step 6 to set up the other digits. 8 Select [OK] by turning the SEL/PUSH EXEC dial, then press the dial. 9 Press MENU to hide the menu screen. Switching the time value To cancel the user bits setting Press TC/U-BIT. To reset the user bits Each time you press the button, the time value changes between the time code and user bits.
(supplied), and a digital device such as a computer to your camcorder using an i.LINK cable (optional). Your camcorder converts the analog video signal from the VCR to a digital signal and transmits it to the computer to be dubbed. To use the signal conversion function, application software to import video signals must be installed on the computer.
Importing a picture to the computer 1 Turn on the analog device. 2 Set the POWER switch to VCR. • You cannot import pictures that have been recorded using a copyright protection signal to a computer via your camcorder. • Analog signals are not output from the COMPONENT OUTPUT jack. Connect your camcorder to the wall outlet using the supplied connecting cable (DK415) and AC Adaptor/charger for the power supply. Press MENU.
Troubleshooting Troubleshooting If you run into any problem using your camcorder, use the following table to troubleshoot the problem. If the problem persists, remove the power source and contact your Sony dealer. If “C:ss:ss” is displayed on the LCD screen or the viewfinder, the self-diagnosis display function is activated. See page 111 for details. Overall operations Symptom Cause and/or Corrective Actions The power does not turn on.
Symptom Cause and/or Corrective Actions The remaining battery time indicator does not indicate the correct time. • The temperature of the environment is too high or too low, or the battery pack has not been charged enough. This is not a malfunction. cFully charge the battery again. If the problem persists, replace the battery pack with a new one. It may be damaged (p. 11, 118).
Recording 108 Symptom Cause and/or Corrective Actions The tape does not start when you press REC START/STOP. cSet the POWER switch to CAMERA (p. 14). cThe tape has reached the end. Rewind it, or insert a new cassette. cSet the write-protect tab to REC or insert a new cassette (p. 114). cThe tape is stuck to the drum due to moisture condensation. Remove the cassette and leave your camcorder for at least 1 hour, then re-insert the cassette (p. 120).
Playback Symptom Cause and/or Corrective Actions Cannot play back. cIf the tape has reached the end, rewind the tape (p. 48). Cannot play back in reverse direction. cReverse playback is not possible with the tape recorded in the HDV format. cClean the head using the cleaning cassette (p. 121). Fine patterns flicker, diagonal lines look jagged. cAdjust [SHARPNESS] to the – (soften) side in the PICTURE PROFILE function (p. 34). No sound or only a low sound is heard. cTurn up the volume (p. 48).
Symptom Cause and/or Corrective Actions The picture appears distorted on the 4:3 TV. • This happens when viewing a picture recorded in the 16:9 wide mode on a 4:3 TV. cTo play back the picture, set [DOWN CONVERT] on the (IN/ OUT REC) menu (p. 74). cBefore recording, set [DV WIDE REC] on the (IN/OUT REC) menu to [OFF] (p. 72). Noises appear and on the screen. • On the (OTHERS) menu, change the [50i/60i SEL] setting to 50i and playback the tape (p. 82). is displayed appears on the LCD screen.
Warning indicators and messages Self-diagnosis display/Warning indicators If indicators appear on the LCD screen or in the viewfinder, check the following. See the page in parentheses for details. Cause and/or Corrective Actions C:ss:ss/E:ss:ss (Selfdiagnosis display) Some symptoms can be fixed by yourself. If the problem persists even after you tried a couple of times, contact your Sony dealer or local authorized Sony service facility.
Warning messages If messages appear on the screen, check the following. See the page in parentheses for details. Subjects Indications Corrective Actions/ References Battery Use the “InfoLITHIUM” battery pack. cSee page 117. Battery level is low. cCharge the battery (p. 11). Old battery. Use a new one. cSee page 118. Z Re-attach the power source. – Moisture condensation % Z Moisture condensation. Eject the cassette. cSee page 120. % Moisture condensation. Turn off for 1H. cSee page 120.
Additional Information On HDV compatible TVs Using your camcorder abroad An HDV compatible TV with the component input jack is required to view playback pictures recorded in the HDV format. See the table below. It is recommended to use an i.LINK cable to connect these TVs. Power supply You can use your camcorder in any country/ regions using the AC Adaptor/charger supplied with your camcorder within AC 100 V to 240 V, 50/60 Hz.
HDV format and recording/playback Your camcorder does not record copyright control signals on the tape when it records. Audio mode The DVCAM format has 2 audio modes. ) format? Fs32K (12-bit) mode The original sound can be recorded in channels 1 and 2, and the new sound in channels 3 and 4 in 32 kHz. The balance between channels 1/2 and channels 3/4 can be adjusted by selecting [AUDIO MIX] in the menu settings during playback and audio dubbing.
When labeling the cassette Be sure to place the label only on the locations as shown in the following illustration so as not to cause malfunction of your camcorder. All other product names mentioned herein may be the trademarks or registered trademarks of their respective companies. Furthermore, “™” and “®” are not mentioned in each case in this manual. Do not put a label along this border.
Compatibility of the DVCAM and DV formats The DVCAM format was developed as a more reliable and higher-end format than the consumer DV format. Explained here are the differences, compatibility, and limitations on editing for the DVCAM and DV formats. Differences between the DVCAM and DV formats Specification DVCAM DV Track pitch 15 µm 10 µm Audio sampling 12 bit: 32 kHz frequency 16 bit: 48 kHz 12 bit: 32 kHz 16 bit: 32 kHz, 44.
Source tape Player’s format Recorder’s format Recording format DVformatted DV DVCAM DV DVCAM1) DV DVCAM- DVCAM formatted2) DVCAM DV DVCAM DV DVCAM- DV3) formatted2) DVCAM DVCAM (Compatibility depends on models.) DV DV b Note • If you use tapes as in 1) to 3) above for editing, the functions may be limited regardless of the format of players and recorders.
• • • • – Use a large capacity battery pack: NP-F770/ F970 (optional). Frequent use of the LCD screen or a frequent playback, fast forward or rewind operation wears out the battery pack faster. We recommend using a large capacity battery pack: NP-F770/F970 (optional). Be sure to set the POWER switch to OFF when not recording or playing back on your camcorder. The battery pack is also consumed when your camcorder is in recording standby or playback pause.
About i.LINK The i.LINK Interface on this unit is an i.LINKcompliant Interface. This section describes the i.LINK standard and its features. What is i.LINK? b Note • Normally, only one device can be connected to this unit with the i.LINK cable. When connecting this unit to an HDV/DV compatible device having two or more i.LINK Interfaces, refer to the operating instructions of the device to be connected. z Tip • i.
Maintenance and precautions On use and care • Do not use or store the camcorder and accessories in the following locations. – Anywhere extremely hot or cold. Never leave them exposed to temperatures above 60°C (140°F), such as under direct sunlight, near heaters or in a car parked in the sun. They may malfunction or become deformed. – Near strong magnetic fields or mechanical vibration. The camcorder may malfunction. – Near strong radio waves or radiation. The camcorder may not be able to record properly.
Note on moisture condensation Moisture may condense when you bring your camcorder from a cold place into a warm place (or vice versa) or when you use your camcorder in a humid place as shown below. • When you bring your camcorder from a ski slope into a place warmed up by a heating device. • When you bring your camcorder from an airconditioned car or room into a hot place outside. • When you use your camcorder after a squall or a shower. • When you use your camcorder in a hot and humid place.
It is recommended you operate your camcorder about once a month to keep it in an optimum state for a long time. To charge the pre-installed battery Your camcorder has a pre-installed battery to retain the date, time, and other settings even when the POWER switch is set to OFF. The preinstalled battery is always charged while you are using your camcorder but it will get discharged gradually if you do not use your camcorder.
Specification System Input/Output connectors Audio/Video input/output Video signal: 1 Vp-p, 75 Ω (ohms), unbalanced, sync negative Audio signal: 327 mV (at load impedance 47 kΩ (kilohms)), Input impedance more than 47 kΩ (kilohms), Output impedance less than 2.2 kΩ (kilohms) S VIDEO input/output Luminance signal: 1 Vp-p, 75 Ω (ohms), unbalanced Chrominance signal: 0.286 Vp-p (at Burst/ NTSC), 0.3 Vp-p (at Burst/PAL), 75 Ω (ohms), unbalanced COMPONENT OUTPUT jack Y: 1 Vp-p (0.
General AC Adaptor/charger AC-VQ850 Power requirements DC 7.2 V (battery pack) Average power consumption (when using the battery pack, and external microphones) During camera recording using the viewfinder with normal brightness: HDV recording 8.0 W at 60 Hz operation* DVCAM (DV) recording 7.6 W at 60 Hz operation* During camera recording using the LCD with normal brightness: HDV recording 8.5 W at 60 Hz operation* DVCAM (DV) recording 8.
Quick Reference Identifying parts and controls Camcorder Quick Reference A SHOT TRANSITION operation buttons (p. 40) N POWER switch (p. 14) B Eyecup (p. 16) C Viewfinder release lever (p. 122) D Rear remote sensor E Rear camera recording lamp (p. 20) F BATT RELEASE (battery release) button (p. 11) G REC START/STOP button (p. 20) H i.LINK lamps (p. 92, 95) Lights up when handling an i.LINK signal. I Battery pack (p. 11) J Shoe adaptor attaching part (p. 130) K Power zoom lever (p.
A Hook for the shoulder strap B Zoom ring (p. 23) C Focus ring (p. 32) To attach the shoulder strap D FOCUS switch (AUTO/MAN (manual)/ INFINITY) (p. 32) Attach the shoulder strap supplied with your camcorder to the hooks for the shoulder strap. E ZOOM switch (p. 22) F ND FILTER switch (1/2/OFF) (p. 30) G PUSH AUTO button (p. 33) H WHT BAL (One-push white balance) button (p. 26) I GAIN switch (H/M/L) (p. 29) J WHT BAL (white balance) switch (A/B/ PRESET) (p. 26) K Handle zoom switch (H/L/OFF) (p.
A LCD screen (p. 3, 15) B IRIS dial (p. 28) C RESET button If you press RESET, all settings including the clock setting (except the Personal Menu and Picture Profile settings) return to the default. * The VOLUME + and PLAY buttons have a raised tactile dot. Use it to identify the location of the buttons. D VOLUME –/+ buttons* (p. 48) E DATA CODE button (p. 51) Quick Reference F DISPLAY/BATT INFO button (p. 12, 50) G END SEARCH (VCR) button (p. 50) H Handle zoom lever (p.
A LANC jack (blue) The LANC control jack is used for controlling the tape transport of video device and peripherals connected to it. B i (headphones) jack When you use headphones, the speaker on your camcorder is silent. C Hook for the shoulder strap (p. 126) D HDV/DV jack (p. 52, 89, 90, 93, 94, 96) E Microphone (p. 98) F Front camera recording lamp (p. 20) G Front remote sensor H Speaker I Lens (Carl Zeiss Lens) Your camcorder is equipped with a Carl Zeiss lens which can reproduce fine images.
A S VIDEO jack (p. 52, 54, 91, 94) B COMPONENT OUTPUT jack (p. 52, 54) C Tripod receptacle Make sure that the length of the tripod screw is less than 5.5 mm (7/32 inch). Otherwise, you cannot attach the tripod securely, and the screw may damage your camcorder. D INPUT1 connector (XLR) (p. 38, 98) E INPUT2 connector (XLR) (p. 38, 98) Quick Reference F Microphone holder (p. 38) G AUDIO/VIDEO jack (p. 52, 54, 91, 94, 98) H INPUT 1 PHANTOM power switch (p. 39) I INPUT 2 PHANTOM power switch (p.
A Shoe adaptor To connect an accessory, press down and push it to the end, and then tighten the screw. To remove an accessory, loosen the screw, and then press down and pull out the accessory. When you attach the shoe adaptor, be careful not to damage the LCD panel. To remove the lens hood Loosen the lens hood fixing screw, then turn the lens hood in the direction of the arrow. B Lens hood (p. 20) C OPEN/EJECT lever (p. 18) D Cassette compartment lid (p. 18) E Viewfinder lens adjustment lever (p.
Remote Commander 2 Insert 2 size AA (R6) batteries by matching the + and – on the batteries to the + and – in the battery compartment. 3 Replace the cover back until it clicks. A TC RESET button (p. 102) B DISPLAY button (p. 50) C SEARCH MODE button (p. 55) D ./> buttons (p. 55) E Video control buttons (Rewind, Playback, Fast-forward, Pause, Stop, Frame, Slow, ×2) (p. 48) G REC START/STOP button (p. 20) H DATA CODE button (p. 51) I Power zoom button (p.
Indicators for the LCD screen and viewfinder Following indicators will appear on the LCD screen and viewfinder to indicate the state of your camcorder. Example: Indicators in the CAMERA mode Indicators LCD backlight off (p. 16) through STBY 00:00:00:00 6 0 min ND CH1 CH2 PP1 F 1 . 6 1 8 dB 180 Indicators Meanings y120min Remaining battery (p. 21) , Recording format (p. 20) STBY/REC Recording standby/ recording mode ND1, ND2, NDOFF ND filter (p. 30) 4:3 TV mode (p. 47) , Audio mode (p.
Index Numerics 50i/60i SEL ........................82 A A/V connecting cable .....53, 54, 91, 94, 98, 104 AC Adaptor/charger...........13 AE RESPONSE .................61 AE SHIFT ..........................35 AF ASSIST ........................61 AGC LIMIT .......................35 ALLSCAN MODE ............88 Aperture .............................28 ASSIGN BTN ....................87 AT IRIS LMT ....................35 ATW SENS........................35 Audio dubbing .................100 AUDIO LIMIT ..........
Lens hood ........................ 130 LETTER BOX .................. 74 Low-angle recording ......... 21 M Manual focus ..................... 32 MARKER.......................... 61 MARKER SEL.................. 61 Menu AUDIO SET ............... 64 CAMERA SET ........... 58 IN/OUT REC.............. 70 LCD/VF SET.............. 68 OTHERS..................... 78 Selecting items............ 57 TC/UB SET ................ 76 Menu letter size (LETTER SIZE) .......................... 80 MIC NR.......................
Z ZEBRA LEVEL.................31 Zebra pattern ......................31 Zoom ..................................22 ZOOM DISPLAY..............80 Zoom ring ..........................
Printed on 100% recycled paper using VOC (Volatile Organic Compound)-free vegetable oil based ink.