USER’S MANUAL LCD TV SET TQT026AVDT.
Contents z Introduction z Warning z Caution z Main Unit Description z Remote Control z OSD basic adjustment z DTV Features z USB Features z PVR Opration z Specifications z Trouble Shooting 1
Introduction Thank you very much for your purchase of our product of LCD TV. It serves as a normal colour TV and PC monitor. To enjoy your TV to the full from the very beginning, read this manual carefully and keep it handy for ready reference. INSTALLATION ① Locate the TV in a room where direct light does not strike the screen. Total darkness or a reflection on the picture screen can cause eyestrain. Soft and indirect lighting is recommended for comfortable viewing.
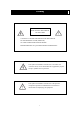
Warning CAUTION RISK OF ELECTRIC SHOCK DO NOT OPEN CAUTION: TO AVOID THE RISK OF ELECTRIC SHOCK. DO NOT REMOVE COVER (OR BACK). NO USER- SERVICEABLE PARTS INSIDE. REFER SERVICING TO QUALIFIED SERVICE PERSONNEL. This symbol is intended to alert the user to avoid the risk of electric shock, do not disassemble this equipment by anyone except a qualified service personnel.
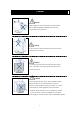
Caution Caution - High voltages are used in the operation of this product. Do not open the product's casing. Refer servicing to qualified service personnel . Caution To prevent fire or electrical shock hazard, Do not expose the main unit to moisture. Caution Do not drop or push objects into the television cabinet slots or openings. Never spill any kind of liquid on the television receiver. Caution Avoid exposing the main unit to direct sunlight and other sources of heat.
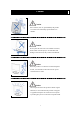
Caution Caution Never stand on, lean on, push suddenly the product or its stand. You should Pay special attention to children. Caution Do not place the main unit on an unstable cart stand, shelf or table. Serious injury to an individual, and damage to the television, may result if it should fall. Caution When the product is not used for an extended period of time, it is advisable to disconnect the AC power cord from the AC outlet. Caution The LCD panel used in this product is made of glass.
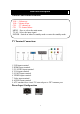
Main unit description Control Panel Button Function VOL+ : Volume up. VOL- : Volume down. CH+ : TV channel up. CH- : TV channel down. MENU : Press to select the main menu. TV/AV : Select the input signal. POWER : Switch on when in standby mode or enter the standby mode. TV Terminal Connections 1. USB input terminal. 2. HDMI input terminal. 3. PC AUDIO input terminal. 4. VGA input terminal. 5. SCART input terminal. 6. YPBPR input terminal . 7. Video input terminal . 8. AUDIO input terminal. 9.
Optional Configuration as below: Connect the USB to the USB jack on the set. NOTE ● It is only 500 mA MAX of DC current output when you connect with USB jack ● To ensure the Mobile HD works well, you should use other power supply for the Mobile HD. And do not use the USB jack in the same time. ● It supports Mobile HD by connecting with USB jack (must more than 2GB) . The partitions of the Mobile HD can’t be more than 4 partitions. The max partition is 2TB. It supports FAT/FAT32 document.
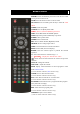
Remote control POWER: Power on/off button, press once to turn the TV on and press again to turn the TV off. MUTE: Press this button to mute or restore sound. NICAM/A2: In the TV mode, press this key to select the sound effects. SLEEP: Set the sleep timer. ASPECT: Press to adjust picture ratio. MEDIA: Press to select the MEDIA signal source. STILL: Press this button to hold the picture. AUTO: Adjust the picture automatically in pc mode. PMODE: Select picture mode. SMODE: Select sound mode.
TEXT: Press to enter the Teletext mode. (Used for European region only) INDEX: Press this button to go to the index page in Teletext. and press this button to display “Record” list in DTV. (Used for European region only) HOLD: Freeze a multi-page passage on screen in Teletext mode. (Used for European region only) :Press to play backward. (Used for models with MEDIA , DTV function only) SIZE: Display the top, bottom or all of page to read easily in Teletext mode.
OSD basic adjustment Installation Guide If this is the first time you are turning on the TV and there are no programs in the TV memory, the “Installation Guide” menu will appear on the screen. 1. Press the “e/f” button to select the local language. 2. Press “c/d” button to select “Auto Scan” and press the “f” button or “ENTER” button to enter ,press “c/d” to select “LCN” and press the “e/f” button to selece the function on or off .
7. Press “c/d” button to select “Tint” and press the “e/f” button to enter hue adjustment menu to adjust tint. Note: The 'Tint' item is used in NTSC mode only 8. Press “c/d” button to select “Color Temperature” and press the “e/f” button to select the color temp. 9. Press “c/d” button to select “Red” and press the “e/f” button to adjust. 10. Press “c/d” button to select “Green” and press the “e/f” button to adjust . 11. Press “c/d” button to select “Blue” and press the “e/f” button to adjust . 12.
TIME 1. Press the “MENU” button to enter the OSD menu. Then press “e/f” button to select the “TIME” menu. Enter the “TIME” menu by pressing “d” button or “ENTER” button. 2. Press “c/d” button to select “Clock” and press the “f” button or “ENTER” button to enter to setup the local time. 3. Press “c/d” button to select “Off Time” and press the “f” button or “ENTER” button to set the time at which you want the TV to turn off.
5. Press “c/d” button to select “Courtry”. The Country is set to default state., setting is can not be changed. 6. Press “c/d” button to select “Restore Setting” menu and press the “f” button or “ENTER” button to enter. Press the “e/f” button to select “YES” or “NO”, press “ENTER” button to reset when select “YES”, press “ENTER” button to return back to the previous menu when select “NO”. LOCK 1. Press the “MENU” button to enter the OSD menu. Then press “e/f” button to select the “LOCK” menu.
2. Press “c/d” button to select “Auto Scan” and press the “f” button or “ENTER” button to do auto search . Press “MENU” button to return the previous menu. Press “EXIT” button to exit. Note: Searching for platform will take a long time , please be patient! 3. Press “c/d” button to select “DTV Manual Scan” and press the “f” button or “ENTER” button to do DTV manual search. Press “MENU” button to return the previous menu. Press “EXIT” button to exit the menu (This function is only used for DTV source ). 4.
PC (When signal source is PC) 1. Press the “MENU” button to enter the OSD menu. Then press “e/f button to select the “PICTURE” menu. Press “c/d” button to select “PC Setup”. Enter the “PC Setup” menu by pressing “f” or “ENTER” button. 2. Press “c/d” button to select “Auto Adjust” menu and press the “f button or “ENTER” button to do auto adjustment. 3. Press “c/d” button to select “Horizontal Pos.” and press the “e/f” button to adjust. 4. Press “c/d” button to select “Vertical Pos.
6. Press “c/d” button to select “PVR File System” and press the “f” button or “ENTER” button to enter.
DTV Features Favourite List When the source is selected as DTV, users can enter FAVOURITE LIST by pressing “FAV” button. The “Favourite LIST” window is illustrated as follows: Program Information When the source is selected as DTV, you can press “INFO” button to display the channel’s information. The PROGRAM INFORMATION window is illustrated as follows: Audio When the source is selected as DTV, users can enter “Audio channel” by pressing “AUDIO” button.
Electronic Program Guide(EPG) Electronic Program Guide provides program information which will be broadcasted now or in the future. The system will display EPG window by pressing “EPG” button. DATE and TIME information is displayed on the right of the window. The left side shows all channels. The right side shows the programs in the channel. The selected program is also displayed on the top of the screen. When you have selected a program, you can press “INFO” button to display the program’s detail.
USB Features 1. Press the “MEDIA” button to enter the “MEDIA” menu. 2. Press the “e/f” button enter the “PHOTO” option, and prsee “ENTER” button to confirm . You can prsee the “c/d” button to enter the file of Memory to play the corresponding document, and then press “ENTER” button to play. 3. Press the “e/f” button to enter the “MUSIC” option, and prsee “ENTER” button to confirm .
PVR Opration 1.Press the “MENU” button to enter the OSD menu. Then press “e/f” button to select the “CHANNEL” menu . Enter the “CHANNEL” menu by pressing “d” button or “ENTER” button. 2.Press “c/d” button to select “PVR File System” and press the “f” button or “ENTER” button to enter. a ) Press “c/d” button to select “Select Disk” and press the “f” button or “ENTER” button to choice disk.
4. Press “c/d” button to select “Recorder Schedule List” and press the “f” button or “ENTER” button to enter. Note: 1. The U disk will be formatted when in burning , please do not store important files in the U disk. 2. When you play recording files , press “T.SHIFT” button to paused. 3. Press “ ” button for the first time to start recording, for the second time, the sign of recorder will be slimmed down, but it's still under recording .
SPECIFICATIONS RGB INPUT Mode Resolution Horizontal Frequency (KHz) DOS 720x400 31.5 70 VGA 640x480 31.5 60 SVGA 800x600 37.9 60 XGA 1024x768 48.4 60 WXGA 1360x768 47.7 60 Vertical Frequency (HZ) HDMI INPUT Mode Resolution Horizontal Frequency (KHz) VGA 640 x 480 31.47 480i 720 x480i 15.73 576i 720 x 576i 15.63 50 480p 720 x480p 31.47 59.94/60 576p 720 x 576p 31.26 50 720p 1280 x 720p 37.50 44.96 50 28.13 50 1080i 1920 x 1080i Vertical Frequency (HZ) 59.
Trouble Shooting Before consulting service personnel, check the following chart for possible solutions. PROBLEM TV will not turn on SOLUTION ●Make sure the power cord is plugged in. ●The batteries in the remote control may be Exhausted ; replace the batteries. ●Check the cable between TV and antenna/ external AV device. No picture, no sound ●Press the power button on the remote. ●Press the SOURCE button the remote, then press the “▲/▼”button repeatedly to select the TV source.
Disposal of old electrical appliances The European directive 2002/96/EC on Waste Electrical and Electronic Equipment (WEEE), requires that old household electrical appliances must not be disposed of in the normal unsorted municipal waste stream. Old appliances must be collected separately in order to optimize the recovery and recycling of the materials they contain, and reduce the impact on human health and the environment.
After-sale Service In case any problem mostly like a fault occurs while your using LCD TV ,please contact the store where you purchased this unit or the service agency.